![]() Key 1: Lubrication - Quality lubricant; applied properly
Key 1: Lubrication - Quality lubricant; applied properly
Lubrication is an extremely important key. The difference in time between a well-lubricated car and a car without lubrication can be several tenths of a second or more (this translates into several feet on the track).
Most people use graphite for lubrication. Graphite is a form of carbon that comes in very small flakes. There are many varieties and qualities of graphite available at hobby and hardware stores, so make sure to get a good brand. Cheap brands have a lower carbon content and include impurities. We offer Max-V-Lube brand which is a high-purity graphite, which has been proven to produce top results in pinewood derby racing.
When lubricating with graphite, take the time to work it in thoroughly; a casual puff before the race is not sufficient. I recommend spending five minutes per wheel adding graphite, spinning the wheel, adding graphite, spinning the wheel etc. Since graphite works best after a break-in period, don't re-lubricate between race heats. By the way, you will find it much easier and cleaner to lubricate before mounting the wheels and axles on the car.
If you use a liquid lube (such as Krytox 100), make sure to follow the recommended application procedure. With liquid lubes, less is best.
![]() Key 2: Wheel Axle Preparation - Axles - no flaws, straight, polished; Wheels - no flaws, polished
Key 2: Wheel Axle Preparation - Axles - no flaws, straight, polished; Wheels - no flaws, polished
All frictional losses in a pinewood derby car come from the wheels and axles. Start by inspecting the parts in your kit to make sure they are usable. If a part has a serious flaw, replace it.
Next, prepare the nails.
- Place the nail in the chuck of a drill and use a Mini-File to remove the flashing under the nail head and minimize the ridges on the shaft. Beveling the nail head slightly is also a good idea. (If you are in a race using Awana or Maximum Velocity kits, the mini-file is not needed).
- Optionally use the Pro-Axle Press to ensure that the nails are straight and round.
- Finally, polish the axles with an Axle Polishing Kit until they are bright and shiny. Avoid overzealous sanding with coarser papers, as that will reduce the diameter of the axle (not desirable).
Depending on the type of wheels you have, the preparation steps will change. If there are flaws on the tread surface or inside edge of the wheel, then use a Pro-Wheel Mandrel and some fine grit (wet) sandpaper to polish the wheels. On some wheels, a Pro-Hub Tool can be used to round the inside wheel hub. Finally, polishing and waxing the wheel bore also reduces friction to increase performance.
![]() Key 3: Alignment - Car goes straight, or rail-rides
Key 3: Alignment - Car goes straight, or rail-rides
In order for the car to get to the finish line as quickly as possible, it needs to go straight. If it zigzags down the track, it will travel a longer distance, but worse it will continually lose speed as it bumps and rubs against the guide rail.
To minimize the amount of alignment adjustment needed, make sure that the axle slots/holes are perfectly parallel to each other and the axles are straight. Also, when using axle slots, make sure that the axles are inserted perfectly straight. The Pro-Axle Press and the Pro-Body Tool are great tools to help minimize the need to align the wheels. In addition, the Pro-Axle Guide will help you insert the wheels and axles properly.
The current thought on alignment is to implement a rail-riding strategy.(1) This technique results in a car that follows the rail (straightest path to the finish line), minimizes undesirable wheel contact with the rail, and allows for more aggressive rear weighting.
Normally, with rail-riding, the two rear axles are bent upwards at 2.5 degrees, the front-left axle is raised, and the front-right axle (the "dominant" or steering axle) is bent downwards at 1.5 degrees. The rear wheels are aligned to have no toe-in or toe-out, and the dominant axle is aligned so that the car drifts left about five inches over eight feet.
If you don't want to try rail-riding, then make sure your car runs as straight as possible.
![]() Key 4: Maximize Momentum - Maximum weight; Weight towards the rear of the car
Key 4: Maximize Momentum - Maximum weight; Weight towards the rear of the car
In an automobile, momentum helps the car keep rolling when you take your foot off the gas. In a similar way, momentum helps a pinewood derby car to continue rolling as fast as possible on the flat section of the track. Momentum must be maximized for top performance, and the key to momentum is weight. In each race, there is a maximum allowable weight for the car (usually five ounces, but certainly check your local rules). Momentum is maximized when your car has the maximum allowable weight for your race.
For a five-ounce maximum weight, you will likely need to add two or three ounces of weight to the car. But where on the car do you add the weight? Add the weight towards the rear of the car.
Tests show that best performance is achieved on most tracks when the weight is added towards the rear of the car. This can be overdone, but a simple test to make sure the car is properly weighted is to balance the finished car on the edge of a ruler, or a balance stand. The car should balance somewhere between 3/4 and one inch in front of the rear axle.(2)
Does the type of weight matter? The maximum weight can be achieved with any type of weight; however, the type of weight does affect how easily the desired weight and balance point can be achieved. Denser weights (such as Lead or Tungsten) take up less space, so it is easier to reach the maximum weight and to place the weight at the back of the car. Also, since denser weights require a smaller volume of space, they allow creation of more aerodynamic cars (which is Key 5).
 By the way, if you are in a BSA-sponsored race, ignore the picture on the front of the BSA kit. Use the slot closest to the end of the block as the rear axle.
![]() Key 5: Aerodynamics - Profile and body features minimized to improve air flow
Key 5: Aerodynamics - Profile and body features minimized to improve air flow
If you had asked me several years ago, "How do I make my pinewood derby car go fast?" I would not have included aerodynamics as a key. However, since that time I have read one study and performed another, both of which showed that the effect of aerodynamics on pinewood derby car performance is not trivial.
There are many elaborate ways to improve aerodynamics, but to simplify matters, let's use the following principles:
- Low-profile cars (smaller surface area as viewed from the front of the car) will tend to outperform higher-profile cars.
- Cars should taper from a smaller surface area in the front to a (possibly) larger surface area in the rear.
- Edges running across the car should be rounded or tapered.
- Wings, sails, flags, pennants, etc. add to the surface area, thus they tend to decrease performance.
- Smooth, slick paint job.
- Fenders help air to flow smoothly around the wheels. Just make sure to use light weight wood or plastic fenders.
To add some balance to this topic, Key 5 (aerodynamics) is not as important as the other four keys, so I don't suggest that you sacrifice looks to achieve an aerodynamic shape. If your child wants to build a car that is not particularly aerodynamic, don't worry about it. Just make sure that the other four keys are carefully followed.
Conclusion
There are many other things you can do to create a competitive pinewood derby car. If you want to read further, our booklet, "Speed to the Finish" thoroughly documents the techniques and tips needed to get top speed out of your car.
But whatever you do, just remember that to create a competitive pinewood derby car, make sure to use the Five Keys!
(1) For a thorough discussion on rail-riding, please see: “Rail-Riding - Getting that Extra Speed” in Volume 14, Issue 4.
(2) With Rail-Riding alignment, you can set the balance point closer to the rear axles. For more information, please see “Revisiting the Balance Point” in Volume 14, Issue 1.
 Are the 5 Keys not enough for you? You want to know all the tricks and secrets to fast pinewood derby cars? Then you need "Speed to the Finish", the most complete pinewood derby manual available to today.
 Let's make this simple. To achieve Key 1 and Key 2 can take some trial and error. But you only get one chance a year to test out a design! What do you do?
If you would like to eliminate the trial and error, thus maximizing your chance of a trophy win and maximizing the value of your time then consider our Car Plan Booklets. Each booklet has step-by-step instructions and full-scale templates for three winning designs. These plans implement Keys 1 and 2, so you don't have to worry about them.
Click here for More Information
![]() Short on time or woodworking tools? Our Pre-Cut Car Kits are made from our winning designs, and they implement Keys 1 and 2. They are pre-shaped for aerodynamics and pre-drilled for weight, and come complete with instructions and weight. Just assemble, sand, paint, and add wheels and axles to have a great looking and top-performing car.
Short on time or woodworking tools? Our Pre-Cut Car Kits are made from our winning designs, and they implement Keys 1 and 2. They are pre-shaped for aerodynamics and pre-drilled for weight, and come complete with instructions and weight. Just assemble, sand, paint, and add wheels and axles to have a great looking and top-performing car.
 Does Key 2 sound intimidating? It's not really that hard, but if you want to skip this key, consider our Official BSA Speed Wheels and Axles. Official BSA Speed Wheels are mold number matched and have been precision-machined for top performance. Official BSA Speed Axles have the burrs and crimps marks removed, a slightly tapered head, and are partially polish. Just a light polishing and these axles are ready to go.
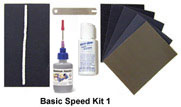 Pinewood Derby Speed Kit To ensure that your car is fast there are a few critical tools and supplies. To ensure that you have these supplies, and to maximize the value of your time, we offer Speed Kits. These Speed Kits include:
- Graphite - The #1 recommended lubricant
- Axle Polishing Kit - For polishing the axles
- Bore Polish - For polishing inside the wheel bores
- Gap Gauge - For setting the wheel to car body gap
- 600 grit sandpaper - For polishing the wheels