Each organization that sponsors a pinewood derby race requires the car builder to use a specific kit. Although the various kit types are similar, there are differences in wheels, axles, and blocks. Due to these differences, each kit requires slightly different preparation techniques.
Below each kit is identified, and the specific preparation techniques are outlined. In addition, the applicability of our specialty tools to the kit is identified.
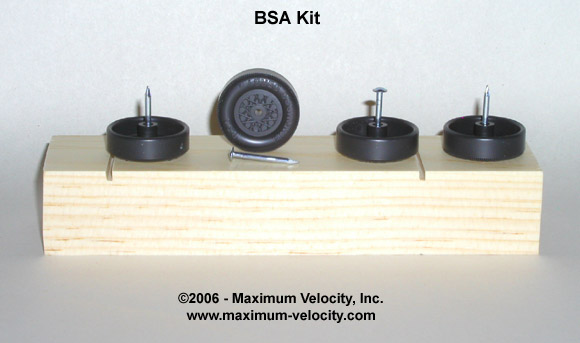
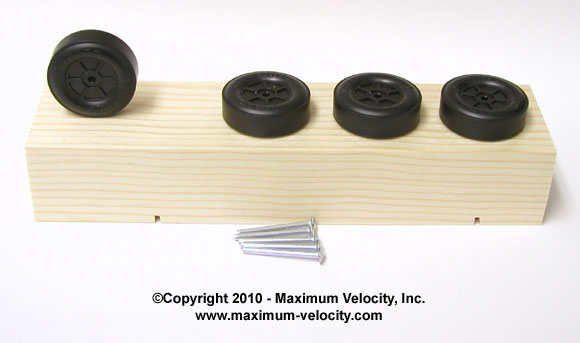
Cub Scout Grand Prix Pinewood Derby® Kit
The Cub Scout Grand Prix Pinewood Derby Kit consists of the following:
- 1 Wood Block: 1-3/4W x 1-1/4H x 7L inches, offset 1/8 inch deep axle slots, with a wheelbase of 4-3/8 inches
- 4 Axles: nail-type
- 4 Wheels: hard plastic, full profile, solid sidewall, raised lettering "BSA Pinewood Derby"
Block Tips
- Use a square to verify that the axle slots are square to the block. If not, replace the block.
- Use the axle slot closest to the end of the block as the rear axle.
- Use the Pro-Body Tool to pilot drill the axle slots (or if allowed by the local rules, use the Pro-Body Tool to drill axle holes on the opposite side of the block).
If you are not satisfied with the block in your kit, replacement blocks can be found Here.
Axle Tips
- Remove the burrs under the nail head, and the crimp marks on the shaft with a Mini-File. Place the axle in the chuck of a drill (head outwards), and apply the file to the spinning axle.
- To minimize contact with the wheel hub, slightly bevel the axle head with the file.
- Straighten and round the axle shaft with the Pro-Axle Press.
- Polish with an Axle Polishing Kit.
As an alternative, Official Cub Scout/BSA Speed Axles are available Here.
Wheel Tips
- Optionally, use the Pro-Wheel Shaver XT to true the wheel before polishing.
- Using a Pro-Wheel Mandrel, polish the tread surface and inside edge with wet, 600 grit sandpaper.
- Polish inside the wheel bore with Wheel Bore Polish.
- Lubricate with Max-V-Lube Graphite.
As an alternative, Official Cub Scout/BSA Speed Wheels are available Here.
Other preparation steps can be performed using our specialty tools. Below is the compatibility / applicability of the specialty tools to the Official Cub Scout/BSA Kit.
| Pro-Hub Tool | Yes1 |
| Pro-Outer Hub Shaver | Yes |
| Pro-Body Tool | Yes: Part #5140 |
| Pro-Axle Press | Yes |
| Pro-Wheel Shaver XT | Yes |
| PPro-Wheel Mandrel | Yes |
| Pro-Axle Guide | Yes |
| Pro-Rail Rider | Yes |
| Pro-Body Jig | Yes |
| Alignment Tool | Yes |
| Axle Extraction Pliers | Yes |
| Pro-Body Slotter | Yes |
1Not for squaring or coning hubs, but required for the Pro-Wheel Shaver XT and Pro-Outer Hub Shaver.
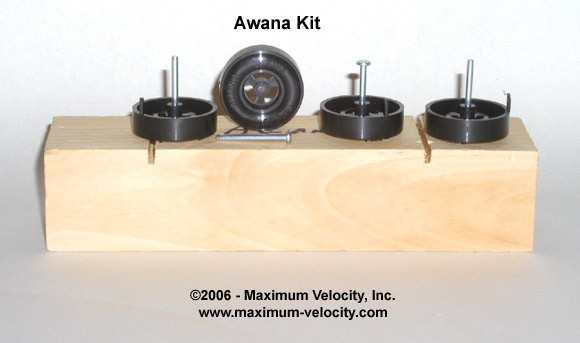
Awana Grand Prix Car Kit
The Awana Grand Prix Kit consists of the following:
- 1 Wood Block: 1-3/4W x 1-1/2H x 6-13/16L inches, centered 3/16 inch deep axle slots with a wheelbase of 3-13/16 inches
- 4 Axles: hinge-pin type
- 4 Wheels: soft plastic, full profile, see-through sidewall, 3 spokes, raised lettering "Awana Grand Prix"
Block Tips
- Most Awana blocks are shorter than 7 inches. If so, replace the block with a 7 inch block.
- In many Awana races, the wheelbase can be extended. If an extended wheelbase is allowed in your race, purchase an Extended Wheelbase Block, or use the Pro-Body Tool (Part #5145) to drill axle holes in your existing block.
- If you are using the slots on an official Awana block, use a square to verify that the axle slots are square to the block. If not, replace the block.
If you are not satisfied with the block in your kit, replacement blocks can be found Here.
Axle Tips
- To minimize contact with the wheel hub, slightly bevel the axle head with a Mini-File. Place the axle in the chuck of a drill (head outwards), and apply the file to the spinning axle.
- Polish with an Axle Polishing Kit. Skip the two coarsest papers in the kit.
- As an alternative, Official Awana Speed Axles are available Here.
Wheel Tips
- If present, use a sharp knife to cut off the molding spike.
- Using a Pro-Wheel Mandrel, polish the tread surface and inside edge with wet, 600 grit sandpaper.
- Use the Pro-Hub Tool to bevel the inside wheel hub.
- Polish inside the wheel bore with the Wheel Bore Polish.
- Lubricate with Graphite or Krytox 100.
As an alternative, Official Awana Speed Wheels are available Here.
Other preparation steps can be performed using our specialty tools. Below is the compatibility / applicability of the specialty tools to the Official Awana Kit.
| Pro-Hub Tool | Yes |
| Pro-Outer Hub Shaver | No1 |
| Pro-Body Tool | Yes: Part #5145 |
| Pro-Axle Press | Yes3 |
| Pro-Wheel Shaver XT | No |
| PPro-Wheel Mandrel | Yes |
| Pro-Axle Guide | Yes2 |
| Pro-Rail Rider | Yes |
| Pro-Body Jig | No |
| Alignment Tool | Yes |
| Axle Extraction Pliers | Yes |
| Pro-Body Slotter | Yes |
1Use the 5110-"Pro-Hub Tool" to square the outer hub on Awana wheels.
2Can be used as a gap gauge, but does not assist in installation.
3Not for straightening the axle or beveling the head, but can be used with the Pro-Rail Rider Tool for bending the axle.
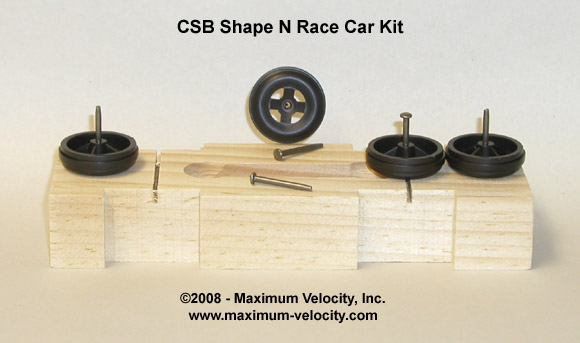
CSB "Shape N Race" Car Kit
The CSB Shape N Race car kit consists of the following:
- 1 Wood Block: 2-1/4W x 1-1/8H x 6-15/16L inches, offset 7/32 inch deep axle slots with a wheelbase of 3-11/16 inches. The wheels inset into the block. A weight pocket is pre-milled into the bottom-middle of the block.
- 5 Axles: hinge-pin type
- 4 Wheels: hard plastic, full profile with a raised ridge, see-through sidewall, 4 spokes, no raised lettering
Block Tips
- Use a square to verify that the axle slots are square to the block. If not, replace the block.
- Use the axle slot closest to the end of the block as the rear axle.
Axle Tips
- To minimize contact with the wheel hub, slightly bevel the axle head with a Mini-File. Place the axle in the chuck of a drill (head outwards), and apply the file to the spinning axle.
- Polish with an Axle Polishing Kit. Skip the two coarsest papers in the kit.
Wheel Tips
- You can use a Pro-Wheel Mandrel to lightly polish the tread surface and inside edge with wet, 600 grit sandpaper. However, due to the raised ridge, it is quite easy to remove too much tread surface material. So polish lightly.
- Use the Pro-Hub Tool to bevel the inside wheel hub.
- Polish inside the wheel bore with Wheel Bore Polish.
- Lubricate with Graphite.
Other preparation steps can be performed using our specialty tools. Below is the compatibility / applicability of the specialty tools to the Official CSB kit.
| Pro-Hub Tool | Yes |
| Pro-Outer Hub Shaver | No |
| Pro-Body Tool | Yes: Part #5145 |
| Pro-Axle Press | Yes1 |
| Pro-Wheel Shaver XT | Yes |
| PPro-Wheel Mandrel | Yes |
| Pro-Axle Guide | Yes2 |
| Pro-Rail Rider | Yes |
| Pro-Body Jig | No |
| Alignment Tool | Yes |
| Axle Extraction Pliers | Yes |
| Pro-Body Slotter | No |
1Not for straightening the axle or beveling the head, but can be used with the Pro-Rail Rider Tool for bending the axle.
2Can be used as a gap gauge, but does not assist in installation.
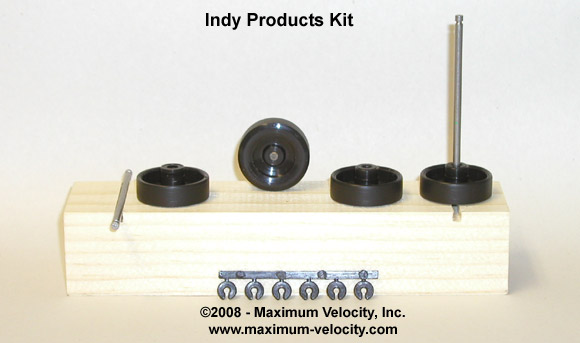
Indy Products Kit
The Indy Products car kit consists of the following:
- 1 Wood Block: 1-5/8W x 1-3/8H x 6-15/16L inches, centered 1/8W x 1/8D inch axle slots with a wheelbase of 5-1/4 inches
- 2 Axles: solid rods with grooves for retaining clips
- 6 Retaining Clips: plastic
- 4 Wheels: hard plastic, full profile, solid sidewall, no raised lettering
Block Tips
- Use a square to verify that the axle slots are square to the block. If not, replace the block.
Axle Tips
- Place the axle in the chuck of a drill and polish the area near the hub cap retention ring with an Axle Polishing Kit.
Wheel Tips
- The wheels are generally quite true, but you can use a Pro-Wheel Mandrel to lightly polish the tread surface and inside edge with wet, 600 grit sandpaper.
- Polish inside the wheel bore with Wheel Bore Polish.
- Lubricate with Graphite.
Other preparation steps can be performed using our specialty tools. Below is the compatibility / applicability of the specialty tools to the Indy Products kit.
| Pro-Hub Tool | No |
| Pro-Outer Hub Shaver | No |
| Pro-Body Tool | No |
| Pro-Axle Press | No |
| Pro-Wheel Shaver XT | No |
| Pro-Wheel Mandrel | Yes |
| Pro-Axle Guide | No |
| Pro-Rail Rider | No |
| Pro-Body Jig | No |
| Alignment Tool | Yes |
| Axle Extraction Pliers | No |
| Pro-Body Slotter | No |
MV Basic Car Kit
The MV Basic Car Kit consists of the following:
- 1 Wood Block: 1-3/4W x 1-1/4H x 7L inches, offset 1/8 inch deep axle slots with a wheelbase of 4-3/8 inches
- 5 Axles: hinge-pin type with a beveled head
- 4 Wheels: hard plastic, full profile, solid sidewall, raised lettering "Maximum Velocity"
Block Tips
- Use a square to verify that the axle slots are square to the block. If not, replace the block.
- Use the axle slot closest to the end of the block as the rear axle.
- Use the Pro-Body Tool to pilot drill the axle slots (or if allowed by the local rules, use the Pro-Body Tool to drill axle holes on the opposite side of the block).
If you are not satisfied with the block in your kit, replacement blocks can be found Here.
Axle Tips
- Polish with Axle Polish.
Wheel Tips
- Optionally, use the Pro-Wheel Shaver XT to true the wheel before polishing.
- Using a Pro-Wheel Mandrel, polish the tread surface and inside edge with wet, 600 grit sandpaper.
- Use the Pro-Hub Tool to bevel the inside wheel hub.
- Polish inside the wheel bore with Wheel Bore Polish.
- Lubricate with Graphite.
As an alternative, MV Speed Wheels are available Here.
Other preparation steps can be performed using our specialty tools. Below is the compatibility / applicability of the specialty tools to the MV Basic Car Kit.
| Pro-Hub Tool | Yes |
| Pro-Outer Hub Shaver | No |
| Pro-Body Tool | Yes: Part #5140 |
| Pro-Axle Press | Yes1 |
| Pro-Wheel Shaver XT | Yes |
| Pro-Wheel Mandrel | Yes |
| Pro-Axle Guide | Yes |
| Pro-Rail Rider | Yes |
| Pro-Body Jig | Yes |
| Alignment Tool | Yes |
| Axle Extraction Pliers | Yes |
| Pro-Body Slotter | Yes |
1Not for straightening the axle or beveling the head, but can be used with the Pro-Rail Rider Tool for bending the axle.
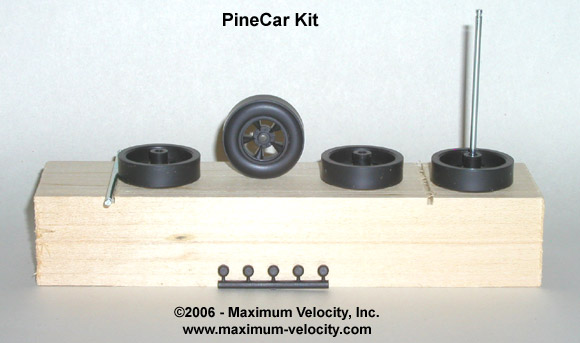
PineCar Basic Kit
The PineCar Basic Car Kit consists of the following:
- 1 Wood Block: 1-3/4W x 1-5/16H x 7L inches, offset 1/16 inch deep axle slots with a wheelbase of 4-7/16 inches
- 2 Axles: solid rods with retention grooves for hubcaps, and 4 nail axles. Either can be used.
- 4 Plastic Hubcaps for solid rod axles.
- 4 Wheels: hard plastic, full profile, see-through sidewall, 5 spokes, no raised lettering
Block Tips
- Use a square to verify that the axle slots are square to the block. If not, replace the block.
- Use the axle slot closest to the end of the block as the rear axle.
- If you cannot cut the axles (see step 1 under 'Axles'), then make sure the block is no wider than 1-11/16 inches wide. Sand the block as needed to reach this measurement.
If you are not satisfied with the block in your kit, replacement blocks can be found Here.
Axle Tips
- If allowed by your local rules, use diagonal cutters to remove 1/4 inch from the middle of each of the solid rod axles. You will now have 4 independent axles.
- Place the axle in the chuck of a drill and polish the area near the hub cap retention ring with an Axle Polishing Kit.
- Polish the inside of the hub caps with wet, 600 grit paper.
If you are using the nail-type axles, follow the steps under the Cub Scout Grand Prix Pinewood Derby Kit
If you need spare or replacement parts, Official PineCar replacement wheels and axles can be found Here.
Wheel Tips
- Optionally, use the Pro-Wheel Shaver XT to true the wheel before polishing.
- Using a Pro-Wheel Mandrel, polish the tread surface and inside edge with wet, 600 grit sandpaper.
- Use the Pro_hub Tool to bevel the inside wheel hub.
- Polish inside the wheel bore with Wheel Bore Polish.
- Lubricate with Graphite.
As an alternative, Official PineCar Speed Wheels are available Here.
Other preparation steps can be performed using our specialty tools. Below is the compatibility / applicability of the specialty tools to the PineCar Kit.
| Pro-Hub Tool | Yes |
| Pro-Outer Hub Shaver | No |
| Pro-Body Tool | Yes1: Part #5140 |
| Pro-Axle Press | Yes1 |
| Pro-Wheel Shaver XT | Yes |
| Pro-Wheel Mandrel | Yes |
| Pro-Axle Guide | Yes |
| Pro-Rail Rider | Yes |
| Pro-Body Jig | Yes |
| Alignment Tool | Yes |
| Axle Extraction Pliers | Yes |
| Pro-Body Slotter | Yes |
1Not for use with the solid rod axles. Use only with PineCar nail axles.
2Can be used as a gap gauge, but does not assist in installation.
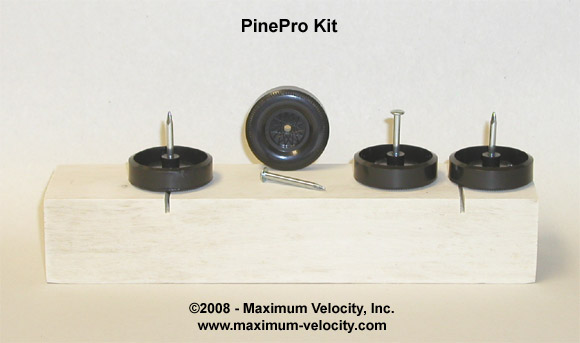
PinePro Block Kit
The PinePro Block kit consists of the following:
- 1 Wood Block: 1-11/16W x 1-1/4H x 7L inches, offset 3/16 inch deep axle slots with a wheelbase of 4-3/16 inches
- 4 Axles: nail-type
- 4 Wheels: hard plastic, full profile, solid sidewall, raised lettering on inside "PINE-PRO"
Block Tips
- Use a square to verify that the axle slots are square to the block. If not, replace the block.
- Use the axle slot closest to the end of the block as the rear axle.
- Use the Pro-Body Tool for Awana (Part #5145) to pilot drill the axle slots (or if allowed by the local rules, use the Pro-Body Tool to drill axle holes on the opposite side of the block).
If you are not satisfied with the block in your kit, replacement blocks can be found Here.
Axle Tips
- Remove the burrs under the nail head, and the crimp marks on the shaft with a Mini-File. Place the axle in the chuck of a drill (head outwards), and apply the file to the spinning axle.
- To minimize contact with the wheel hub, slightly bevel the axle head with the file.
- Polish with an Axle Polishing Kit.
Wheel Tips
- Using a Pro-Wheel Mandrel, polish the tread surface and inside edge with wet, 600 grit sandpaper.
- Use the Pro-Hub Tool to bevel the inside wheel hub.
- Polish inside the wheel bore with the Wheel Bore Polish.
- Lubricate with Graphite.
Other preparation steps can be performed using our specialty tools. Below is the compatibility / applicability of the specialty tools to the PinePro Kit.
| Pro-Hub Tool | Yes |
| Pro-Outer Hub Shaver | No |
| Pro-Body Tool | Yes: Part #5145 |
| Pro-Axle Press | Yes1 |
| Pro-Wheel Shaver XT | No |
| Pro-Wheel Mandrel | Yes |
| Pro-Axle Guide | Yes2 |
| Pro-Rail Rider | Yes |
| Pro-Body Jig | No |
| Alignment Tool | Yes |
| Axle Extraction Pliers | Yes |
| Pro-Body Slotter | Yes |
1Not for straightening the axle or beveling the head, but can be used with the Pro-Rail Rider Tool for bending the axle.
2Can be used as a gap gauge, but does not assist in installation.
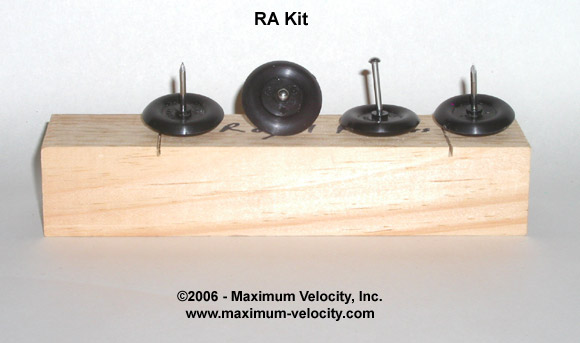
RA Kit
The RA Car Kit consists of the following:
- 1 Wood Block: 1-11/16W x 1-3/8H x 7L inches, offset 1/8 inch deep axle slots with a wheelbase of 4-1/4 inches
- 4 Axles: nail-type
- 4 Wheels: hard plastic, narrow symmetrical profile, solid sidewall, raised lettering "Royal Racers"
Block Tips
- Use a square to verify that the axle slots are square to the block. If not, replace the block.
- Use the axle slot closest to the end of the block as the rear axle.
- Use the Pro-Body Tool (Part #5145) to pilot drill the axle slots (or if allowed by the local rules, use the Pro-Body Tool to drill axle holes on the opposite side of the block).
Axle Tips
- Remove the burrs under the nail head, and the crimp marks on the shaft with a Mini-File. Place the axle in the chuck of a drill (head outwards), and apply the file to the spinning axle.
- To minimize contact with the wheel hub, slightly bevel the axle head with the file.
- Polish with an Axle Polishing Kit.
Wheel Tips
- Optionally, use the Pro-Wheel Shaver XT to true the wheel before polishing.
- Using a Pro-Wheel Mandrel polish the tread surface with wet 600 grit sandpaper. Make sure to remove the seam around the middle of the tread.
- Use the Pro-Hub Tool to bevel the inside wheel hub.
- Polish inside the wheel bore with the Wheel Bore Polish.
- Lubricate with Graphite.
- Note that the side of the wheel with the raised lettering is mounted away from the car.
Other preparation steps can be performed using our specialty tools. Below is the compatibility / applicability of the specialty tools to the Official RA Kit.
| Pro-Hub Tool | Yes |
| Pro-Outer Hub Shaver | No |
| Pro-Body Tool | Yes: Part #5145 |
| Pro-Axle Press | Yes1 |
| Pro-Wheel Shaver XT | Yes |
| Pro-Wheel Mandrel | Yes |
| Pro-Axle Guide | Yes2 |
| Pro-Rail Rider | Yes |
| Pro-Body Jig | Yes |
| Alignment Tool | Yes |
| Axle Extraction Pliers | Yes |
| Pro-Body Slotter | Yes |
1Not for straightening the axle or beveling the head, but can be used with the Pro-Rail Rider Tool for bending the axle.
2Can be used as a gap gauge, but does not assist in installation.
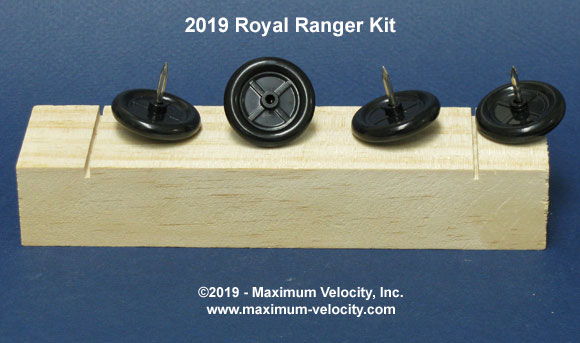
2019 Royal Ranger Kit
The 2019 Royal Ranger kit consists of the following:
- 1 Wood Block: 1-3/4W x 1-1/4 H x 7L inches, extended-centered 1/8 inch deep axle slots, with a wheelbase of 5-3/32 inches
- 4 Axles: nail-type
- 4 Wheels: hard plastic, narrow symmetrical profile, solid sidewall, no raised lettering
Block Tips
- Use a square to verify that the axle slots are square to the block. If not, replace the block or flip the block over and cut new axles slots.
- Many races allow the car to be 7-1/2 inches long. Since the block is only 7 inches long, extend the length by gluing on a 1/2 inch 'nose' of wood or another material.
- Use the Pro-Body Tool for Awana (Part #5145) to drill pilot holes in the axle slots.
Axle Tips
- Remove the burrs under the nail head, and the crimp marks on the shaft with a Mini-File. Place the axle in the chuck of a drill (head outwards), and apply the file to the spinning axle.
- To minimize contact with the wheel hub, slightly bevel the axle head with the file.
- Polish with an Axle Polishing Kit.
Wheel Tips
- Optionally, use the Pro-Wheel Shaver XT to true the wheel before polishing.
- Using a Pro-Wheel Mandrel, polish the tread surface and inside edge with wet, 600 grit sandpaper.
- Polish inside the wheel bore with Wheel Bore Polish.
- Lubricate with Max-V-Lube Graphite.
Other preparation steps can be performed using our specialty tools. Below is the compatibility / applicability of the specialty tools to the 2019 Royal Ranger Kit.
| Pro-Hub Tool | Yes1 |
| Pro-Outer Hub Shaver | No |
| Pro-Body Tool | Yes: Part #5145 |
| Pro-Axle Press | Yes2 |
| Pro-Wheel Shaver XT | Yes |
| Pro-Wheel Mandrel | Yes |
| Pro-Axle Guide | Yes |
| Pro-Rail Rider | Yes |
| Pro-Body Jig | No |
| Alignment Tool | Yes |
| Axle Extraction Pliers | Yes |
| Pro-Body Slotter | Yes |
1Not for squaring or coning hubs, but required for the Pro-Wheel Shaver XT.
2Not for straightening the axle or beveling the head, but can be used with the Pro-Rail Rider Tool for bending the axle.
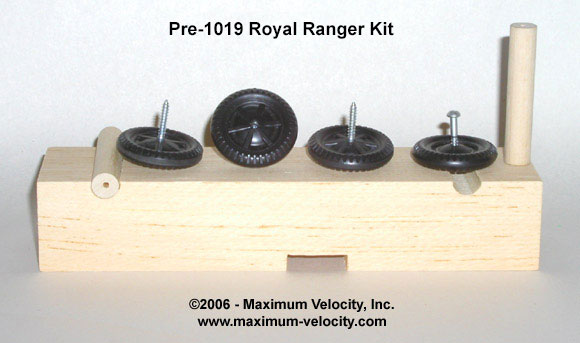
Pre-2019 Royal Ranger Kit
The Royal Ranger kit (same kit is also supplied by S&W crafts) consists of the following:
- 1 Wood Block: 1-3/4W x 1-5/16H x 6-15/16L inches, driver cut-out, extended-centered axle channels (3/8 semi-circular) with a wheelbase of 5 inches
- 2 Dowel rod axle struts with pilot holes
- 4 Axles: screw-type
- 4 Wheels: hard plastic, narrow symmetrical profile, solid sidewall, no raised lettering
Block Tips
- Use a square to verify that the axle channels are square to the block. If not, replace the block.
- Many races allow the car to be 7-1/2 inches long. Since the block is only 6-15/16 inches long, extend the length by gluing on a 1/2 inch 'nose' of wood or another material.
- Use the axle channel closest to the end of the block as the rear axle.
- Use the Pro-Body Tool for Royal Rangers (Part #5148) to re-drill the pilot holes in the axle struts.
Axle Tips
- Remove the burrs under the screw head with a Mini-File. Place the axle in the chuck of a drill (head outwards), and apply the file to the spinning axle.
- To minimize contact with the wheel hub, slightly bevel the screw head with the file.
- Polish with an Axle Polishing Kit.
Wheel Tips
- Optionally, use the Pro-Wheel Shaver XT to true the wheel before polishing. A 1/8 inch bushing is required.
- Using a Pro-Wheel Mandrel polish the tread surface with wet 600 grit sandpaper. Make sure to remove the seam around the middle of the tread.
- Polish inside the wheel bore with the Wheel Bore Polish.
- Lubricate with Graphite.
- Note that the wheels have a stamped side and a smooth side. The smooth side is mounted towards the car.
Click Here for an Article on Royal Ranger Wheel Alignment
Other preparation steps can be performed using our specialty tools. Below is the compatibility / applicability of the specialty tools to the Pre-2019 Royal Ranger/S&W Kit.
| Pro-Hub Tool | Yes1 |
| Pro-Outer Hub Shaver | No |
| Pro-Body Tool | Yes: Part #5148 |
| Pro-Axle Press | No |
| Pro-Wheel Shaver XT | Yes2 |
| Pro-Wheel Mandrel | Yes |
| Pro-Axle Guide | No |
| Pro-Rail Rider | No |
| Pro-Body Jig | No |
| Alignment Tool | Yes |
| Axle Extraction Pliers | No |
| Pro-Body Slotter | No |
1Not for squaring or coning hubs, but required for the Pro-Wheel Shaver XT.
2Requires a 1/8" bushing (Part #5159)
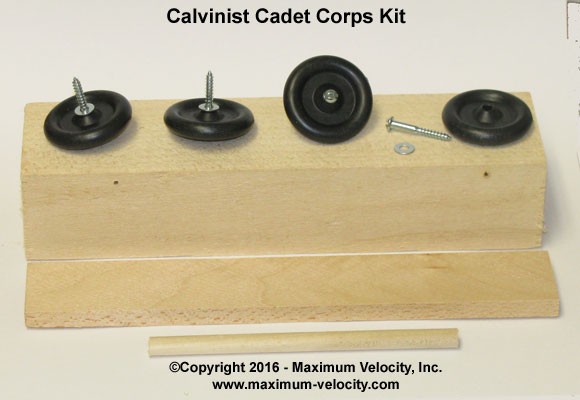
Calvinist Cadet Kit
The Calvinist Cadet Kit consists of the following:
- 1 Wood Block: 1-3/4W x 1-3/8H x 7L inches, extended-offset wheelbase with axle holes (1/16 inch), wheelbase of 5 inches
- 4 Axles: screw-type (same as Royal Ranger)
- 4 Wheels: hard plastic, narrow symmetrical profile, solid sidewall, no raised lettering, large bore (.133 inch)
- Additional plank of wood and long dowel rod for use in making decorative items.
Block Tips
- The axle holes are quite small, which could cause the wood to split when the axles are installed. Use the 5145-Pro-Body Tool to drill new axle holes on the opposite side of the block. Make sure to match the wheelbase position.
Axle Tips
- Remove the burrs under the screw head with a Mini-File. Place the axle in the chuck of a drill (head outwards), and apply the file to the spinning axle.
- To minimize contact with the wheel hub, slightly bevel the screw head with the file.
- Polish with an Axle Polishing Kit.
Wheel Tips
- Using a Pro-Wheel Mandrel polish the tread surface with wet 600 grit sandpaper. Make sure to remove the mold mark in the middle of the tread.
- Polish inside the wheel bore with the Wheel Bore Polish.
- Lubricate with Max-V-Lube Graphite.
Other preparation steps can be performed using our specialty tools. Below is the compatibility / applicability of the specialty tools to the Official Royal Ranger/S&W Kit.
| Pro-Hub Tool | Yes1 |
| Pro-Outer Hub Shaver | No |
| Pro-Body Tool | Yes: Part #5145 |
| Pro-Axle Press | No |
| Pro-Wheel Shaver XT | Yes2 |
| Pro-Wheel Mandrel | Yes |
| Pro-Axle Guide | No |
| Pro-Rail Rider | No |
| Pro-Body Jig | Yes3 |
| Alignment Tool | Yes |
| Axle Extraction Pliers | No |
| Pro-Body Slotter | No |
1Not for squaring or coning hubs, but required for the Pro-Wheel Shaver XT.
2Requires a 1/8" bushing (Part #5159)
3Will result in holes slightly smaller than the 5145-Pro-Body Tool, but still sufficient for insertion.