– Feature Article – Preparing Nail Axles
– Pinewood Derby Car Showcase
– Q&A
Preparing Nail Axles
By Randy Davis
When looking at the axles in your car kit 1, what do you see … four nails? four metal rods? If so, I suggest you reconsider and take another look. For what you actually see are precision parts for a high-speed racing machine! Well, at least they will be after some preparation.
Proper axle preparation is a key factor in creating a top-performing pinewood derby car. Without proper preparation, performance will suffer. Fortunately, the axles can be prepared satisfactorily by the car owner with minimal household tools.
Nail-Axle Preparation Steps
If you plan to have a top performing car, then these nail-axle preparation steps must be performed. But be careful; when using a drill always wear eye protection, secure loose clothing and long hair, and remove loose jewelry.
Straightness
The first step in preparing axles is to ensure that the axles are straight. This is most easily accomplished by inserting each axle in the chuck of a drill with the head facing outwards. Start the drill and observe the shaft of the axle (not the head). If the shaft of the axle moves from side to side, then the axle is crooked. If the axle shaft is bent, then it can be straightened using the Pro-Axle Press after the burrs are removed.
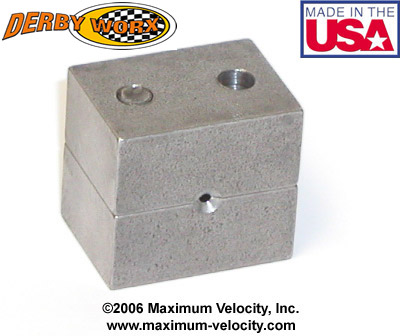
Figure 1 – Pro-Axle Press
Now look at the head of the axle. Does it appear to be moving in an elliptical path? If so, the head of the axle is not exactly centered on the shaft. If the head is more than just slightly off-center, then I suggest replacing the axle.
Removing the Burr
The next step in preparing axles is removing the burrs on the head of the axle. The required tools are a drill, a clamp or vise, and a fine file (I prefer to use a triangular file). To remove the burr, perform the following steps:
- Fasten a drill or rotating tool to a work surface using a Drill Mount, clamp, or vise.
- Insert an axle into the drill chuck with the head facing outwards.
- Start the drill and set the speed somewhere between 3/4 and full speed.
- Slowly apply the file to the inside of the axle head. You may find it helpful to hold the tip of the file on the work surface, and pivot the file up to the axle.
- Stop the drill and check the axle. Repeat the previous steps as needed until the burr is completely removed.
- Before removing the axle from the drill, use the side of the file to create a slight taper on the nail head. This will minimize the frictional loss between the wheel hub and the axle head.2
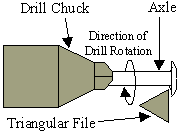
Figure 2 – Removing the Burr
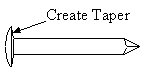
Figure 3 – Creating a Taper
Polishing
The third step in preparing the axles is polishing. I will describe how this is done using Maximum Velocity’s axle polishing kit.
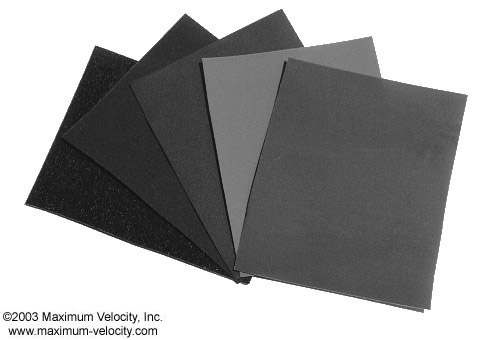
Figure 4 – Axle Polishing Kit
- Cut the axle polishing papers into strips about 1/4 inch wide.
- Insert an axle into the drill chuck with the head facing outwards.
- Start the drill and dip the first sandpaper strip into a cup of water.
- Apply the sandpaper to the portion of the axle on which the wheel will spin. Also sand the inside of the axle head.
- After polishing for about 10 seconds, dip a second strip in the water and repeat.
- Repeat steps 4 and 5 for the next finest paper. Continue through all five grades of paper.
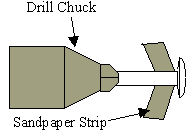
Figure 5 – Polishing
Diamond Polishing
To get an even higher shine, Maximum Velocity’s Diamond Polish can be used.
- Fasten a drill or rotating tool to a work surface using a Drill Mount, clamp, or vise.
- Insert an axle into the chuck of the tool, and start the drill.
- Apply a small dab of polish to a clean, soft rag.
- Apply the polish to the axle for about 15 seconds. Make sure to polish the portion of the shaft on which the wheel will spin, and polish the underside of the axle head.
- Buff off the residue with a clean part of the rag until no more black residue comes off the axle.
- Repeat the above steps for each axle.
- Gently clean the axles with Isopropyl Alcohol, rinse with water, and then dry thoroughly.
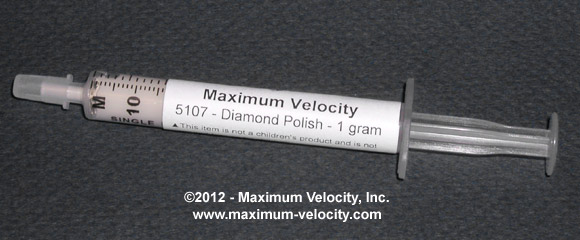
Figure 6 – Diamond Polish
Summary
Axle preparation is an important step, and must not be skipped. So plan ahead and make sure you have time to perform the required steps. Have fun and good luck with your race!
1Nail-type axles are used in BSA, PineCar, and a few other kits. Awana kits and Maximum Velocity kits use pin axles which need polishing, but do not require filing. A few kits use screw axles, for which you would follow the same procedure as for nail-type axles.
2An alternative is to use the Pro-Axle Press to create a slight bevel.
Pinewood Derby Car Showcase
Cobra – Jim White
My grandson, Aaron Shain, and I built this car that we named “Cobra” for the 2012/2013 racing season. We hope the front and rear fenders produce favorable air flow and high speeds.
Street Rod – Jim White
My grandson and I built this car to compete in the “Street Rod” class of a Pinewood Derby Racing League. The basic car is a stretched wedge shaped car, and the body shell is from a 1 to 25 scale AMT model kit.
Following the rules for the “Street Rod” class, the car is 9 inches long and weighs 6 ounces. There are two sets of front axle mounting holes to allow for shortening the wheel base. In our first race the car ran in the middle of the pack four times, but it sure was an eye catcher.
Corkscrew – Wess Eslinger
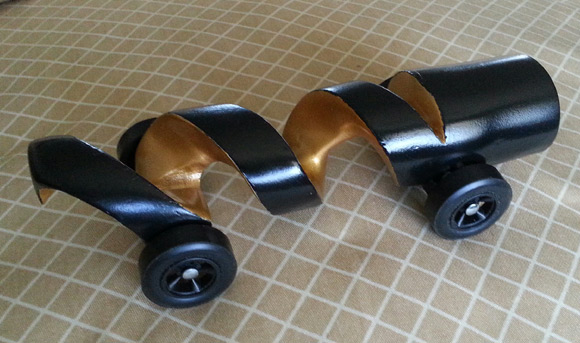
The Corkscrew is completely impractical (the only place to put weight is behind the rear wheels) but I thought it would be funny. I had the idea several years ago, but didn’t think I could actually make it. But this last summer I got bored on a Saturday morning, and decided to give it a try. It was easier than I thought to get the basic shape, but because I thought I would ruin it, I had used a really awful block of wood that I was going to throw away. So, it took a lot longer than I would have liked to get it looking even respectfully smooth. The gold paint was also tricky to get right. Since I spent a LOT more time on this than I ever anticipated, I hope it will get some laughs at our next race.
Q&A
How much does paint add to the weight of a car?
A typical paint job is less than 0.1 ounces. However, if you use an unusually large number of coats of primer, paint, and/or clear, then the weight could go higher.
I am interested in building a 2-wheeled derby car like the one mentioned in this Newsletter Article. Do you have a set of plans for it? If not, could you let me know the basic details (how much weight used, measurements, etc)?
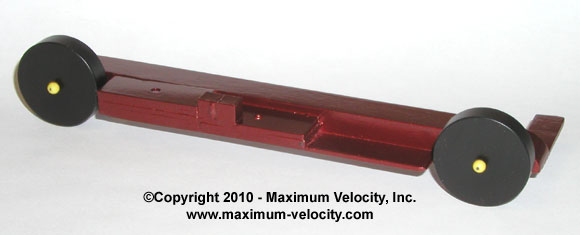
I don’t have plans for that car. But here are the basic measurements:
Main Body
- Length – 7 inches
- Width – 1/2 inch
- Thickness – 3/8 inch.
Underbody Plate
- Length – 4-1/2 inches
- Width – 1 inch
- Thickness 1/16 inch
Weight
The amount of weight depends on the weight of everything else you use. I needed just under 4.2 ounces, I used eight, 1/2 ounce tungsten plates, and two, 1/4 inch tungsten cubes.
Make sure to mechanically attach the front wing. I just used glue, and it broke off after the third heat.
Want Answers?
Do you have a pinewood derby-related question? If so, e-mail us your question.We answer all questions by e-mail, but not every question will appear in the Q&A section of the newsletter.
Back Issues
Are you a new subscriber, or have you missed some of the previous newsletters? Don’t miss out; all of the issues for Volume 5 through Volume 17 are posted on our web site.
Newsletter Contributions
We welcome your contributions. If you would like to contribute an article, a web site review, a speed tip, or a pinewood derby memory, please e-mail us.
Subscription Information
The Pinewood Derby Times is a free e-newsletter focused on pinewood derby racing. It is published biweekly from October through March.
If you haven’t already done so, please forward this issue to your pinewood derby friends. But please don’t subscribe your friends. Let them decide for themselves. Thanks.
If this newsletter was forwarded to you, why not subscribe to receive this newsletter. There is no cost, and your e-mail address is safe, as we never sell or share our distribution list.
To subscribe, send a blank e-mail to
[email protected]
You will receive a confirmation e-mail. Reply to the confirmation e-mail and you will start receiving the Pinewood Derby Times with the next issue.
Randy Davis, Editor, Pinewood Derby Times
E-Mail: [email protected]
(C)2018, Maximum Velocity, Inc. All rights reserved. Please do not reprint or place this newsletter on your web site without explicit permission. However, if you like this newsletter we grant permission, and encourage you to e-mail it to a friend.
Maximum Velocity disclaims any personal loss or liability caused by utilization of any information presented in this newsletter.
The Pinewood Derby Times is not specific to, and is not affiliated with the Boy Scouts of America, YMCA, Awana, or any other organization.
(R)Maximum Velocity is a registered trademark of Maximum Velocity, Inc.
(R)Pinewood Derby is a registered trademarks of the Boys Scouts of America.
(R)Awana is a registered trademark of Awana Clubs International.
All other names are trademarks of their respective owners.