– Feature Article – Axle Installation Made Easy
– Car Showcase
– Memory – Late Start
– Q&A
Axle Installation Made Easy
Mounting axles in blocks with slots has always been problematic. Problems include damage to the car body, sore thumbs, non-symmetrical insertion (some axles angled, others not), bent axles, and uneven car-to-wheel gapping. I believe there is an easier way, so today’s article will provide a game plan for both simplifying axle insertion and improving accuracy.
AXLE SLOT/HOLE PREPARATION
Whether your block is equipped with axle slots or axle holes, preparation is necessary to simplify and ensure proper axle installation. This preparation should occur before any other work is done on the wood block.
-
- Axle Method – One way to widen the slot is to use a hammer to tap a spare axle into the slot, pull it out with a pair of pliers, and then repeat for the other three positions. While this will work, it is not particularly accurate and can lead to block damage.
- Pro-Body Tool Method – The preferred method to widen the slot is to use a Pro-Body Tool.1 The Pro-Body Tool is a drilling guide, with which a drill bit is used to accurately widen the slot. It will also compensate for slots that are slightly out of square. Click Here to get a better idea as to how the Pro-Body Tool works.
WHEEL/AXLE PREPARATION
Before installing the wheels and axles, complete all axle and wheel preparation steps. Then lubricate the wheels/axles while they are off the car. If you are unsure as to these preparation steps, they are covered in back issues of this newsletter, as well as in our booklet, “Speed to the Finish”.2
AXLE INSERTION
Axles can be inserted by a variety of methods including pressing them in by hand, or pressing them in place with a vise or clamp. Regardless of the method, the gap must then be set between the car body and the wheel hub. The PineCar alignment tool can be used for setting this gap, or you can use a dime.
While these methods work, I would like to introduce you to a new method of axle installation using a tool called the Pro-Axle Guide.3
The Pro-Axle Guide is a tool to help insert axles with accuracy. The tool is equipped with a ridge to keep the axle at the correct depth in the slot, and is also equipped with a gauge for setting the proper gap between the car body and the wheel hub (see Figure 1).
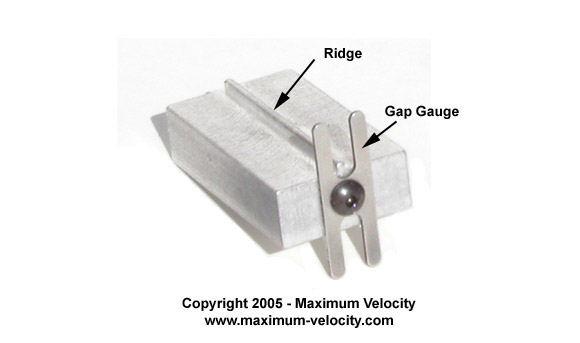 Figure 1
Pro-Axle Guide Components
-
- Partially insert the axle into the slot/hole, and then place the tool on the bottom of the block with the gauge between the wheel and the car body.
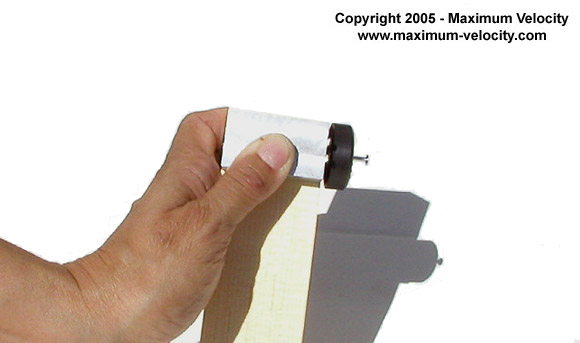
Figure 2
Preparing to Insert an Axle - Next place the axle head on a hard surface, such as a workbench or desk. While firmly squeezing the tool to the block, press down on the axle head. Continue pressing until the wheel hub rests against the gauge.
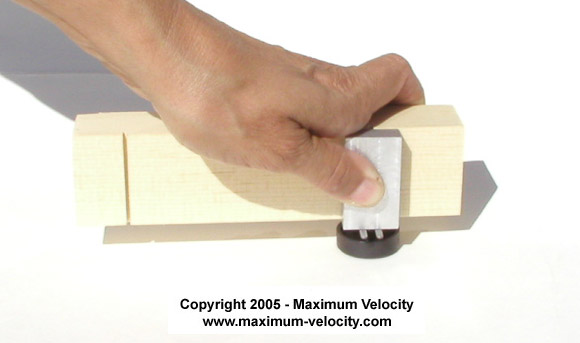
Figure 3
Pressing the Axle into Place - For non-BSA wheels, the axle will need to be inserted a bit further. This can be done by pressing the axle head with a thumb or the handle of a small screwdriver.
- Remove the tool and repeat for the other axles.
- Partially insert the axle into the slot/hole, and then place the tool on the bottom of the block with the gauge between the wheel and the car body.
AXLE ALIGNMENT
Now that the wheels/axles are installed, but before they are permanently affixed, test and adjust the alignment of the car. To accomplish this, you may need to remove and reinstall the axles. If so, then repeat the process described in the previous step. If you are unsure as to how to align the car, there will be an article on alignment in a future newsletter, or you can find two documented procedures in our “Speed to the Finish” booklet.
SECURING THE AXLES
Finally, the axles must be secured in place. The method is different for axles slots versus axle holes.
- It is not permanent (like epoxy), so if necessary, the axles can be removed by grasping the axle head with a pair of pliers, slightly rotating the axle (which breaks the glue bond), and then pulling the axles out; and
- It is not runny (like superglue), so it won’t sneak into the wheel bore and lock up the wheel.
To glue the axles, lay the car on soft rag with the bottom facing upwards. Place a dab of white glue in the slot area between the axle tips. Spread the glue over the top of the axles, but keep it away from the wheels. Remove excess glue with a rag, and then don’t move the car until the glue is dry.
- Remove an axle,
- Put a small drop of white glue on a toothpick,
- Insert the toothpick into an axle hole and swish it around,
- Remove the toothpick, wipe off any glue on the side of the car, and
- Reinstall the axle.
Again, I prefer white glue for the same reasons listed above.
CONCLUSION
Proper axle installation is extremely important to reach maximum velocity. I hope that you find the information in this article to be helpful, and that you have a successful race this year.
1The Pro-Body Tool can be found by Clicking Here.
2“Speed to the Finish” can be found by Clicking Here.
3The Pro-Axle Guide can be found by Clicking Here.
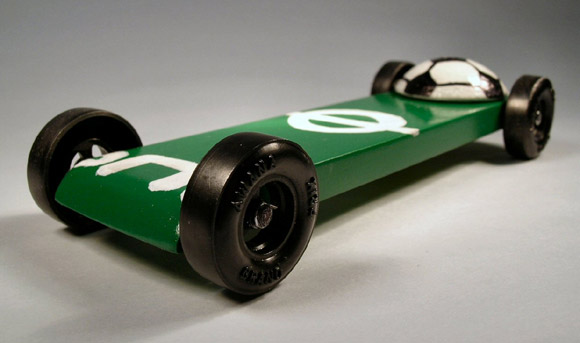
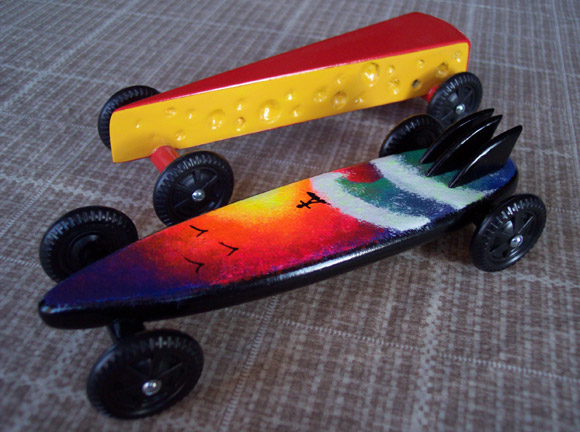
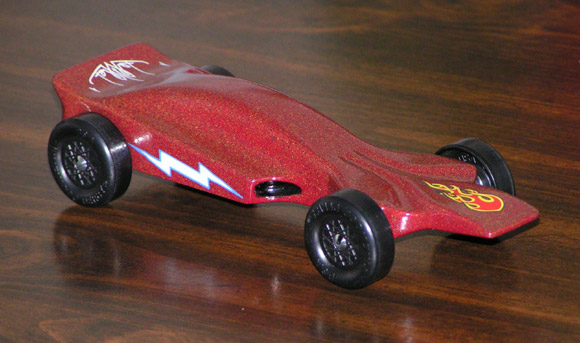
Pinewood Derby Car Showcase
Soccer: Mike Parrish
Cheese Block & Surf Board: Daniel Nagel
Zack’s Car: Dwight Endersbe
Pinewood Derby Memory
Late Start
Our son started his Cub Scouting career late, so he didn’t do his first pinewood derby until he was a Bear. Remembering the one pathetic race I participated in when I was a Cub, I did lots of research into the ‘tricks of the trade’. I learned about matching the wheels, sanding and polishing, axle positioning, weight distribution, etc. I also looked for car designs and templates, printed these, and let my son choose his car.
We spent the next month putting all of these lessons learned into effect. There was much cutting, sanding, polishing, sanding, polishing, and then more sanding. We got down to a week before the big race, and it was time to paint. With our son being a big Harry Potter fan, he wanted a ‘Snitch’ car, so we painted the car a metallic gold. Mom then got in on the act and hand-painted wings on the side, a lightning bolt on the nose, and the ‘HP’ logo on the rear end of the top. A trip to the Post Office revealed I was still light on weight, so I added one flat piece of weight to the end, painted it with the gold, and we were set.
Our son is highly competitive, so we spent the morning of the race talking with him about being a good sport regardless of the results. His best friend was the two-time defending Pack Champion, so we thought we’d have a hard time placing, and wanted our boy to be emotionally prepared. Turns out we were wasting our breath.
The first heat our son was in, he got himself positioned right at the end of the track. As the cars left the starting gate, it was clear we’d done something right. His car had a two car-length lead coming out of the curve, and extended it on the flat. He was absolutely ecstatic as his car won his first ever race. On his second heat, with his friend in an adjacent lane, he ‘took the flag’ by two car-lengths. He faced a real challenge in the third heat, coming off the curve half a car-length behind. However, he shot past all the cars on the flat to win by a full length. End result – Den and Pack Champion, with a big trophy to prove it!!! I’m glad I had the DVD camera to capture all of the excitement.
The District race was held a month later. In the Bear rank preliminaries, our son took third out of 45 participants, qualifying for the District finals. There was a significant break between our rank qualifying and the finals, so I took the car and we went to lunch. It was at this point I probably made a mistake. During the lunch break I added more graphite to the wheels and axles. While I spun them in, I’m still wondering if it was a mistake. In the finals, we never came close. We ended up finishing ninth out of 15 in the finals. Disappointing for our son, but not bad for a first-ever racer.
John Nelson
Sterling, VA
Q&A
I understand the reason to run with one wheel off of the track but which wheel should you raise?
I recommend lifting a front wheel and offsetting the added weight towards the rear of the car. Left or right doesn’t really matter, but I always lift the left-front wheel (probably because I am right-handed!).
Our pack is considering buying a new track to host the District races. We’re thinking about an aluminum track with at least 6 lanes. But, we see there are several lengths of tracks available. We run in a school gym, and that gives us plenty of room. Is there a large difference in performance/speed between tracks that are 32′, 40′ or 48′? Does one length favor a certain type of car over another length? Would you expect cars that work well on a Pack’s wood track to do equally well on an aluminum track?
Here are some Pros and Cons of longer tracks
Pros
- Longer tracks provide more room for spectators.
- Longer tracks make the races a bit longer which may be more interesting.
Cons
- Longer tracks are more expensive.
- Longer tracks take more space to store, and a little longer to set up accurately.
- Longer tracks result in more cars failing to reach the finish line (probably won’t happen at the district level).
- Longer tracks can lengthen the overall event as it takes longer to retrieve cars.
The performance difference is in the order of a few tenths of a second per every 8 additional feet.
Assuming that the tracks being compared have the same geometry (slope followed by a long flat), the shorter tracks (under 40) strongly favor a rear weighted car. As the track lengthens, best results are obtained by adjusting the balance point forward in proportion to the track length.
If you have a 32 foot track at the pack race, and then a 48 foot or longer track at the districts, you may get different results (i.e., the finishers from a particular pack may finish in a different order). There could be fairness issues if some packs impound cars and other packs don’t. The people that have access to their car between the events could adjust the weight position slightly to optimize for the longer track.
We are thinking of using a Body Skin for our car. If we apply a Body Skin can we then apply dry transfer decals over the Body Skin, or will there be adhesion problems?
Dry transfer decals can be applied to the Body Skins. Just make sure the Body Skin is fully dry before applying the decal.
Want Answers?
Do you have a pinewood derby-related question? If so, e-mail us your question.We answer all questions by e-mail, but not every question will appear in the Q&A section of the newsletter.
Back Issues
Are you a new subscriber, or have you missed some of the previous newsletters? Don’t miss out; all of the issues for Volume 5 through Volume 17 are posted on our web site.
Newsletter Contributions
We welcome your contributions. If you would like to contribute an article, a web site review, a speed tip, or a pinewood derby memory, please e-mail us.
Subscription Information
The Pinewood Derby Times is a free e-newsletter focused on pinewood derby racing. It is published biweekly from October through March.
If you haven’t already done so, please forward this issue to your pinewood derby friends. But please don’t subscribe your friends. Let them decide for themselves. Thanks.
If this newsletter was forwarded to you, why not subscribe to receive this newsletter. There is no cost, and your e-mail address is safe, as we never sell or share our distribution list.
To subscribe, send a blank e-mail to
[email protected]
You will receive a confirmation e-mail. Reply to the confirmation e-mail and you will start receiving the Pinewood Derby Times with the next issue.
Randy Davis, Editor, Pinewood Derby Times
E-Mail: [email protected]
(C)2018, Maximum Velocity, Inc. All rights reserved. Please do not reprint or place this newsletter on your web site without explicit permission. However, if you like this newsletter we grant permission, and encourage you to e-mail it to a friend.
Maximum Velocity disclaims any personal loss or liability caused by utilization of any information presented in this newsletter.
The Pinewood Derby Times is not specific to, and is not affiliated with the Boy Scouts of America, YMCA, Awana, or any other organization.
(R)Maximum Velocity is a registered trademark of Maximum Velocity, Inc.
(R)Pinewood Derby is a registered trademarks of the Boys Scouts of America.
(R)Awana is a registered trademark of Awana Clubs International.
All other names are trademarks of their respective owners.