– Feature Article – Transforming that Block into the Ultimate Derby Car
– Humor
– Pinewood Derby Car Showcase
– Memory – The Thirty-Minute Car
– Q&A
Feature Article
Transforming that Block into the Ultimate Derby Car
By Randy Davis
After waiting for a whole year, the time has finally arrived to transform a pine block into the ultimate pinewood derby car. I know it is tempting to draw a few lines and start cutting. But before that, ask yourself two questions:
- Where will the weight go? Depending on how much wood you remove, you will likely need to add between 2.5 to 3.5 ounces of weight. Too often car builders don’t consider the need to add weight until after the car is shaped and painted. The time to deal with the weight is now, before cutting the block. So, figure out what kind of weight you will be using and where it will go.
Speaking of where the weight will go … - Does the design allow the weight to be placed near the rear axle? For best performance most people recommend locating the center of gravity of the car at 3/4 to 1 inch in front of the rear axle. To accomplish this, you will need to place 1/3 to 1/2 of the weight behind the rear axle.
Sketching
Now that you know where the weight will go, draw the side profile of the car on both sides of the block, and draw the top profile on the bottom of the block. Then draw the location of the pockets/holes for the weight.
Prepare Axle Slots/Drill Axle Holes
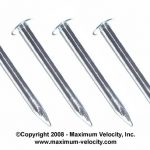
 If you are using axle slots, prepare them by pre-inserting a spare nail in each slot position, then twist and pull it out with a pair of pliers. This is more accurately accomplished with a Pro-Axle Guide, or better yet, a Pro-Body Tool will accurately pilot drill the slots.
If you will be using axle holes, drill them now with a Pro-Body Tool or Pro-Body Jig.
Rough Cutting
The weight pockets/holes are much easier to create while the block is rectangular. So, begin the shaping process by creating the weight pockets/holes. Then begin shaping the block by removing the wood from the top of the car (using the drawing on the sides of the car), then remove the wood from the sides of the car (using the drawing on the bottom of the car).
Shaping
Shape the car using a rasp, file, coarse (60-grit) sandpaper, etc. If you have a steady hand, a Dremel tool is handy. If there are any gouges (boo-boos), fill them with wood putty.
Sanding
When the car is shaped as desired, sand the car with medium (120 and 220 grit) sandpaper, followed by fine (400 grit) sandpaper. If you want a nice finish, make sure that the car is very smooth. There should not be any visible marks on the car (with the possible exception of fine sandpaper marks on the bottom of the car, or on the back of the car where the wood end-grain is visible).
Preparing To Paint
 The car is now ready to paint. A Paint Stand is a great tool, but if you don’t have one I recommend inserting a long cabinet screw into the bottom of the car (screw it into a weight pocket if present) as a painting handle. The screw only needs to go deep enough to be firmly in place. Be careful not to run the screw completely through the car! Next, insert round toothpicks in the axle slots/holes. Now locate a place in a dust-free, shaded area where you can hang the car while it dries. In this location hang a short wire between two nails or screws such that the car can be suspended from the wire without touching a wall or other object.
If you will be using spray paint, put on eye and breathing protection. Then place a plastic bag over the hand that will hold the car and secure the bag with a rubber band around the wrist.
Painting
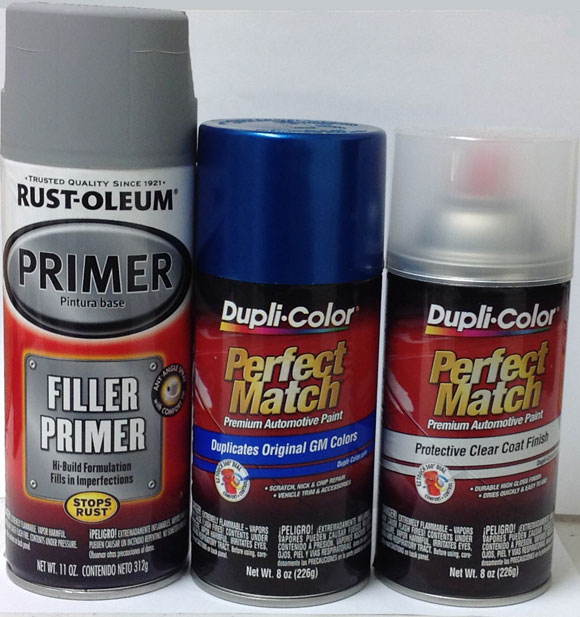 Paint the car following the recommendations on the paint can. For spray painting, I recommend starting with five coats of Rust-Oleum brand Filler Primer.1 After the primer dries, sand the car smooth with 800 grit wet paper. Then apply two coats of Dupli-Color-brand Perfect Match paint.1
If you intend to brush paint, then use an acrylic paint (water or alcohol cleanup). In general, I recommend using either lacquer or acrylic paints (Perfect Match is a lacquer). Avoid enamel paints as the cure time is quite long.
Drying
Between coats hang the car up to dry. Use a binder clip or clothespin to attach the screw to the wire. Make sure to follow the dry and re- coat instructions for the paint you are using. If you are careful and avoid runs, you should only need to sand after applying the primer.
Detailing
The car is now ready for numbers, decals, or other decorations. I prefer to use dry-transfer decals and/or pin-striping. Another option is Paint Stencils.
Clear Coat
To get a better shine and protect the paint and decals, apply several coats of clear. Make sure to use a clear coat of the same brand and formulation as the paint (lacquer with lacquer, acrylic with acrylic, etc).2
Whew! That was a lot of work, but the car body is complete and it looks great. But if you want the car to be fast, your work has only begun …
1Rust-Oleum Filler/primer and Duplicolor paint are available at auto parts stores.
2If you used Dupli-Color Perfect Match paint, use Dupli-Color Perfect Match Protective Clear Coat.
Humor
A courier was travelling across country on a horse. He was in a hurry and rode the horse too hard, so it foundered. Needing to continue on his journey, he went up to a nearby farm and asked the farmer if he could buy a horse.
“The only horse I have is this one,” the farmer said.
“Fine, I’ll take it,” the courier replied and jumped on the horse’s back.
The rather religious farmer told the courier how to control the horse. “Say ‘Praise the Lord’ to get the horse to go and ‘Amen’ to get it to stop.”
So with a quick “Praise the Lord,” the courier was on his way. He made good time, and his mind wandered as the countryside flew by. Looking up after a while, the courier realized that a cliff was coming up, but the horse was showing no indication of slowing down. He began to panic as the cliff loomed closer, and he found he could not remember the command to stop the horse. In a real fright, the courier prayed earnestly for a reminder, and finished his prayer with “Amen.”
The horse came to a screeching halt at the edge of the cliff. Looking down over the edge, the relieved courier exclaimed loudly, “Praise the Lord!”
Pinewood Derby Car Showcase
Pretty in Pink – Rob Wagner
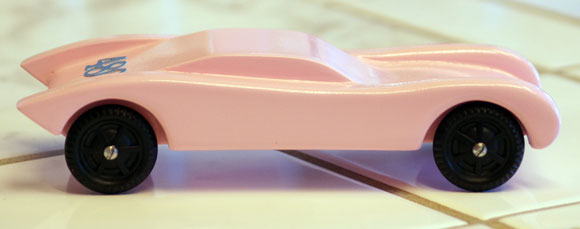
My daughter Lucie (9) picked this design out after seeing something similar online. She sketched out the template we used to cut it. The car took 2nd place in a combined Cadets and GEMS (like girl scouts) race. The kits we use have dowel rod axle struts that the screw axles mount into. We used the 5148-Pro-Body Tool on new dowel rods. It made all the difference. The car went straight and true the first try.
Scooby-Doo – Tony Grim
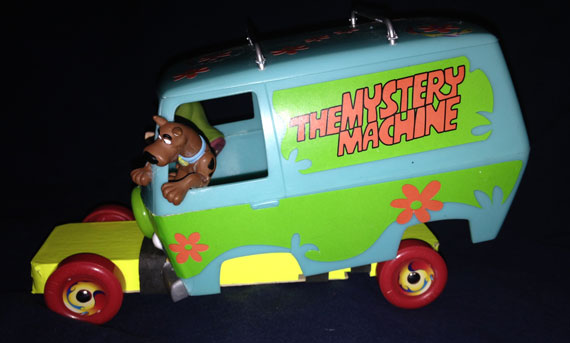
This car is one of your propeller car kits with a Scooby-Doo “Mystery Machine” model over the top. It raced the top leaders’ cars and won by three car lengths. The kids at our race loved it.
Pinewood Derby Memory
The Thirty-Minute Car
Two years ago we held a pinewood derby workshop as we do every year on the eve of our race. A boy named Chris came in with his car kit untouched. So we helped him cut out the design he wanted. He then took about ten or fifteen swipes across his newly formed car with sandpaper, and added some stickers. We helped add weight, install the wheels and axles, and lube the car. In all, he spent about 30 minutes on the car (in contrast, my two sons and I had about 15 hours in our cars).
The next day at the derby we all watched in complete astonishment as Chris’ car raced down the track. It was very fast and was beating almost every car it raced! When the dust finally settled, he came in fourth place and was sent on to the district derby.
For that one young boy it was all he needed to feel like he was the greatest pinewood derby racer. Seeing the look on his face when he was handed the 4th place trophy, and his ear-to-ear smile was more than enough for me to want to help as many boys as possible in the years to come.
John Henderson
Garrett, Indiana
Q&A
 Which of your axles meet the BSA national Pinewood Derby guidelines and come deburred and polished?
Our 4097 axles are official BSA nails that have been deburred and partially polished.
Our 4094, 4056, 4035 and 4036 axles (all the same, just different treatment) are a clone of the BSA nail but without the flaws. They are a superior axle and we have never had any problem with legality. But admittedly, they are not the official nail.
 Some other sites recommend graphite lube with “moly.” What do you think? Is graphite with moly a superior product?
I do not recommend graphite containing molybdenum for pinewood derby use. Molybdenum is a hard metal that is used as a lubricant in some industrial processes which require a lubricant with no electrical conductivity, high pressure, and high heat. None of these conditions apply to pinewood derby racing. In our testing the addition of molybdenum to graphite did nothing for performance, but did scratch the axles that you just spent so much time polishing.
 I bought your Axle Polishing Kit. I tried to follow your directions but it’s hard to break habits. For example, the instructions said to polish for “at least 10 seconds”. Well, I did at least 110 seconds per grit. My thinking was there’s no way 10 seconds could do the same job as hours did with my oldest son’s car. That car won, but time is tighter this year. Did I waste time by working the axles more than 10 seconds per grit? Can I get away with just 10 seconds and get same results?
Congratulations on your son’s success!
I don’t recommend sanding very long with the coarser grits, as the diameter of the axle gets reduced, which just makes the wheel/axle fit sloppier. So if you polish for 10 seconds, it is sufficient. On the fine grits you can go longer if desired.
Want Answers?
Do you have a pinewood derby-related question? If so, e-mail us your question.We answer all questions by e-mail, but not every question will appear in the Q&A section of the newsletter.
Back Issues
Are you a new subscriber, or have you missed some of the previous newsletters? Don’t miss out; all of the issues for Volume 5 through Volume 17 are posted on our web site.
Newsletter Contributions
We welcome your contributions. If you would like to contribute an article, a web site review, a speed tip, or a pinewood derby memory, please e-mail us.
Subscription Information
The Pinewood Derby Times is a free e-newsletter focused on pinewood derby racing. It is published biweekly from October through March.
If you haven’t already done so, please forward this issue to your pinewood derby friends. But please don’t subscribe your friends. Let them decide for themselves. Thanks.
If this newsletter was forwarded to you, why not subscribe to receive this newsletter. There is no cost, and your e-mail address is safe, as we never sell or share our distribution list.
To subscribe, send a blank e-mail to
[email protected]
You will receive a confirmation e-mail. Reply to the confirmation e-mail and you will start receiving the Pinewood Derby Times with the next issue.
Randy Davis, Editor, Pinewood Derby Times
E-Mail: [email protected]
(C)2018, Maximum Velocity, Inc. All rights reserved. Please do not reprint or place this newsletter on your web site without explicit permission. However, if you like this newsletter we grant permission, and encourage you to e-mail it to a friend.
Maximum Velocity disclaims any personal loss or liability caused by utilization of any information presented in this newsletter.
The Pinewood Derby Times is not specific to, and is not affiliated with the Boy Scouts of America, YMCA, Awana, or any other organization.
(R)Maximum Velocity is a registered trademark of Maximum Velocity, Inc.
(R)Pinewood Derby is a registered trademarks of the Boys Scouts of America.
(R)Awana is a registered trademark of Awana Clubs International.
All other names are trademarks of their respective owners.