– Feature Article – Height of Weight Effect on Performance
– Pinewood Derby Car Showcase
– Q&A
Feature Article
Height of Weight Effect on Performance
By Randy Davis
While looking through the index of Pinewood Derby Times articles, I realized that I had never performed a test on the performance effect of the height of the ballast weight. What an oversight. This topic tends to bring out the extremes. A few people have told me that they made a wing at the maximum allowable height and put the weight right at the top of the wing. On the other hand, a larger group of folks say that the weight must be at the bottom of the car, maybe even hanging down a bit. These folks won’t even consider using a tungsten canopy, as “that would make the weight too high”.
I have always believed that the height of the weight has only a trivial impact on performance. From a physics viewpoint, given two cars with the center of gravity at the same lengthwise location, but with one having the center of gravity low on the car (LCG), while the other has the center of gravity high on the car (HCG), the LCG car will fall a greater distance. Referring to Figure 1, note that because of the starting ramp angle, the fall distance for the HCG car is actually less than the fall distance of the LCG car. The actual difference is based on the slope angle. But on this hypothetical track, the HCG car falls only 96.6% of the LCG car’s fall distance.
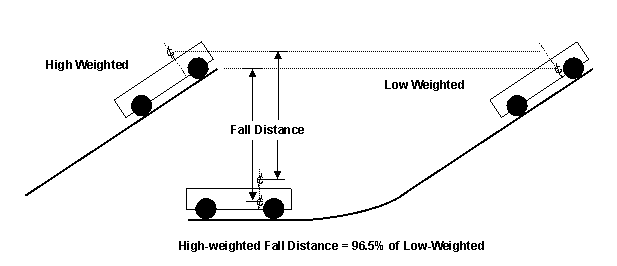
Figure 1 – Effect of Vertical Weight Position on Fall Distance
Although the LCG car will attain a higher speed, due to a pendulum effect the HCG car will traverse the curved portion of the track slightly faster than the LCG car. But unless the flat section of the track is very short, the LCG car will overtake the HCG car on the flat section.
But note that the example above is an extreme case, with the difference in vertical CG of well over one inch. In most cases, the difference between a high and low CG car is much less than one inch.
Well, enough of this speculation. Let’s do an experiment to see what really happens.
Experimental Setup
First, we need to create a car on which the vertical COG can be changed without affecting any other factor.
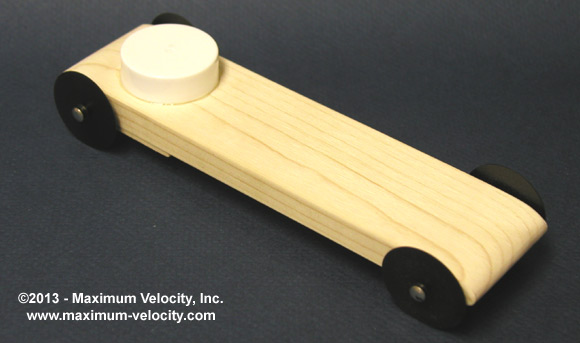
Figure 2 – Vertical COG Test Car
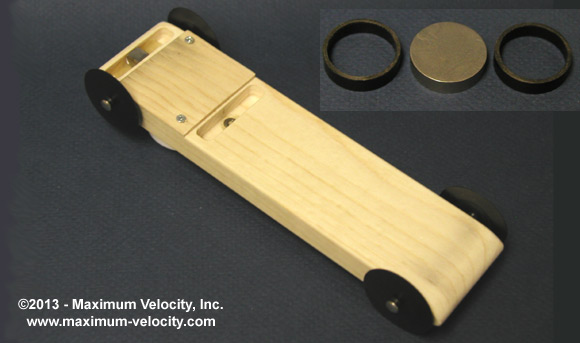
Figure 3 – Bottom of Car with Weight and Spacers Inset
The car in Figure 2 has a 1-3/8 inch hole drilled completely through the car, and a medicine bottle cap with a 1-3/8 inch internal diameter is glued over the hole. The resulting cavity can hold a 3.25 ounce tungsten round (9/32 inch thick) and two hollow plastic spacers (same OD and thickness), and a thin plastic shim to prevent rattling. On the bottom of the car, the hole is covered with a removable plate (Figure 3).
The experiment starts with the tungsten round at the bottom and the two spacers on the top. Three heats are run with this configuration. Then the plate is removed, the round placed between the spacers, and the plate replaced. After three heats with this configuration, the round is placed above the two spacers, and six heats are run. Then the configuration is changed back to the round in the middle for three heats, followed by the round at the bottom for the final three heats. Thus, six heats are run for each configuration.
To minimize variance in heats, Outlaw wheels, nickel speed axles, and Krytox 100 lube were used. Also, additional ballast weight was added to bring the car up to five ounces.
Experimental Results
As I stated above, I expected the difference in COG height would have a relatively trivial affect on performance. But I was surprised to find that the height of the COG made absolutely no difference in performance.
- 2.490 Sec – Low COG Average
- 2.491 Sec – Middle COG Average
- 2.490 Sec – High COG Average
- .0016 Sec – Standard Deviation
The 1 millisecond variation between the averages is within the standard deviation, so the difference of 1 millisecond is statistically insignificant.
Conclusion
What does this all mean? Well, within reason1 don’t worry about the height of the COG. Certainly get the COG towards the back, keep your car aerodynamically sleek, and have fun designing your dream car.
1In this test, the height of the COG varied by 9/16 inch without any effect on performance. However, there could be a difference in performance for more extreme swings in COG height.
Pinewood Derby Car Showcase
Just one car this time, but it is a doozy!
Dan’s Model T Street Rod – Andy Holzer
During the summer of 2010 I attended a car club event at a drag race track. The car owners could run the 1/8th or the 1/4 mile with their cars (depending on how their cars teched out). I saw a friend’s car there staged for another opportunity to run down the track. While looking at Dan’s Model T Street Rod I thought to myself, this would make an excellent extended wheelbase pinewood derby car.
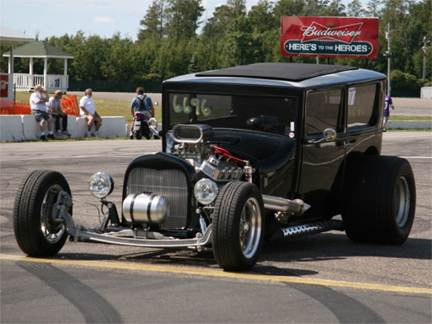
I figured this would be a fairly straightforward build, not having to make full fenders would make things easier. I started out and drew up some plans based on the pictures I took at the track. The grille ended up getting cut down, as it is quite difficult to use a drop axle on a pinewood derby car and have it race down a standard pinewood derby track. The body was s-t-r-e-t-c-h-e-d to use up the whole 7 inch block, so the width looks fairly narrow (compared to the picture).
Now what to use for the motor? Dan’s car had a Chevrolet 396 engine in it. I was thinking of looking for a model with a 396 to use in the car. My son, Noah offered me a couple of small block Chevy motors to use (from some models he has purchased for parts). I didn’t like the way the Chevy small block looks in a street rod with the “siamesed” exhaust ports, so I needed a big block. After some thought, I decided to build the motor from wood (a pine – pinewood derby motor). So I did some searching on the Internet to see what Chevy 396 parts looked like (I should have taken better pictures of the motor). It may have been a better idea to go and find a 1/25th scale motor for my car as I have about 12 hours in the motor build. There were a lot of parts that were made and then re-made after the learning had taken place making the first round of parts.
At this point the motor was adding a lot of weight to the front end. I had made some headers from 12 gauge copper wire (I was planning to paint the copper wire silver). I removed most of the wood from the radiator assembly and the front tank to make them as light as they could be, but there was still a lot of weight on the front. The headers weighed .15 ounce each.
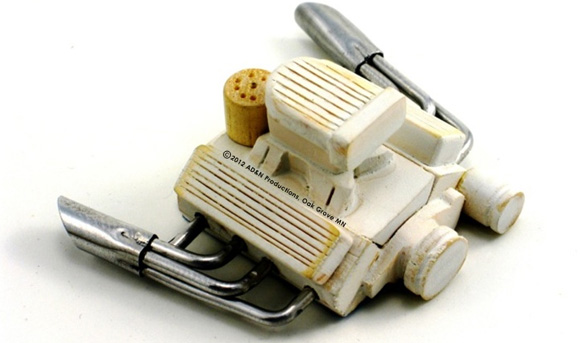
I looked at a farm supply store for some aluminum 12 gauge wire and found some, but it was electric fence wire and I needed to buy a quarter mile of it (really didn’t know what I would use the other 1318 feet of wire for). I went to the Internet and looked up aluminum 12 gauge wire and found they use aluminum wire in jewelry (not that I ever needed to know that). I went to a craft store and purchased 3 feet of it for about $3. The aluminum wire was much lighter. I bent up another header quickly and was wondering what I should use for a collector on the headers. I found some aluminum tubing I used for diesel exhausts for a PWD 18 wheel truck. It seemed to be the right size to fit over the 4 header tubes. I used a flat screwdriver to crimp the collectors around the aluminum wire and epoxied the assembly together after polishing each component.
After the motor was painted I was thinking of adding some spark plug wires to the distributor and run them down to where the spark plugs would be. I was thinking this would be a big pain to do and I probably should pass. But I decided to try it. The spark plug wires on Dan’s car are red, but only had 26 gauge, black copper wire. So I decided to use the black wire even though it would not be easily seen.
So I went back to the Internet to find the firing order of a Chevy 396 and the direction of rotation of the distributor (if you are going to do it you might as well do it right). I epoxied all of the wires to the distributor and then split them into sides and drilled small holes and epoxied the other end to the block near each header output. I won’t say this was easy, but it wasn’t that bad. I also used a piece of wire to create a belt on the exposed pulleys.
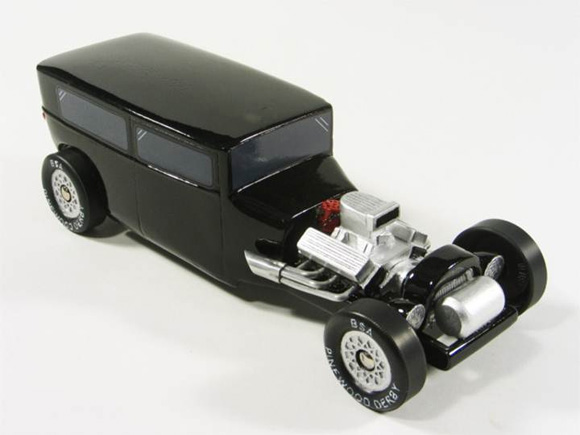
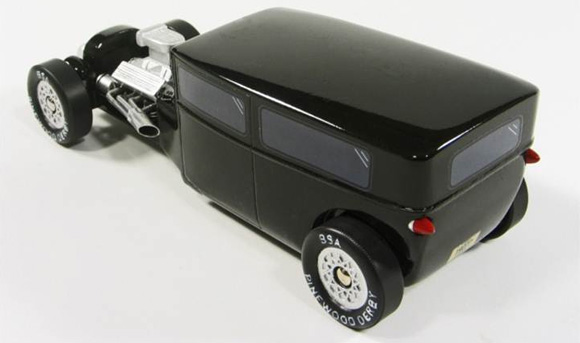
The Model T was fast but there were a lot of fast cars in the open race, it took 5th place.
Q&A
I am a leader with the Royal Rangers boy’s group at our AG church. Do the Royal Rangers have a specific kit that must be used? I have noticed that some previous year’s cars have the axle hole in the center of a 3/8 inch dowel that sets in an area that has been removed for the axle to be glued in.
The last I heard, the official Royal Ranger kit is the one you described:
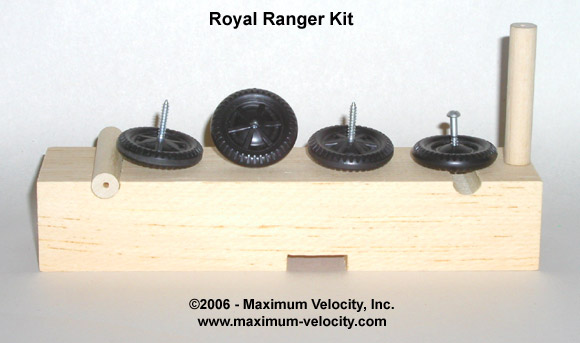
However, some groups use our MV kits, and some use other kits.
If your local group will be participating in a “district” type meet, then your group will need to use the kit sanctioned by the district. But if you will only be holding a local race, then you can use any kit you want.
Last year you recommended BSA wheel molds 2,3, 8, and 15 as the best wheels. This year it is 2, 3, 6, and 15. Why the switch from 8 to 6? I have some wheels from last year and want to know which one to go with as I have both.
When I measured the wheels this past summer, the #8 molds were not anywhere near as good as they were a year previous. Apparently, the #8 mold casting degraded, and the #6 mold was replaced or refurbished.
If you purchased the #8 wheels well over a year ago, then they will probably be fine.
Want Answers?
Do you have a pinewood derby-related question? If so, e-mail us your question.We answer all questions by e-mail, but not every question will appear in the Q&A section of the newsletter.
Back Issues
Are you a new subscriber, or have you missed some of the previous newsletters? Don’t miss out; all of the issues for Volume 5 through Volume 17 are posted on our web site.
Newsletter Contributions
We welcome your contributions. If you would like to contribute an article, a web site review, a speed tip, or a pinewood derby memory, please e-mail us.
Subscription Information
The Pinewood Derby Times is a free e-newsletter focused on pinewood derby racing. It is published biweekly from October through March.
If you haven’t already done so, please forward this issue to your pinewood derby friends. But please don’t subscribe your friends. Let them decide for themselves. Thanks.
If this newsletter was forwarded to you, why not subscribe to receive this newsletter. There is no cost, and your e-mail address is safe, as we never sell or share our distribution list.
To subscribe, send a blank e-mail to
[email protected]
You will receive a confirmation e-mail. Reply to the confirmation e-mail and you will start receiving the Pinewood Derby Times with the next issue.
Randy Davis, Editor, Pinewood Derby Times
E-Mail: [email protected]
(C)2018, Maximum Velocity, Inc. All rights reserved. Please do not reprint or place this newsletter on your web site without explicit permission. However, if you like this newsletter we grant permission, and encourage you to e-mail it to a friend.
Maximum Velocity disclaims any personal loss or liability caused by utilization of any information presented in this newsletter.
The Pinewood Derby Times is not specific to, and is not affiliated with the Boy Scouts of America, YMCA, Awana, or any other organization.
(R)Maximum Velocity is a registered trademark of Maximum Velocity, Inc.
(R)Pinewood Derby is a registered trademarks of the Boys Scouts of America.
(R)Awana is a registered trademark of Awana Clubs International.
All other names are trademarks of their respective owners.