– Feature Article – Let’s Light it Up
– Pinewood Derby Car Showcase
– Q&A
Feature Article
Let’s Light it Up
By Randy Davis
Driving down the road, every vehicle you see has white headlights and red taillights. Not only are these lights mandated by law, but they greatly increase the visibility of the car for improved safety; and at night, headlights are needed to help you see where you are going.
Of course, none of this is necessary for pinewood derby cars. But if you did have lights on your car, you would certainly increase the car’s visibility!
In today’s article, we will be reviewing four products that are available for adding lights to your car. We will be looking at cost, quality, ease of implementation, and ease of use.
Some Caveats
First, there is no perfect solution for pinewood derby lighting. All methods require some careful planning and woodworking.
Second, if your race will not be held immediately after the check-in (in which case you would turn on the lights before turning in the car), make sure that you will be allowed to turn on your lights prior to the race (or make sure an official will do that for you). It would be a real disappointment to implement lighting, and then find that you were not able to turn on the lights after the car was checked in.
Finally, implementing lighting does add some weight to the car in undesirable locations. However, the products are light-weight, so likely the effect is quite small.
Product 1 – Fishing Bobber Light Refills1
Although the manufacture certainly never thought of pinewood derby racing when developing this product, bobber light refills are one of the easier ways to add lights to your car. These refills consist of a metal tube holding a battery and an LED. The LED is pushed inwards to turn on the LED, and then pulled outwards to turn it off. The tubes are just over 1-1/4 inch long and fit nicely in an 11/64 inch hole. They are available in yellow, red, and green.
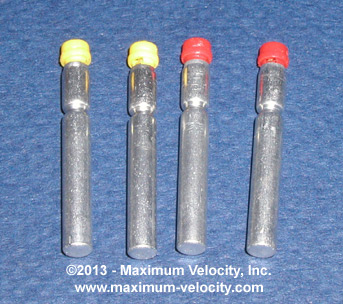
Figure 1 – Bobber Lights
For my implementation, I purchased two yellow and two red – too bad there is no white. Two holes were drilled into the front and back of the block to accept the lights. But in order to turn them off and on, you must be able to remove them from the car. So I added access holes in the bottom of the car. After the lights are installed (don’t glue them in – press fit only), a small screwdriver can be used to push them back out of the car so the lights can be turned off or on.
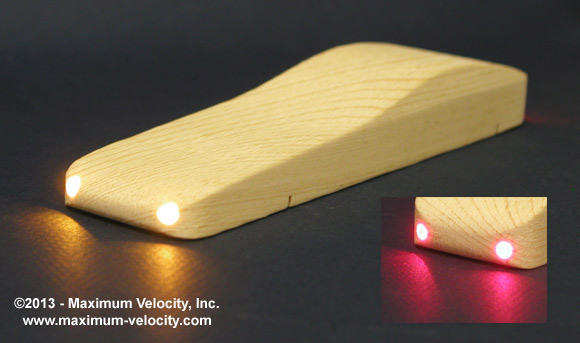
Figure 2 – Bobber Lights Installed2
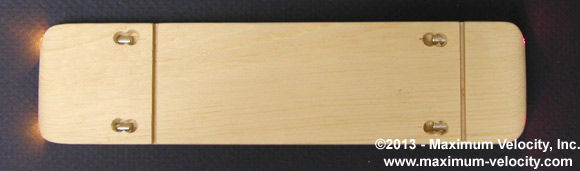
Figure 3 – Bottom of Car
Cost – $20.95 for four lights; includes First Class Mail Shipping
Quality – The lights work and are very bright. They are advertised to last 21+ continuous hours of use.
Ease of Implementation – The easiest of all products to install, just drill the four light holes, plus access holes.
Ease of Use – Each light must be individually turned on. They cannot be glued in place, so the light holes must be exactly the right size.
Product 2 – Pinewood Headlights3
Pinewood Headlights consist of a circuit board with two attached, white LEDs. A coin battery is installed on the circuit board. Also included are instructions, double stick tape, and a spare battery (nice touch). There is no switch; the lights are turned on by removing a plastic tab, and turned off by replacing the tab.
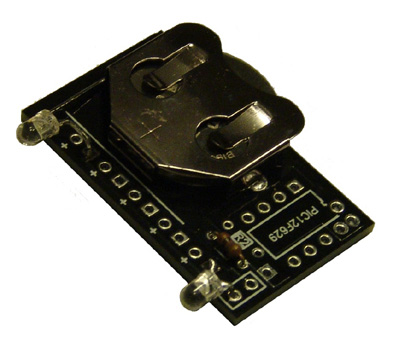
Figure 4 – Pinewood Headlights
Photo Source: derbylights.com
To install the lights, two 1/8 inch holes were drilled into the front of the block. A pocket was then created on the bottom of the block to accept the circuit board. The depth of the pocket must be accurately measured so that the board sits on the bottom of the pocket with the LEDs inserted into the holes. I put a thin layer of wood filler in the bottom of the pocket so that the double stick tape (included) would have a smooth surface on which to stick.
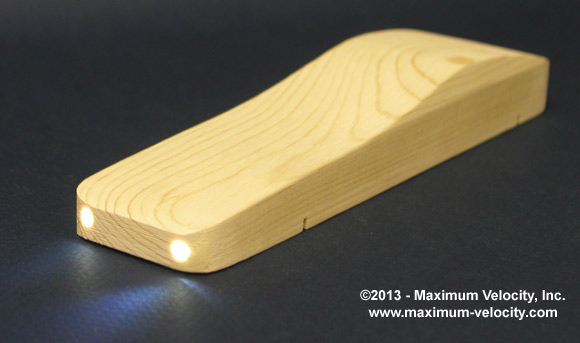
Figure 5 – Pinewood Headlights Installed
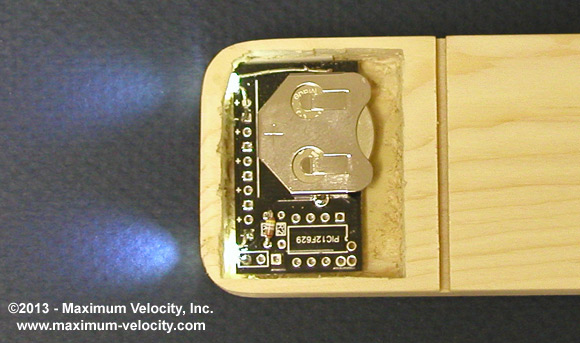
Figure 6 – Bottom of Car
Cost – $12.00 for one set of headlights; includes First Class Mail Shipping
Quality – The lights work and are very bright. The battery life is estimated to be 10 hours. Note that no taillights are available.
Ease of Implementation – Because the lights are attached to the circuit board, the pocket for the circuit board must be placed very close to the end of the block. This can be difficult to do without damaging the wood.
Ease of Use – Once installed, the lights can be turned on by removing the tab. But to turn off the lights, or to replace the battery, the circuit board must be removed. So the board cannot be permanently glued into place (double sided tape is provided for installation).
Product 3 – Pinewood Lights4
Pinewood Lights consist of two white and two red LEDs, a do-it- yourself circuit board, a battery, screws for attaching the board to the car, and instructions. The completed circuit board includes a power switch.
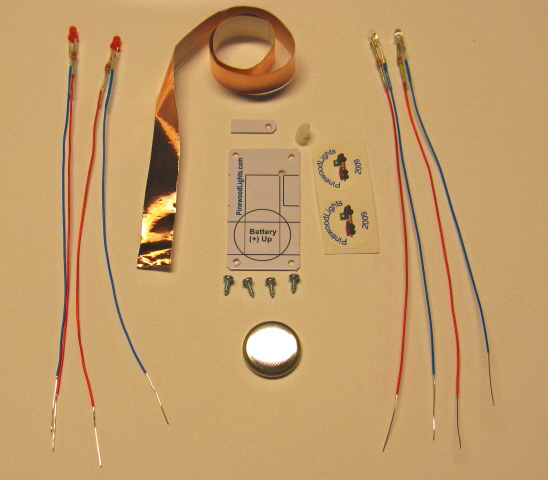
Figure 7 – Pinewood Lights
Photo Source: pinewoodlights.com
To install the lights, light holes were drilled with a 5/32 inch drill bit. Next, pockets were created under the car to hold the circuit board and for access to the lights. Finally, channels were machined from the light holes to the pocket. The circuit board was then constructed following the provided instructions.
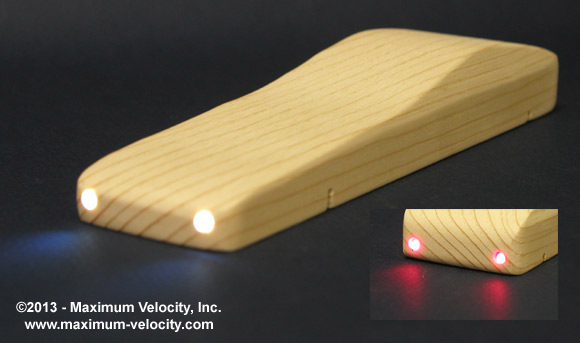
Figure 8 – Pinewood Lights Installed5
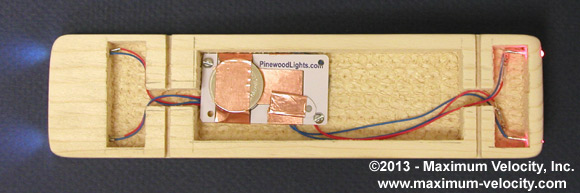
Figure 9 – Bottom of Car6
Cost – $11.90 for one set of headlights and taillights; includes First Class Mail Shipping
Quality – The lights work and are bright. The battery life is estimated to be 20 hours.
Ease of Implementation – The instruction booklet is 16 pages long, and seems quite complex. But after doing the project, I realize that many of the pages explain the engineering/science of LEDs and circuit boards. If you are all thumbs, this product is probably not for you. But anyone with some handiness should be able to pull it off. But note that because of the wiring, quite a bit of underbody woodworking is required.
Ease of Use – Once installed, the lights can be turned on or off with a switch on the circuit board. But to replace the battery, a piece of copper tape must be cut, removed, and then replaced. To do this the board would need to be removed from the bottom of the car (4 screws – I only used two in Figure 9). Extra copper tape is provided.
Product 4 – Flashing Light Bar7
The Flashing Light Bar consists of a pre-wired light bar, switch, circuit board, and battery holder. Two batteries (included) are required. When turned on, the light bar flashes red, blue, and white in sequence.
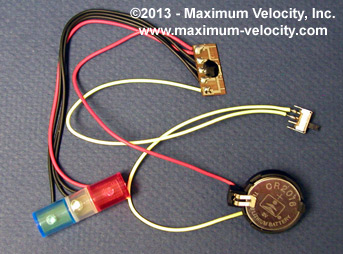
Figure 10 – Flashing Light Bar
To install the light bar, a hole (actually a slot works better) was drilled into the top of the car and continuing into a pocket under the car. But how do your get the wires fed through the top of the car? Well, according to the instructions, you cut the wires, feed them through the hole, and then twist them back together again (applying electrical tape – not supplied).
Figure 11 – Flashing Light Bar in Action8
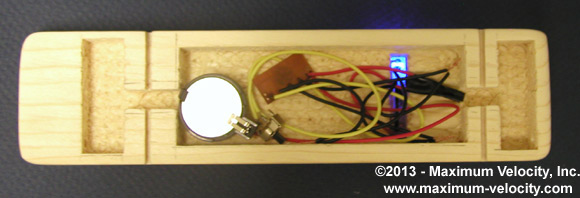
Figure 12 – Bottom of Car9
Cost – $15-20 from various retailers. Includes First Class Mail Shipping
Quality – The lights work and are bright. No estimate is provided for the battery life. The quality of the unit itself is iffy. The one I purchased had a corroded switch, the light cover was detached from the light bar circuit board, and one of the wires had to be re-soldered to the light bar circuit board.
Ease of Implementation – The product is straightforward to implement, although having to cut and splice wires is not the best solution (a simple plug connector would be a much better solution). Coupling this with the quality issues, this product is recommended only for handy people.
Ease of Use – Once installed, the lights can be turned on or off with a switch. The batteries are easy to replace.
Bringing it All Together
It seemed a shame to have these products and not make a completed car so I chose two of the products to implement a police car. Obviously the light bar was used, but I chose the “Pinewood Lights” product as it had both white headlights and red taillights.
The resulting car is shown in Figure 13 and 14. A video of the lights is available here:
Flashing Light Video
(5.6 MB, 5 seconds)
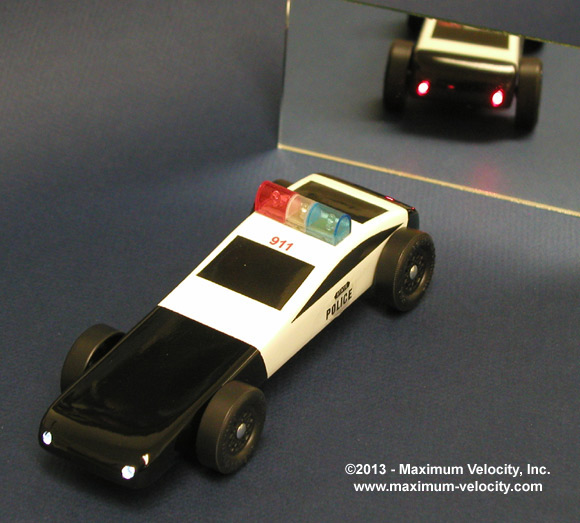
Figure 13 – Completed Police Car
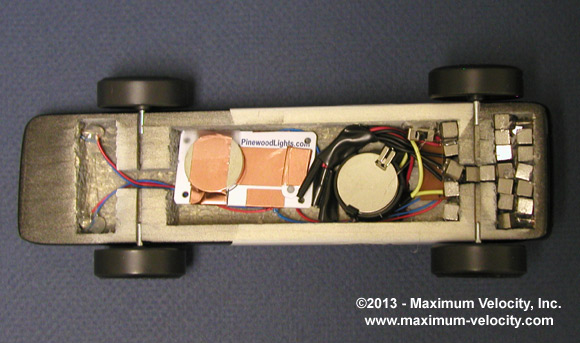
Figure 14 – Bottom of Completed Police Car10Conclusion
If you want to light up your car, there are several readily available products to choose from. But make sure to do your homework and select the product that is best for you.
1Can be purchased from several on-line stores. I purchased mine from gandermoutain.com
2Headlights are yellow and the taillights are red. LED light does not photograph well.
3Available from derbylights.com. This company also offers a set of scanner lights, which look very cool. They install in a similar way to the headlights.
4Available from pinewoodlights.com
5Headlights are white and the taillights are red.
6I made the rear pocket for weight; it is not required for the lights as the main pocket could have been used for access (the rear light holes could have been drilled all the way to the middle pocket as long as they are drilled high enough to clear the rear axle slot. The middle pocket is larger than necessary; you will see why later in the article.
7Manufactured by Amenco. Available at many on-line and walk-in hobby stores.
8The photo doesn’t really do the product justice. See the video later in the article.
9I didn’t make the wiring neat, as this was just a temporary installation for the photos.
10The weights are not very neatly placed. Normally, I use epoxy for weight, which allows time to reposition the weights. But for this project I used hot glue so that I could remove the weight if there was a problem with the lights. Hot Glue holds well, but gives virtually no time for adjusting the weight.
Pinewood Derby Car Showcase
Cyc’s Factory Special – Bruce Edney
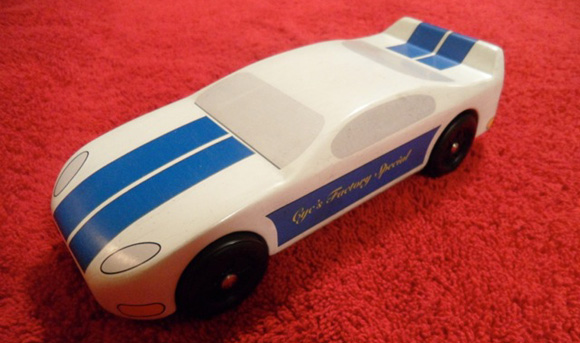
This car is built from a Stock Car kit and was raced with PWDerbyracing.com. It came in second in the April race. (My other Stock Car took first place in the same race, but it is not as good looking! Looks don’t mean it will be fast!)
Awana Cars – Terry Walker
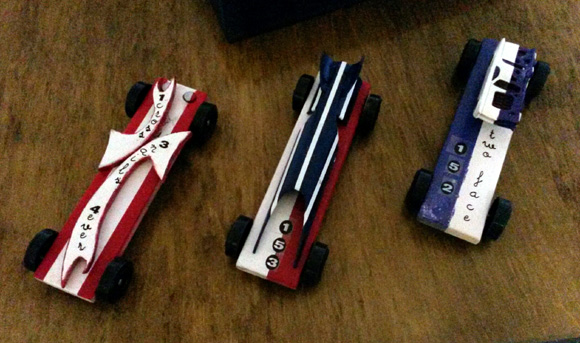
Here are our three cars from our Awana race this year. “1 Cross, 3 Nails, 4 Ever” used balsa to create the top design. “Two Face” used a Hot Wheels car for part of the weight. The middle car, “Hydro” was my first attempt at using PVC to create the cover to hide the weights. Hydro was the fastest car, but all three designs were fun and functional. My boys had a blast and are already talking about next year.
Hammer Head – Charles Mott
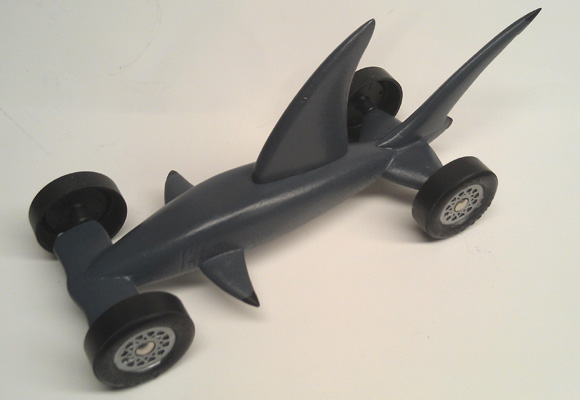
We made this little shark so small and streamlined that even after hollowing out the body and filling it with lead, it weighed only 3.5 ounces. So, we made the dorsal fin entirely out of lead. A hole was drilled and tapped on the bottom of the fin. A threaded rod was screwed into the fin, then ran through the body and secured with a nut under the car.
In my son’s first heat the sensor at the end of the track malfunctioned – TWICE! His car beat the other three easily on the first two runs, and then came in a close 2nd on the third when they finally got the sensor working. So, his overall average would have been even lower than 2.42 if his first two runs had counted. Since he still placed first after all heats were done, I didn’t complain much!
Q&A
I’m looking for a jig to allow me to easily drill axle holes at an angle. Does your device do that?
Both the Pro-Body Tool, and Pro-Body Jig drill straight holes. Generally it is best to angle axles by bending the axle. This can be done with the Pro-Axle Bender, or with the Pro-Axle Press/Pro-Rail Rider Tools.
The reason that we do not offer a jig to drill angled holes is because angled holes do not allow for alignment adjustment. Consider a car with angled holes at the back and a bent front axle for aligning the car. If the front axle is angled up, then the nose of the car will be lowered, resulting in the rear axles being toed-in. If the front axle is angled down, then the nose of the car will be raised, resulting in the rear axles being toed-out. Since there is no way to adjust the rear alignment, in either case the car will have an impediment to speed.
We just received our pinewood derby kits yesterday. Our pack rules stated “No Lathe Work”. I want to purchase the 4080 wheels (Pro-Stock Matched Speed Wheels). Will these wheels conform to the rules?
The 4080 wheels have been machined on a lathe. The only BSA wheels we have that are not machine-lathed are the 5453-Premium Matched Wheels. A machine lathe is the tool used to true wheels, which greatly increases the accuracy of the wheel.
Want Answers?
Do you have a pinewood derby-related question? If so, e-mail us your question.We answer all questions by e-mail, but not every question will appear in the Q&A section of the newsletter.
Back Issues
Are you a new subscriber, or have you missed some of the previous newsletters? Don’t miss out; all of the issues for Volume 5 through Volume 17 are posted on our web site.
Newsletter Contributions
We welcome your contributions. If you would like to contribute an article, a web site review, a speed tip, or a pinewood derby memory, please e-mail us.
Subscription Information
The Pinewood Derby Times is a free e-newsletter focused on pinewood derby racing. It is published biweekly from October through March.
If you haven’t already done so, please forward this issue to your pinewood derby friends. But please don’t subscribe your friends. Let them decide for themselves. Thanks.
If this newsletter was forwarded to you, why not subscribe to receive this newsletter. There is no cost, and your e-mail address is safe, as we never sell or share our distribution list.
To subscribe, send a blank e-mail to
[email protected]
You will receive a confirmation e-mail. Reply to the confirmation e-mail and you will start receiving the Pinewood Derby Times with the next issue.
Randy Davis, Editor, Pinewood Derby Times
E-Mail: [email protected]
(C)2018, Maximum Velocity, Inc. All rights reserved. Please do not reprint or place this newsletter on your web site without explicit permission. However, if you like this newsletter we grant permission, and encourage you to e-mail it to a friend.
Maximum Velocity disclaims any personal loss or liability caused by utilization of any information presented in this newsletter.
The Pinewood Derby Times is not specific to, and is not affiliated with the Boy Scouts of America, YMCA, Awana, or any other organization.
(R)Maximum Velocity is a registered trademark of Maximum Velocity, Inc.
(R)Pinewood Derby is a registered trademarks of the Boys Scouts of America.
(R)Awana is a registered trademark of Awana Clubs International.
All other names are trademarks of their respective owners.