– Feature Article – Shop Talk: Shaping Wood with Hand Tools
– Pinewood Derby Car Showcase
– Q&A
Shop Talk: Shaping Wood with Hand Tools
By Randy Davis
Many years ago I made a few pinewood derby cars with a rocket-shaped fuselage. Since then, I have been asked many times if the car body was shaped on a lathe, and if so, how did I deal with the wheel struts? When I tell them that the car was hand shaped from a block of wood, they think I am kidding with them. But I soon convince them that I am being serious.
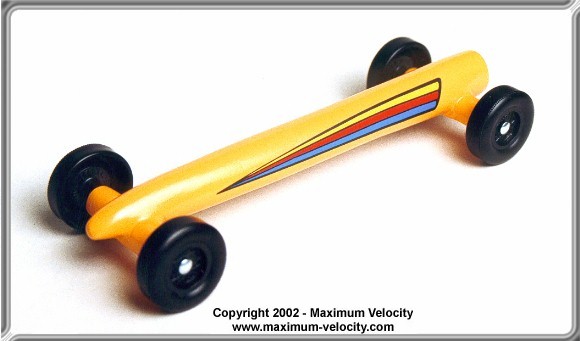 The Rocket – Extended Wheelbase
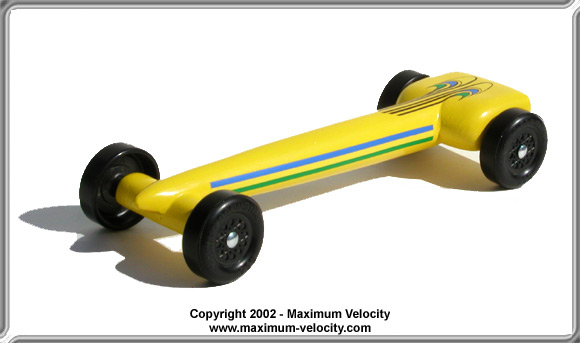 The Missile – Extended Wheelbase
Although I am not the most talented of woodworkers, I have found that with the right tools, and a good technique you can accomplish more than you would think. Oftentimes, just a little shaping (or more, as in the case of the cars above), will really set your car apart from the rest of the field. So, today we will discuss some tools and techniques for putting some pizzazz into your car.
Rough Cut
For any car, you must first cut out the rough shape with a saw. In the case of the Missile pictured above, the body is first cut out with all sides flat and square, and initial cuts are made at the front axle strut and at the rear of the car (Figure 1).
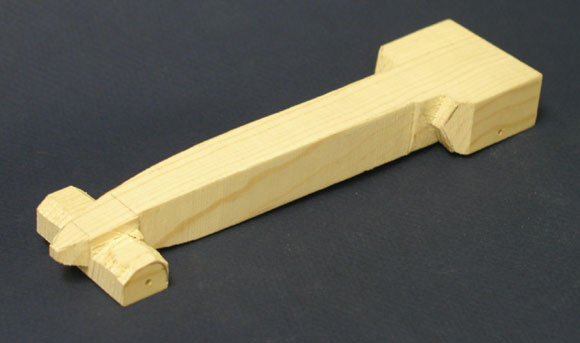 Figure 1 – Missile After Sawing
Shaping
Then the shaping begins. My preferred tool is a special wood rasp, called a “4-in-Hand” (aka, a “Shoe Rasp” or a “4-in-One” Rasp).
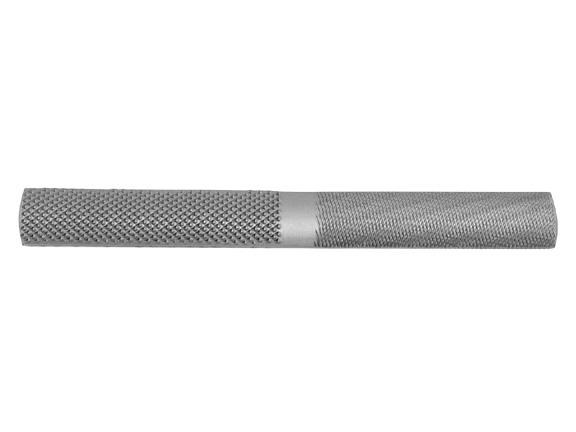 Figure 2 – 4-in-Hand Rasp
Source: www.traditionalwoodworker.com
A rasp is a rough file; and the 4-in-Hand rasp is a combination of four rasps, a coarse and fine flat rasp, and a coarse and fine curved rasp. The flat file sections of the tool are used for creating exterior curves, while the curved file sections of the tool are used for interior curves. So, with this one tool, you can perform a wide variety of shaping operations.
For the shaping operation, the wood must be immobilized with a clamp, but the wood must be accessible on all sides. One way to accomplish this is with a combination of clamps, such as is shown here.
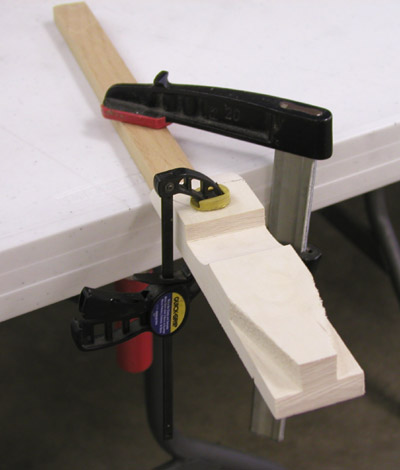 Figure 3 – Combination Clamping
For the Missile pinewood derby car, the coarse flat file is used to remove most of the excess wood, leaving behind a generally cylindrical fuselage. Then the fine flat rasp is used to finish up the shaping. The result is shown in Figure 4. The red color is Bondo, a car body filler which was used to fill a few spots where a saw cut was too deep.
 Figure 4 – Missile After Rasp Work
Sanding
After the rasp work, 60 grit sandpaper is applied to finish the shaping. Finish sanding is accomplished with 120 and 220 grit sandpaper.
Sometimes, detail needs to be carved into the car body. On the Missile car shown above, the grooved transition from the fuselage to the wider back must be created. For this type of job, I use either a small flat or triangular-shaped file. The edge of the file cuts into the wood allowing you to create the desired shape. Just be careful as it will cut into the wood very easily and quickly. Figure 5 shows the sanded version. Additional Bondo was used in a few spots.
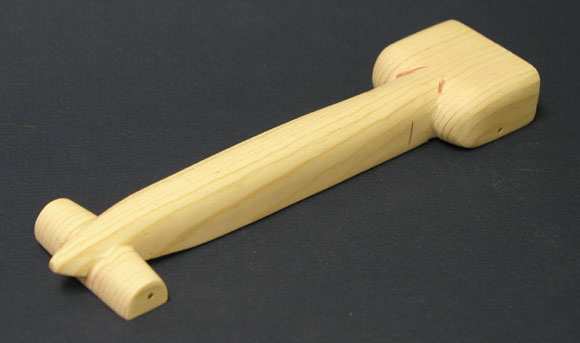 Figure 5 – Missile Ready for Painting
A Few Tips
In building these cars, I learned the hard way that shaping the wheel struts is a bit tricky, as the wheel struts cannot take too much force (or they will break). To minimize the risk of breaking a strut, increase the strength by inserting a spare axle into each axle slot/hole. Once shaping is complete, pull the axles out with a pair of pliers (gently twist and pull).
By the way, if you are interested in making the Rocket or Missile car, complete plans are available on our web site in “Advanced Car Plans” and “Advanced Car Plans 2“.
Pinewood Derby Car Showcase
On several occasions, I have showcased cars from Andy Holzer. Here are his amazing creations for 2011.
Turbine Car
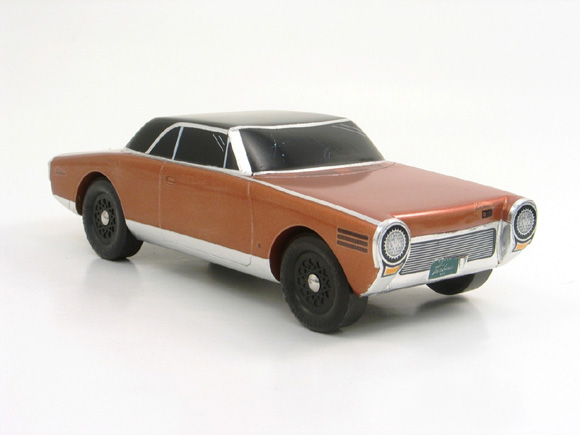
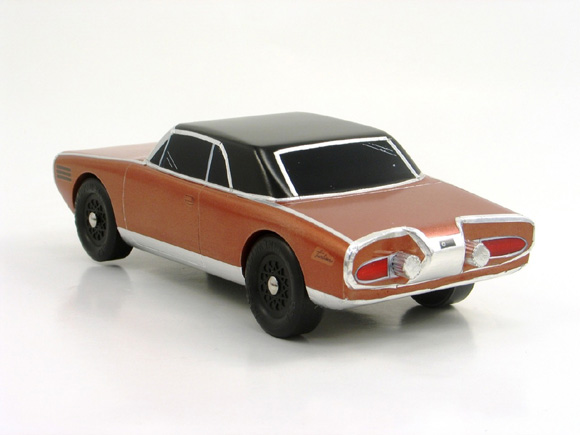
For my 2011 car I chose the Chrysler Turbine. Back in 2001 I pulled up to a stoplight. Another car pulled up beside me, and to my surprise it was a Chrysler Turbine car. I knew about the Turbine car as my dad had a model of that car in his display case when I was growing up. I rolled down the window to listen to the car, figuring the motor had been replaced, or the car was some sort of replica. But to my surprise the car made the turbine whistle as it drove away.
The Turbine car came in second in the pack open race and second in another race put on by a local motorcycle shop.
DeLorean DMC-12
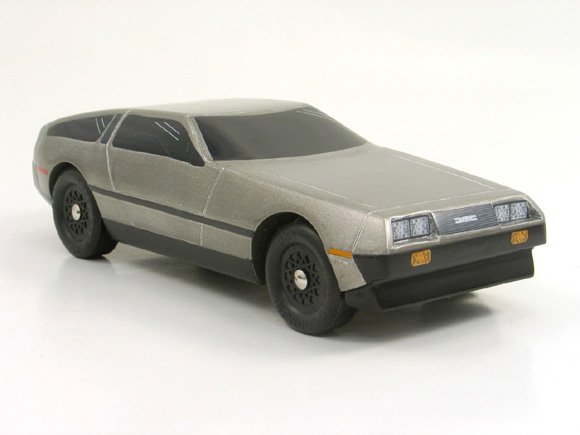
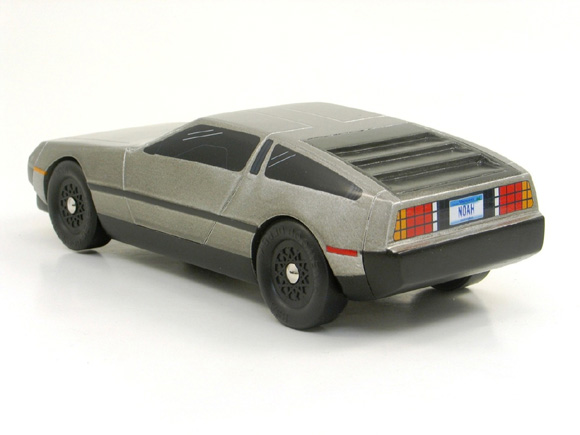
For my son’s 2011 car, Noah decided to build the DeLorean DMC-12. Noah was in Boy Scouts, so he had to race in the open class with his old pack. Noah decided he wanted to build the stock DeLorean, not the time travel version. He used a Hot Wheels DeLorean as his guide to draw his plan. The DeLorean came in 4th place in the pack open race.
1959 Cadillac


On Christmas Eve as we were leaving my sister’s house, my nine year old niece came up and asked, “Can you help me build my pinewood car?” (At this point it was Christmas for me!) Of course I said yes. I asked her if she had the kit and the rules. She said she was going to get the kit the next time she went to her Wednesday church class. I told her mother we needed the kit (assuming it was an Awana kit), the rules, and if she could find out what kind of track the race was going to be run on.
We brought my niece to some hobby stores to look at cars to build. She liked a lot of cars from a ’63 Thunderbird to a 2002 Camaro, but in the end she chose a 1959 Cadillac. I told her the ’59 Cadillac could have come from the factory in a pink color. My niece told me she hates pink; she wanted the car to be black with a white top.
When she received the kit she called me and said the car needed to be completed the next Wednesday for the weigh-in. This left us only seven days to complete her car. We arranged for her to stay over for the weekend and also for the school holiday. When she arrived she drew up her plans for the car using some pictures and a die cast model of a ’59 Cadillac:
The kit she had received was not an Awana kit, but a Maximum Velocity kit. The MV kit has excellent wheels and axles included with the kit and of course a very nice pine block (I would recommend this kit to anyone having a derby that does not require a specific kit, very good parts). Her block had been “pre-cut” by someone at the church so all we needed to do was finish it (yea right).
The rules said we needed to use the block included with the kit so we glued the precut block to another MV block and trimmed all of the precut from the block.
At her Awana race she placed 1st for speed and 1st for design.
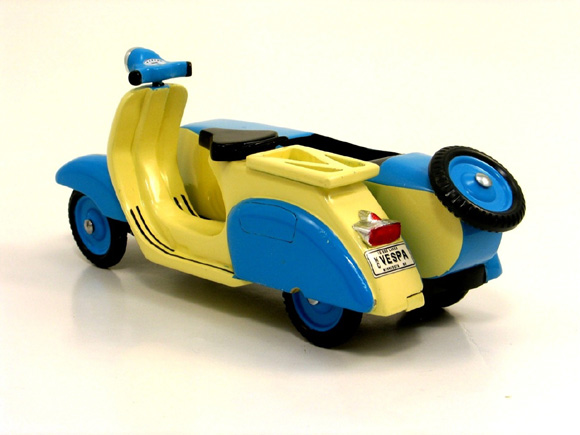
Vespa Scooter
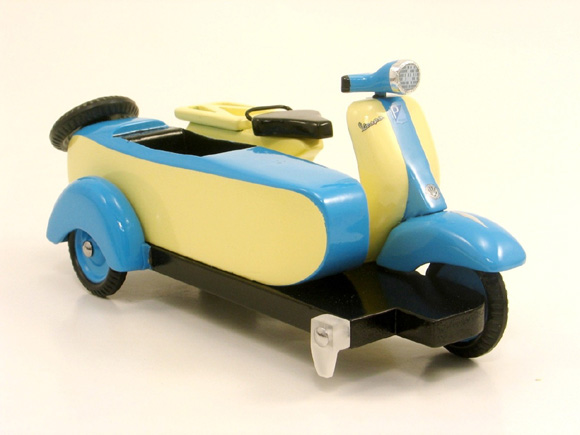
In January 2010, just after the weekend of my son’s last official Cub Scout pinewood derby race, a friend sent me a link to a race at a local motorcycle shop. It turns out the race was the same day as our pack pinewood derby so it had already passed. I thought to myself this would be a cool event. I found some online pictures of the event and I was hooked. Fast forward to January 2011 and the event was happening again.
Being that the derby was sponsored by the motorcycle shop I decided to see if I could build some sort of motorcycle car. I had done some drawings trying to make a motorcycle with a sidecar work; to keep the plans in scale proved to be difficult. Motorcycles have large wheels and when trying to stretch to the pinewood dimensions I would have an extremely short car (or bike).
I was having trouble making the Vespa narrow enough to fit over the wheels (1/2 inch wide centered). I decided I could just not make this plan work. One day I was down in the shop and I spotted some old PWD wheels (pre 1980 narrow wheels). I figured I possibly could make these wheels work with the Vespa. So I modified the plans to use the old wheels:
The rear axles are drilled at 2.5 degrees camber. The front axle was bent 2.5 degrees. I ran the Vespa down the test board and adjusted the drift. Now it was time to run down the 20 foot BestTrack. These were nervous times for me as I was not sure what would happen on its maiden run. It is a very tall pinewood vehicle; I made sure I had pictures of the Vespa taken from all angles (in case of a disastrous crash).
My son Noah was at the lever ready to release the Vespa, and I was at the stop section. On its first run it went to the rail and down the incline, just after the curve it went to the left and fell from the track. Turns out the wheel replacement peg I made was too short (probably a good thing to test before the first run). The Vespa was OK with no damage. I made a longer peg and tested it before the second run.
The second run it went to the rail and down the track without any trouble, I just wanted the Vespa to be able to finish the races without taking out any innocent cars in the process. I was off to the races.
The Vespa was indeed fast, it took 1st place in the stock class. The only car it lost to was the Turbine Car (once).
If you interested in Andy’s technique for building these detailed cars, check out his article in Volume 9, Issue 9.
Q&A
If I use the Pro-Body Tool II are the axles just nailed into the holes or is there a special tool to get the axles in the holes?
The axles are press fit. I recommend taking a spare axle and pressing it into an axle hole. Start with your thumb, then carefully press the axle head down onto a firm work surface. Carefully twist and remove the axle with a pair of pliers, then proceed to the next hole. When painting, keep paint out of the hole by inserting round toothpicks. If you do this, when you are ready to install the wheels/axles, you should be able to press them in with minimal effort.
Do you have a chart or recommendations on the best kind of weight to use in a car and the best possible locations to place the weights?
Regardless of the type of weight, in general you want the final balance point of the car to be about one inch in front of the rear axles. To make this happen, a general guideline is to place 1/3 of the added weight behind the rear axle, 1/3 on top of the rear axle, and 1/3 in front of the rear axle. This will vary depending on the style of the car (for thin cars, you don’t put any on top of the rear axle, but divide that portion of the weight around the rear axle.
You will find that trying to achieve this desired balance point with low-density weights (zinc or steel) is more challenging than if you use high-density weights (lead or tungsten).
If you use a tungsten canopy or round, then the bulk of the weight will be located just ahead of the rear axle. The trim weight can then be placed as needed to get the desired balance point. Generally these larger weights help with performance as they focus most of the weight in one location, instead of spreading it out on the car.
Want Answers?
Do you have a pinewood derby-related question? If so, e-mail us your question.We answer all questions by e-mail, but not every question will appear in the Q&A section of the newsletter.
Back Issues
Are you a new subscriber, or have you missed some of the previous newsletters? Don’t miss out; all of the issues for Volume 5 through Volume 17 are posted on our web site.
Newsletter Contributions
We welcome your contributions. If you would like to contribute an article, a web site review, a speed tip, or a pinewood derby memory, please e-mail us.
Subscription Information
The Pinewood Derby Times is a free e-newsletter focused on pinewood derby racing. It is published biweekly from October through March.
If you haven’t already done so, please forward this issue to your pinewood derby friends. But please don’t subscribe your friends. Let them decide for themselves. Thanks.
If this newsletter was forwarded to you, why not subscribe to receive this newsletter. There is no cost, and your e-mail address is safe, as we never sell or share our distribution list.
To subscribe, send a blank e-mail to
[email protected]
You will receive a confirmation e-mail. Reply to the confirmation e-mail and you will start receiving the Pinewood Derby Times with the next issue.
Randy Davis, Editor, Pinewood Derby Times
E-Mail: [email protected]
(C)2018, Maximum Velocity, Inc. All rights reserved. Please do not reprint or place this newsletter on your web site without explicit permission. However, if you like this newsletter we grant permission, and encourage you to e-mail it to a friend.
Maximum Velocity disclaims any personal loss or liability caused by utilization of any information presented in this newsletter.
The Pinewood Derby Times is not specific to, and is not affiliated with the Boy Scouts of America, YMCA, Awana, or any other organization.
(R)Maximum Velocity is a registered trademark of Maximum Velocity, Inc.
(R)Pinewood Derby is a registered trademarks of the Boys Scouts of America.
(R)Awana is a registered trademark of Awana Clubs International.
All other names are trademarks of their respective owners.