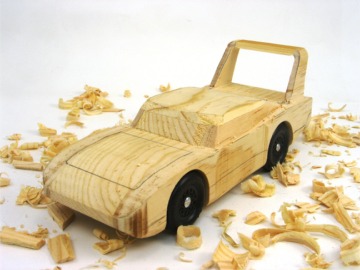
– Feature Article – Creating “The King”
– Pinewood Derby Car Showcase
– Q&A
Creating “The King”
by Andy Holzer
When my son Noah was given his first pinewood derby car kit in 2004-2005, we began looking at pictures on the Internet for ideas. He asked “Could we build it to look like a real car?” Being a car guy myself, I thought that would be a great idea. I had never thought about pinewood derby cars having fenders. The ones I had built with my dad (in the early 1970s) were the open wheel, vintage race car style.
So, since that first pinewood derby in 2005 we have always built full fendered cars. Here is how we go about making the cars.
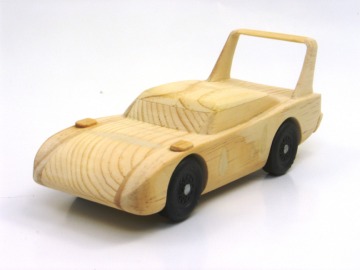
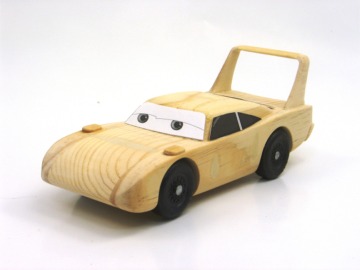
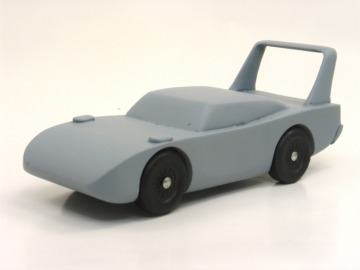
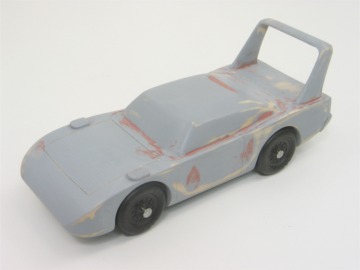
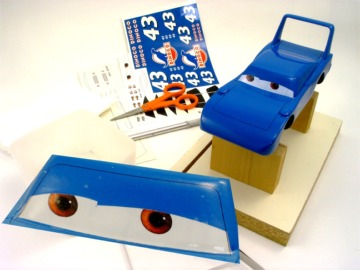
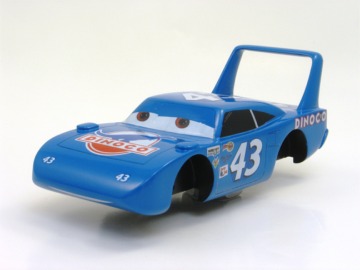
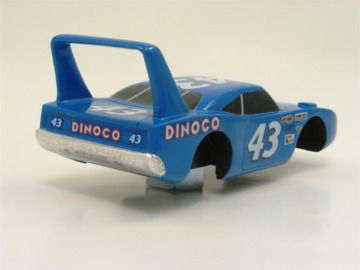
The car we have decided to show being built is “The King”. This car, also known as “Strip Weathers”, is one of the characters in the 2006 Disney / Pixar film Cars. The car character is based on the Richard Petty 1970 Plymouth Superbird (The King was also voiced by Richard Petty). The King’s main sponsor is Dinoco (which I have always assumed was a fuel provider – the logo is similar to the Sinclair logo, and the name sounds like Texaco). The King is Dinoco’s “Golden Boy”, having won seven Piston Cups, and is working towards another Piston Cup win in the movie. After his final run for the Piston Cup he plans to retire.
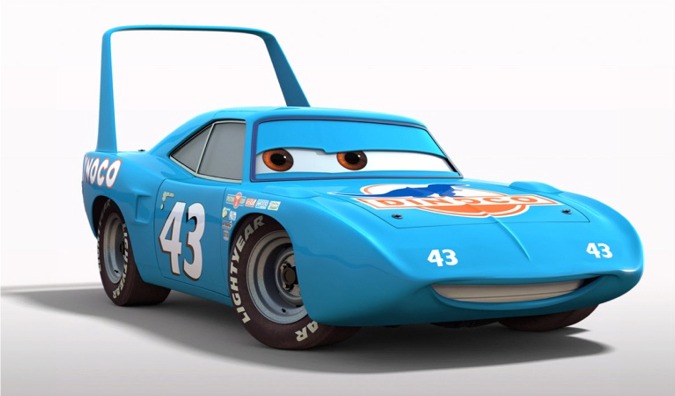
1 – Strip Weathers, “The King” from the 2006 Disney / Pixar film Cars
The build we will be showing is using the official BSA Pinewood Derby Kit. The build could also be done using a Pinecar, Awana, CSB or any other pinewood type car. If one of these alternate kits is used, the wheelbase might have to be altered.
Safety is at all times paramount when it comes to using sharp tools or power tools, and a parent’s direction is absolutely expected. However, if a child is indeed capable of accomplishing a particular construction or design step, he should be encouraged to do so.
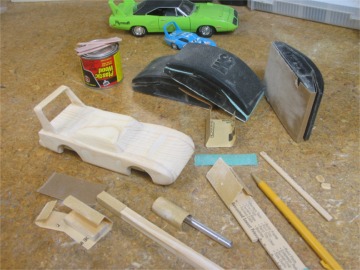
The methods I describe are the way we accomplished the car build. Others may have different ideas of how this should (or could) be done. We do a lot of carving using a wood chisel and hobby knife. You may decide this would be better done using a rotary tool to remove the wood. We personally do not use many power tools for shaping, as I feel they can remove a lot of material too quickly. You will need to decide if you are comfortable, before you start, using the methods we use.
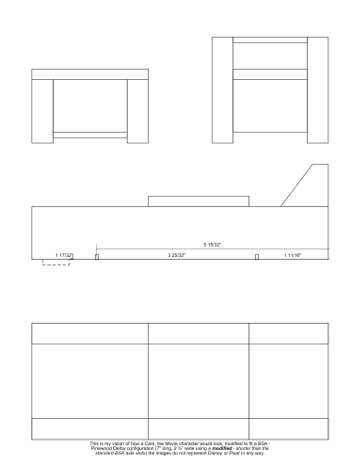
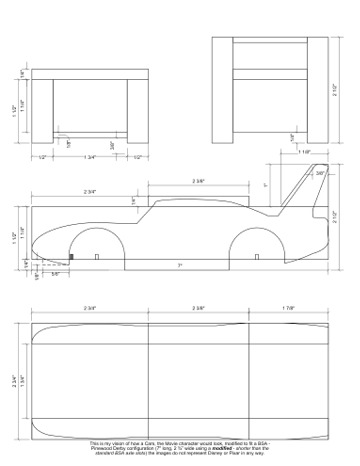
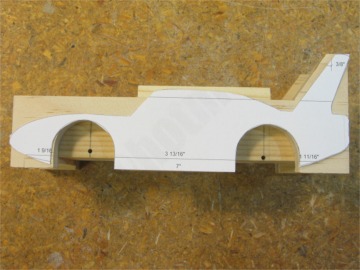
I started by drawing out the features that I wanted to incorporate into the car. My drawings are done on a computer using Microsoft Visio, but you can use other drawing tools, or draw the car by hand on graph paper. You can also shrink pictures found on the Internet to make them match pinewood dimensions, and then trace them onto graph paper. Whichever method you use, draw the proposed car from the front, rear, one side and the top. Here is a stylized view of the scale drawing of the King:
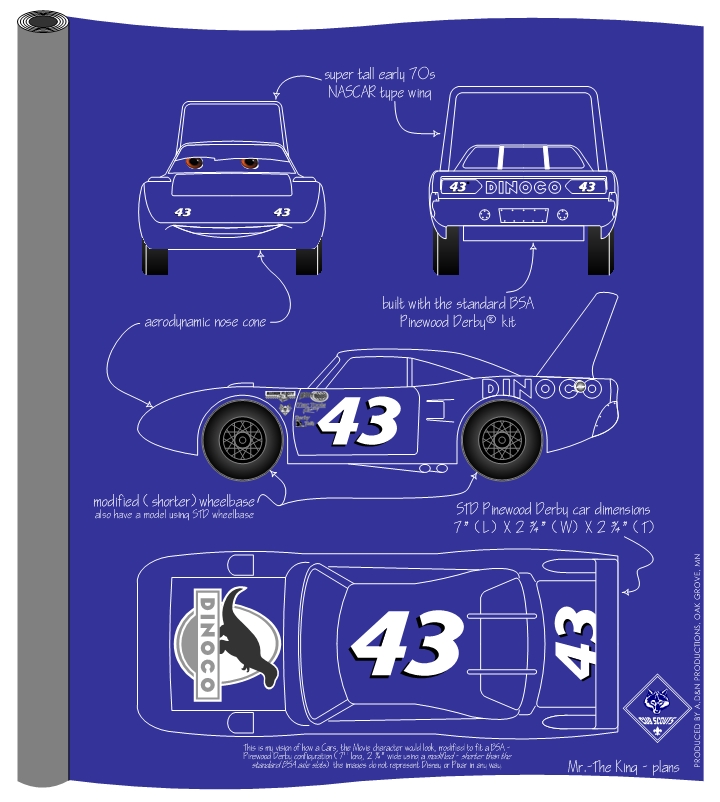
2 – Stylized scale 1-to-1 drawing of plan for “The King” car
These plans incorporate layers. With Visio, you can turn on or off the layers that you do not need to see or print. In the building process I show what layers were printed to get the plans to show only the information that was needed at that specific time.
A note about rules: Please check your local rules before implementing any of the modifications that are shown in this document (e.g., not using the provided axle slots). If you are unsure if a modification is within your rules, or need rules clarification, please check with your race official. No one wants to spend hours building a car that cannot race. You don’t want to be disqualified or have to make modifications at race check in. Things we feel you might need to check your rules for will be denoted by this symbol – ₪
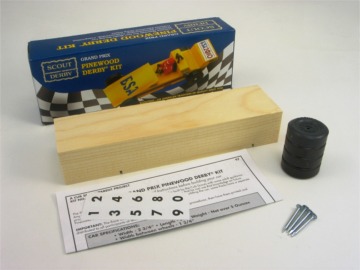
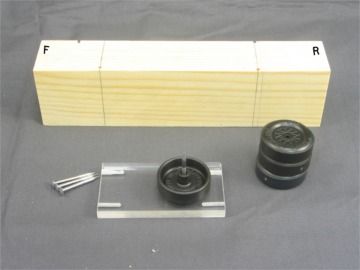
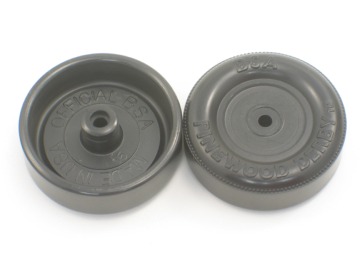
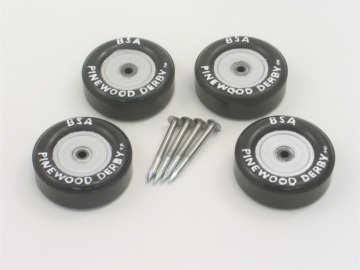
3-The contents of the BSA Pinewood Derby® Kit (PN 17006). The wood block – 1 3/4″ (W) X 7″ (L) X 1 1/4″ (H), (4) nail type axles, (4) BSA wheels, instructions and race numbers. With the method we use the four long sides of the block should be checked to see if they are square. If your rules state you need to use the provided axle slots, you should also check these axle slots for square.
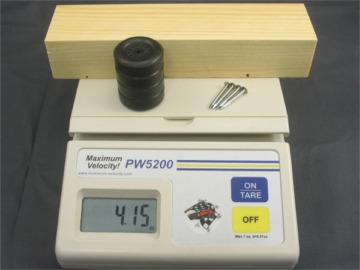
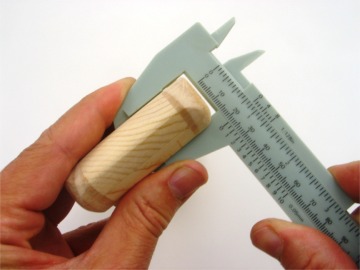
4-This is the weight of the block and wheels that came in our particular kit when we started the car. Block weights will vary considerably. We like to start with the lightest block we can find, so each year we buy a couple of extra kits so that we can pick the best parts to go on our cars.
5-Here is the plan with the block layer and the dimensions wheelbase layer turned on. We will use this to mark the axle locations for drilling the axle holes. (₪ check your rules to see if you need to use the provided slots)

6-We always turn the block over as we do not need to use the provided axle slots. The new wheelbase is marked on the block at 1 11/16″ (rear) and 5 15/32″ (front) (we always make all measurements from the rear of the block). Mark the front and rear of the block with a permanent marker.
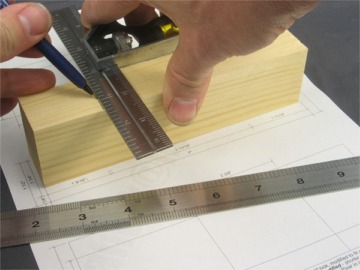
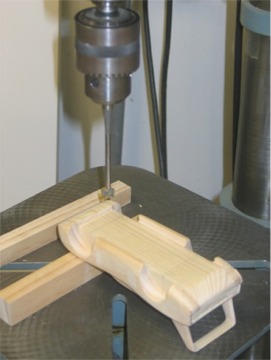
7-Using a square, draw lines on the side, bottom, and up the other side of block. These lines will be used with the Pro Body tool.
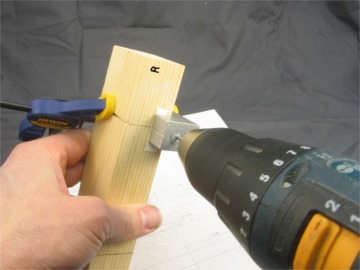
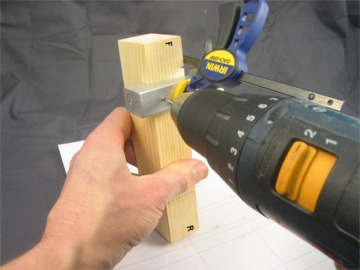
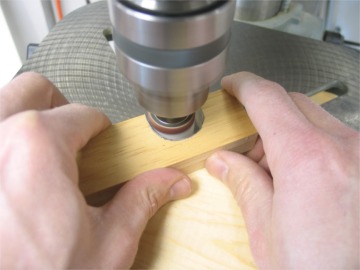
8-Line up the Pro Body tool on the lines on both sides of the block, and attach the Pro Body tool with a clamp. The rear two axle locations are drilled using the Pro Body tool. Then the tool is used to drill the right-front axle hole.
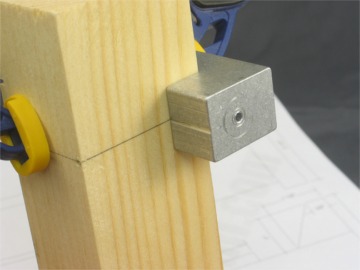
9-The Pro Body tool is re-positioned to drill a raised hole in the left front position. The tool is turned and lined up with the line on the bottom of the block. (₪ check your rules).
10-The hole is then drilled to get the raised wheel axle hole approximately 1/16″ higher than the other three wheels.
11-We then test the wheels (we usually have multiple kits purchased) on a set of semi prepared axles (axles that have been filed, to remove the burrs, and then polished with 400 and 600 grit sandpaper to make them smooth). Place a wheel on the axle and spin the wheel, looking for any side to side wobble. Get rid of any wheels that have a lot of wobble. Pick out the best four wheels for the car. Then mount the wheels onto the car. We use an insertion tool that is just a scrap of Plexiglas (you could also use a scrap of wood) with a 3/16″ dimple drilled into it. Place a wheel on an axle…
12-then press the block onto the axle. Press until the wood block contacts the wheel. Repeat for the other wheels that will contact the track.
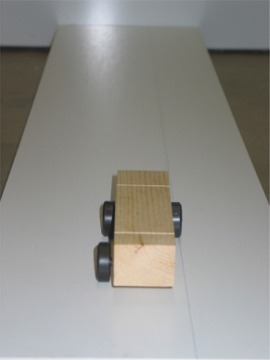
13-Ready for testing on the test board. The last wheel is the raised wheel so it does not need to be positioned for testing. The test board is a 4′ melamine shelf with one end inclined on a 1½” board. Notice the line drawn down the length of the board; the car is lined up with the line with the wheels pulled away from the body. The car is then released; it should follow the straight line. If it veers any direction, the trouble should be repaired or a new block should be used. We do all this testing before starting on the car to make sure the car, when completed, will race at least as good as it looks.
14-Here is the plan with the wood block layer, the dimensions layer, and the wood block cut layer turned on. We will use this first to draw the wheel wells onto the 7″ X 2 1/2″ X 3/4″ boards we will use for the fenders. We usually print this on some light card stock to help the durability of the templates.
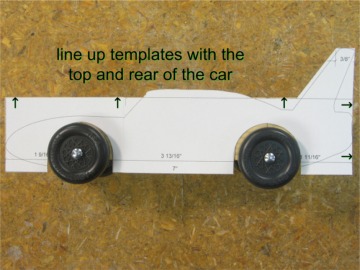
15-Cut out the side template and lay the block on its side with the wheels on, making sure the front-rear orientation is correct. Place the template on the side of the block, lining up the top and the rear of the template, and check if the wheel wells line up. If modifications need to be made you can draw the modifications on the template (on this side the front wheel needs to be cut up higher to accommodate the raised wheel). You will need to test the template on both the left and the right sides.
16-Trim the top of the two wood blocks that will be used for the fenders.

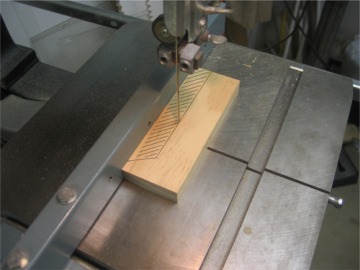
17-Draw the wheel well cutouts on the block (left side shown). Then flip the template over and draw the other side onto the R side of the block. Saw the wheel wells out of the blocks (L & R).
18-Re-check wheel clearance, you will need to position yourself just over each wheel to see how it lines up. Always make sure to line up the top and rear of the sides.
19-Clean up any issues with a 1″ drum sander attached to drill. We purchased the drum and sanding sleeve for under $7 (you could also use a drum sander attached to a rotary tool, but the larger diameter seems to work better). Be sure the block is parallel to the drum sander.
20-Re-check wheel clearance (should look even around both of the wheels).
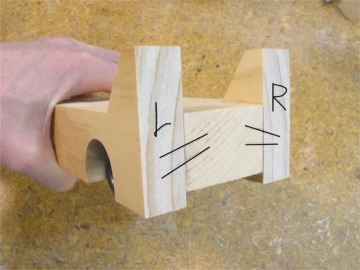
21-Make sure to label L & R sides and correct orientation to the main block to make sure you attach the correct side block to the main block.
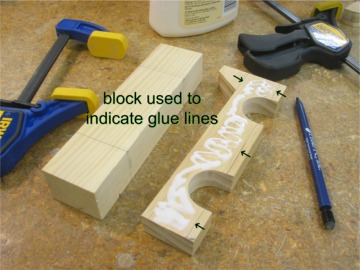
22-Use the block to mark where you do not need to apply glue.
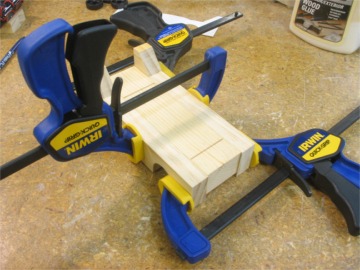
23-Glue and line up one side block first. Line up the rear and the top of the blocks (we turn the car upside down to line up and clamp). Then glue the other side to the main block, and the 1/4″ piece onto the top.24-Completed block glue up. The block at this point is still over 7 oz.
24-Completed block glue up. The block at this point is still over 7 oz.
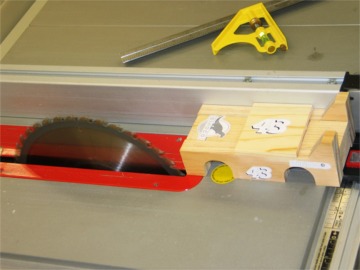
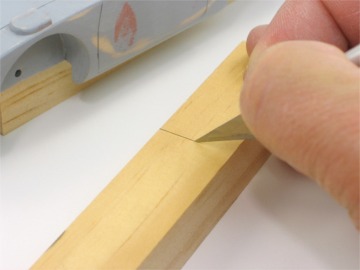
25-Move the block to the table saw and set the fence to 2 31/32″ (make sure of your fence setting by checking with a ruler) and cut off the first side. Then reset the fence to 2 11/16″ and trim the other side of the block-see figure 26 (this leaves 1/16″ for primer and paint).
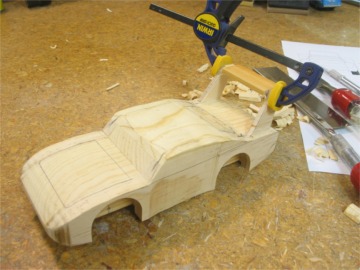
![]()
26-To trim for wheel clearance under the block, set the block over the blade, raise the blade until just before it contacts the block, set the fence for 3/8″ and run the block through to trim both sides. Remove 3/16″ to 1/8″ to make sure the wheels (not the car body) rubs the guide rail.
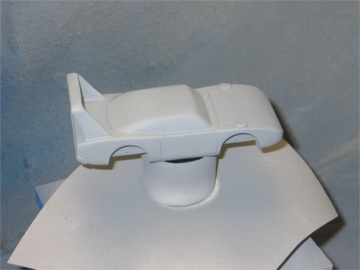
![]()
27-With the wheels on and wheel to body gap set at approximately 1/32″ (width of a credit card) set a straight edge across the wheels and check that the body will not rub the guide rail. You can now glue the front filler block (1/8″ x 5/8″ x width across the block) – see plan.
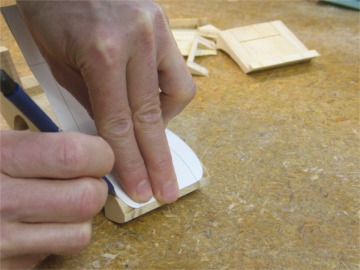
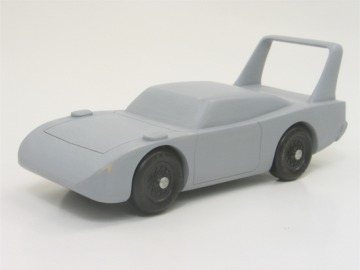
28-Trimmed block. The block is still over 7 ounces.
29-Trim the template that was used to mark the wheel wells (figures 15 & 17) and place it on the trimmed block to mark the body cut out.
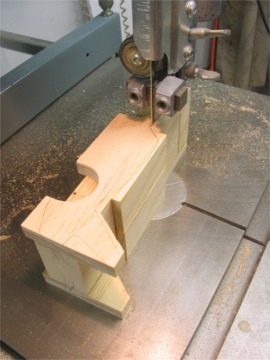
30-We use a band saw to cut out the body, but it could also be accomplished using a coping saw (you would need to mark both sides of the block). Most jigsaws cannot cut 2 3/4″ so a jigsaw would not work in this step.
31-Using the template to mark the vertical cuts to be made.
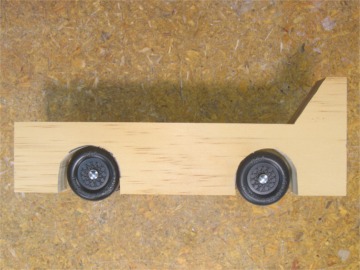
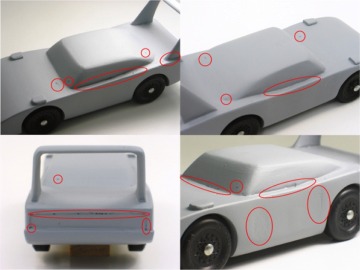
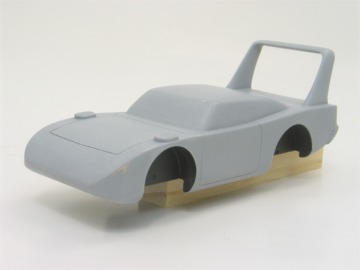
32-Saw cuts complete – weight is 5.91 ounces.
33-Here is the plan with the body layer, the wheels back layer and the wood block layer turned on.
34-Use the plan to draw the detail still needing to be removed, the wing struts, the side windows, the windshield curve, and the back window curve.
![]()
35-We removed the excess wood from between the wing struts using a wood chisel and knife.
36-Then used a jigsaw to trim the wing struts (a coping saw could also be used).
37-Finally, use a hobby saw to clean up what the jigsaw could not cut, and remove the excess wood with a wood chisel.
38-Measure between the struts and cut a piece of 1/8″ pine to fill in the missing part of the rear wing (it should be 1 3/4″). Glue in the wing filler piece.
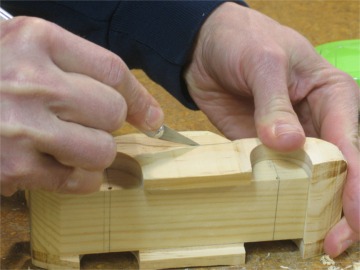
39-Now we move to carving out the car. Score the lines that you do not want to carve past.
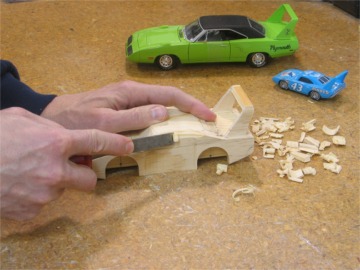
40-Use a wood chisel to remove small amounts of wood, and to round any corner that needs to be rounded.
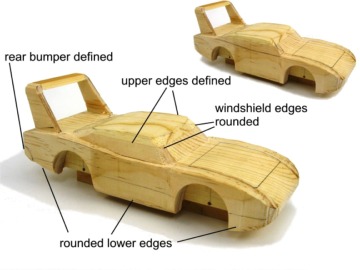
41-During carving, the car went from looking like the upper picture to the lower picture with some detail added.
42-Rough carved, the weight is now 5.37 oz.

43-For sanding, we use a paint stick with sandpaper glued to it, a rubber sanding block, sandpaper wrapped around a dowel, and a block of wood wrapped in sandpaper. For rough sanding we use 80 grit sandpaper. To test if you have defects sanded out, rub your finger over an area. If you feel anything, keep sanding (if you can feel it you will see it after painting). Make sure to use a sanding block or some sort of sandpaper backing, or you will sand waves into the wood.

44-Front fender scoop – cut a 3/32″ thick piece out of a scrap piece of pine. Cut the front fender scoops using the template. Smooth the sides and front of the scoops using a sanding block. Test the fit on the body. We will not glue these down until after fine sanding the body (otherwise they may get in the way of sanding).
45-Here are some of the tools used in finish-sanding the car body. Some tools just have to be made when you come to certain parts that need sanding. After finish-sanding, glue the front fender scoops to the car.
46-Finish sanded, the weight is now 5.28 oz.
47-When the sanding is finished, the car must be looked at from all angles to insure symmetry (mostly side to side). If the symmetry is not true it will need to be fixed.
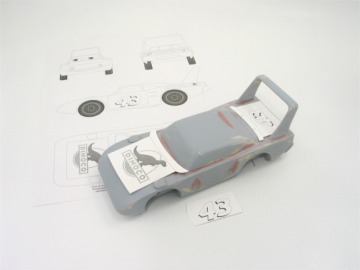
48-Before priming, check any decals you are going to use to make sure they fit in the spots they are meant for.
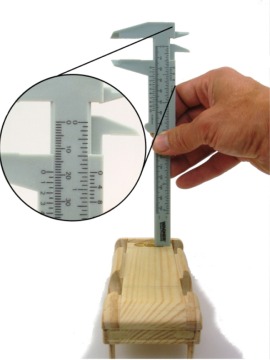
49-We like to get the block to approximately 4.8 oz. before applying paint. We use calipers to measure the block to determine how much wood we can remove without going through (the thickness at the front of the hood is approximately 7/8″).
50-The drill press is setup with a 1/2″ bit, because there is only about 3/4″ from the axle centerline to the front block on this model. A hand drill could also be used to accomplish this step. We usually remove weight from the front of the car to give rear weight bias.
51-Drill slowly and use the calipers to check progress. The holes were drilled 3/4″ deep, which means there is approximately 1/8″ between the bottom of the hole and the top of the hood.

52-Hole after drilling – we use a rotary tool to clean up the hole.

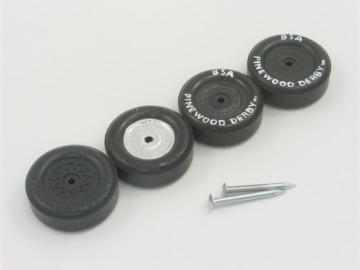
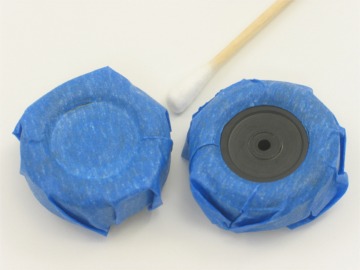
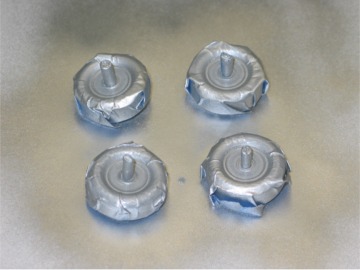
53-The hole we drilled was only good for relieving the body of approximately .09 oz. We needed to drill additional weight relieving holes. This is how much we had to remove to get the weight down to 4.8 oz. We drill and weigh to see how much more we need to remove (behind the front axle we used a 3/4″ bit). At this point the body, with wheels was 4.80 oz.
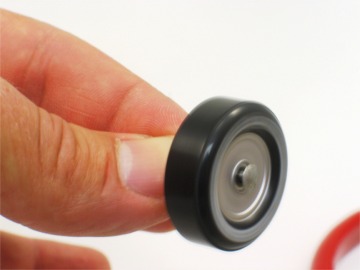
54-Body primed with sandable primer. Our paint booth is a large box with the side and top removed to contain the paint, we use an old sheet draped over the box to catch the over spray. We built a turntable out of some scrap wood, and a lazy susan bearing, to turn the car (see figure 63).
55-After priming you will notice areas that need more attention.
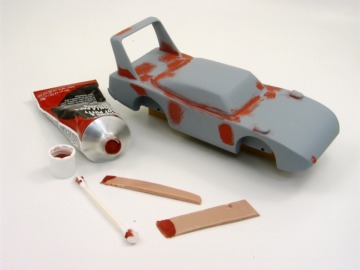
56-We fill small imperfections with spot putty (purchased from Wal-Mart, in the automotive section, for under $4). You could also use wood filler for this but it does not sand as easily. To apply the spot putty, we cut down the plastic applicators, and use Q-tips to smooth tight areas.
57-The primer is sanded with 220 grit sandpaper and then 400 grit sandpaper (the primer almost gets shiny with the 400 grit sanding.
58-At this point we make the cuts into the body to highlight the doors, hood and trunk lid. We cut out the patterns from the plans and place on to the car.
59-We then use a pencil to draw the lines to be cut on the body (be sure the patterns are placed on the body straight).
60-We make sure to use a new #11 X-Acto blade to make the door line cuts, practice on a scrap piece of wood (you may need to V out the cut a little to get a decent line in the primer).

61-Use a straight edge along all of the straight lines, then cut the curved lines, do all of the rounded corners last (sometimes tight corners are cut with multiple jab cuts to make the corner). Any mistakes can be filled with spot putty and sanded smooth.
62-The door lines look good, although the lines are not real noticeable right now with the car in multiple colors. Notice the mistake cut/fix on the lower edge of hood.
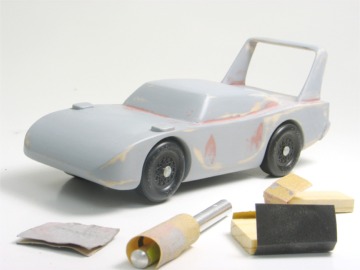
63-Back to the paint booth for another coat of primer. The primer is then sanded smooth using 600 grit sandpaper (the bodywork should be flawless at this point, if not add some more spot putty and sand out again, then re-prime).
64-Here is the car, finally ready for paint. Now the door lines show really well. The car is all one color so the paint should cover evenly. Weight 4.88 oz.
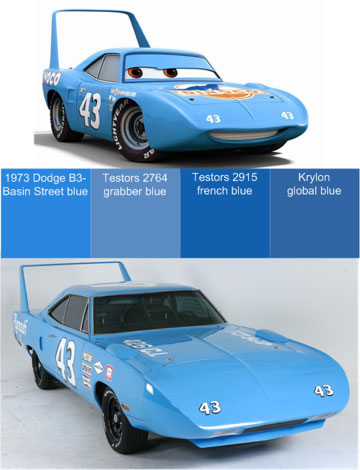
In trying to find paint for The King, I have found many opinions on what Petty blue really is. If you search the Internet for “Petty blue paint” you can find many different ideas of what the color should be:When asked directly about the “Petty Blue” color, Richard related, years later, that indeed, it had been a fluke. Late in the 1959 season, after having to rebuild one of the ’59 Plymouth Fury’s, Maurice told Richard that they didn’t have enough white paint for the painting of the entire car. Being brought up to waste nothing, Richard found some dark blue paint, but not in a sufficient amount to paint the whole car. Richard said that he looked at Maurice and Maurice looked at him, and they just dumped the two paints into one tub, and then proceeded to paint the Plymouth in the color that came out. When they got done, they were impressed with the hue. Lee came back from an out of town race, and marveled at how that color set the car off. Almost electric is what he said. Of course, Richard and Maurice had to scramble to remember the right mix. Once they did, the formula became their secret, even to the point of being patented by a paint company as Petty Blue.
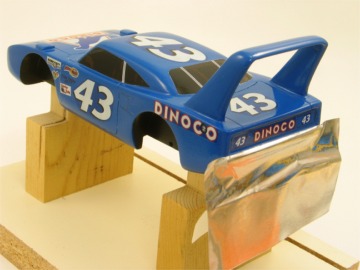
I looked around and purchased the Testors French Blue and I also found Krylon, Global blue. After test painting some paint sticks I liked the Testors paint better, so I colored the decal background to match up to the Testors French blue.
66- Masked for painting the bottom semi-gloss black. When painting always use products from the same manufacturer. On this project we are using Testors products, (1249 flat black, 2915 French blue and 1841 clear gloss) in 3 oz. spray cans. If you do not use paint from the same manufacturer you will have adhesion problems.
67-Bottom painting complete. If additional primer was applied, door lines may need to be cleaned up with an X-Acto knife before painting the body color. At this point the black needs to be masked for painting the body color.
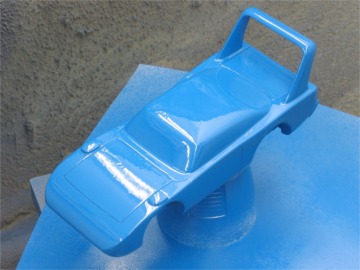
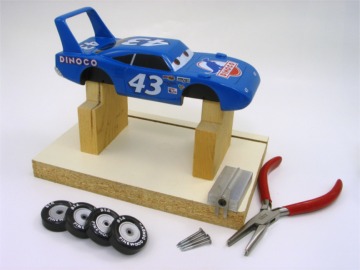
68-Car in the paint both, painted with Testors 2915 French blue.
69-While the paint was curing we decided to get the wheels and axles ready for installation. For the King we wanted to have a different wheel look. We experimented with different ways to accomplish this. I wanted to get rid of the spokes so I experimented with removing them using the drill press as a lathe, but I could not reproduce the results consistently. We also liked the way the wheels looked with the raised lettering on the tires painted.
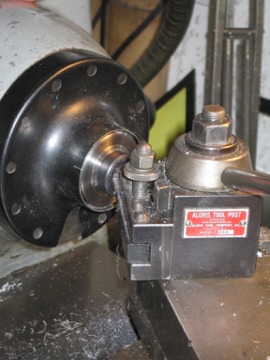
70-Our wheels were already prepared using DerbyWorx tools. The Pro-Wheel Shaver (to make them round) and the Pro Wheel Mandrel (to finish the tread surface). The hubs were coned, using the Pro Hub Tool and the outer hub trued using the Pro Outer Hub Shaver. Then the wheel bore was polished. A good friend of mine helped me use his lathe to remove the spokes from the wheels (₪ check your rules).
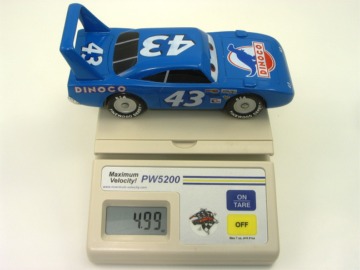
71-Coned hubs and wheel spokes removed from wheels.
72-To mask the wheels for painting, we used a Q-tip (and a finger) to push down the tape to the center of the wheel, then turned the Q-tip around and use the stick to get the tape pressed tightly to the wheel. Then we use an X-Acto knife to trim away the tape and pressed the tape down again around the wheel edge.
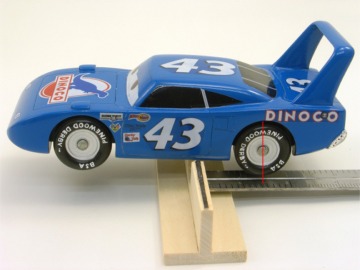
73-Wheels painted with Testors 1246 metallic silver. I used Q-tip shafts with masking tape wrapped around to keep the paint out of the newly polished wheel bores.
74-To paint the wheel letters we use a round tooth pick pressed into the paint jar top (notice not much paint on the tooth pick edge) and stipple it onto the tire letters. Every time I do this I have to practice on a junk wheel to get how much paint needs to be applied. If you get too much paint on the wheel the paint can easily be removed by using mineral spirits on a small rag to wipe off paint and start over.
75-Axles were filed, smoothed and polished down to 2000 grit sandpaper, then final polished with mag wheel polish. Wheels and axles complete and ready for installation on the car.
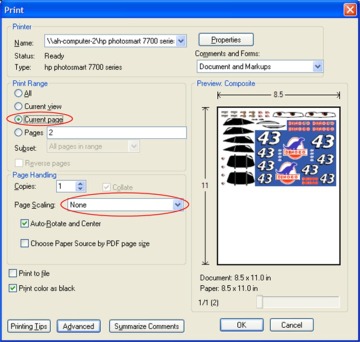
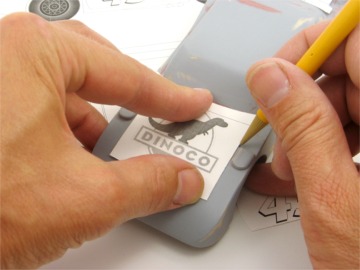
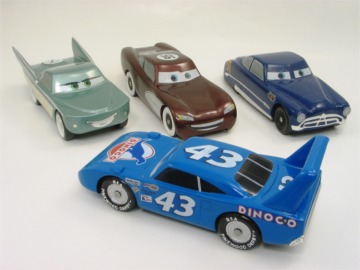
76-Decals can be drawn in any drawing program, such as Microsoft Paint (a component of Microsoft Windows). I personally use Microsoft Visio to draw the decals I use on our cars. The decals are printed on special decal paper using an ink jet printer. The paper I use is from Micro-Mark. Ink jet and laser printers cannot print white so they make both clear and white backgrounds in decal paper (Micro-Mark 82272 clear decal paper & 82277 white decal paper) so one needs to figure out if one can make decals using just the clear decal paper (would work better if using on a light colored background) or if one needs the white decal paper too. For Mr. the King we have both clear and white decals; there is one half sheet of decals with the white background and a quarter sheet of clear decals. I always make two of every decal, so if one gets messed up during application you already have a spare. Load the correct paper into your ink jet printer and open up Acrobat Reader to the page you want to print. Press the print button (or [CTRL]-P) and this dialog box will come up. Make sure the Current page is selected and the Page Scaling is set to None. Then press the Properties button.
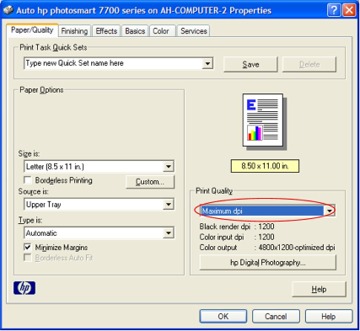
77-Set the Print Quality to Maximum DPI and press OK, then press OK to print. My printer gives me the following warning:
This setting will temporarily use a large amount of hard disk space (400 MB or more) and will print slower, Photo cartridge, if present, further enhances the print• quality, Would you like to continue?
Press Yes. You will need to do this process all over again for the clear decals.

78-Here are the 2 sheets of decals printed. The sheet to the right – half sheet is the white background and the lower (left) quarter sheet is the clear background. Then the decals need to be sealed I use the clear that I plan to use after the decals have been applied. Place them in the paint booth and spray 2 thin, but thorough coats of clear on the decals and let dry.
79-Here are the tools we use to apply the decals. A small bowl with clean water, stand to hold the car, tweezers, X-Acto knife, sharp scissors (we use these scissors only to trim decals) and a paper towel.
Decal application instructions (follow these closely for best results)
1.) Place decal into a cup of clean water for no more than 15 seconds, remove and place decal on a smooth, clean countertop, and do not touch for sixty seconds.
2.) Apply and position decal (Discard backing material after the decal has been removed).
3.) Once in place, carefully press decal with paper towel to remove excess moisture. Remove any air or water bubbles from behind the decal.
Let dry for a few minutes, to set the decal.
80-The windshield, mouth decals and the tail light panel decals are applied in 2 steps. First there is a white background decal applied. Trim any black lines off of the decal when cutting out the white background decal (so you do not have a double black line if the decal does not register correctly). Then a detail clear decal is applied over the white decal. Here you can see the white part of the eyes and the eyeball decal is applied. Then a clear decal makes up the rest of the windshield frame, it is applied over the white decal (inset).
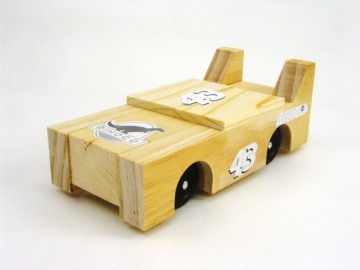
81-32 of the 33 decals applied, the last decal goes onto the rear bumper.
82-The rear bumpers on the early seventies race cars were made to look like the production car bumpers, usually made from aluminum (to save weight), so we decided to cover the bumper with aluminum foil tape. I purchased the tape from our local home care center, in the heating department. I have used it for chrome bumpers on other PWD cars.
83-Cut a piece that is slightly wider than the car body (for the wrap around ends). The tape is 2″ wide so I peeled the backing from only part of the tape, lined it up with the top of the bumper and used a Q-tip to help smooth it out. Make sure the tape does not stick to any painted part, because when you peel it back it will lift the paint. If this is a problem, mask the parts around the bumper with masking tape.
84-The bumper ended up too shiny for my tastes. So I sanded the tape with 600 grit sandpaper to dull the shine. Then I added the last decal to the bumper and used an Ultra Fine Point Sharpie to add some rivets to the bumper ends. Then its back to the paint booth for a coat of clear coat over the decals.
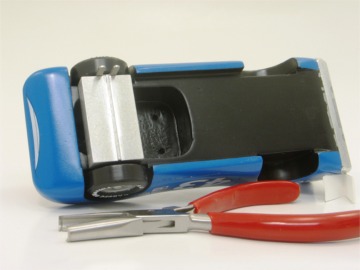
85-At this point it is time to install the wheels and do final alignment. The wheels and axles have been previously prepped and are ready to be installed. The tools we use for this step are the Axle Extraction Pliers (could not have completed this project without them) and the Pro Axle Guide.
86-The first thing we do is figure out where the wheels will be placed. The best two wheels will be placed on the back, the next best will be on the front right, and the worst wheel will be the raised wheel. Place one wheel at a time on a prepared axle and spin the wheel, look for any side to side wobble. Rate each wheel. Then we roll each wheel down our test board (4′ melamine shelf with one end on a 1 1/2″ board) to make sure there are no problems with the tread surface. Set one end of the test board on a 1½” board. Set the wheel on the ramp and give a slight push and watch the wheel roll. Rate each wheel again. Now you should have all of your wheel locations figured out. I set the wheels individually onto a piece of paper, so I can add testing notes next to each of the wheels.
87-Lubricate the axles and the wheels (we use NyOil-₪ check your rules) and spin once again, wipe any excess lube off of the wheel and install the wheel and axle on the car, using the Pro Axle Guide. I use the end of the axle pliers to push the axle down all the way. Then remove the Pro Axle Guide.
88-Fully assembled-weight, I know our 3 digit scale is very close to the official pack 2 digit scale. We carry drill bits and tungsten putty for any necessary adjustment to weight.
89-The Center Of Mass (COM) is at 1 3/8″ in front of the rear wheel.
90-Back to the test board to adjust alignment. We reference Maximum Velocity’s, “Speed to the Finish!” to guide us through the alignment process. On Mr. the King we did use the shim method to align the car so it tracks straight. It also helps that we tested simple alignment earlier in the build.

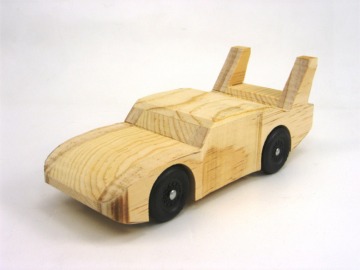
91-Ready to race – front.
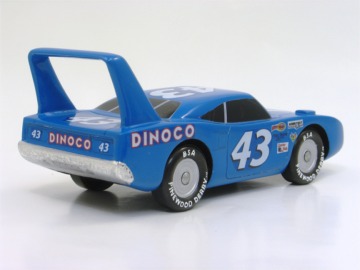
92-Ready to race – rear.
93-Here is the Cars family picture, showing the King along with the other cars we built almost 3 years ago for the pinewood derby when Noah was a Wolf.
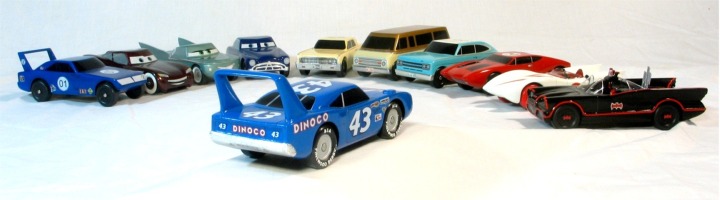
94-Our story would not be complete without a picture of all of the full fendered cars we have built since Noah has been involved in Cub Scouts. Notice we started by making a Superbird for his first car. Then Whitewalls McQueen, the Marlin and the Batmobile. The other pinewood cars are cars that my wife and I have raced in the parent sibling races.
As Stan Pope, the Guru of Pinewood Derby racing always warns pinewood derby builders, “There is no one aspect of a racer that makes it a winner. It is not what you do best that determines your racing result… it is what you do worst! So, you gotta take care of all the little things”. This means you need to look at every possibility of making a car go faster (weight placement, wheel axle modifications, aerodynamics, etc..), to build a winning car.
During our first pinewood derby season, Noah was somewhat disinterested in the whole process, but showing him and the explanations of the “why” we do things has brought his interest around. Along with his interest in the science of racing, now he cannot wait for the next pinewood derby season to start; he is already making plans for this year’s car (which will be his last official Cub Scout pinewood derby car). We have always done well in our pack race so we have gone on to the district competition. In the last 2 years Noah has placed in 4th (both years) in our district competition. Imagine what it is like to have a bunch of wedges (door stops) compete against a real looking car that is also fast.
As a kid I built plastic models of cars, not that I was all that good at it, but I find building pinewood derby cars more interesting. The pinewood derby cars are more challenging as there isn’t any specific way to design and build the cars; it all needs to be thought out. If you want to add scoops or side pipes to a car you just need to figure out how you would need to build the parts, and the material you would make them from, then add them to your car.
I have plans for the new Challenger and a Chrysler Turbine car rolling around somewhere in my mind. Often when I attend car shows, or even in traffic, I will see a car and I can imagine how cool that car, or a certain feature of that car, would look built as a pinewood derby car.
If you would like a copy of the PDF file of “The King” plans and the decal sheets, you can contact me at [email protected].
Pinewood Derby Car Showcase
Catfish Car: Jennifer Camden

In January 2009, my son Hunter wanted to create a catfish pinewood derby car. He and my husband took a picture of a catfish that Hunter caught and began working. We were not sure if the car was going to be fast, but we were going more for looks. Turns out that he received 1st place in his Den out of 43 Cub Scouts. He also received a trophy for most creative.
The Arrow: Scott Schnegelberger
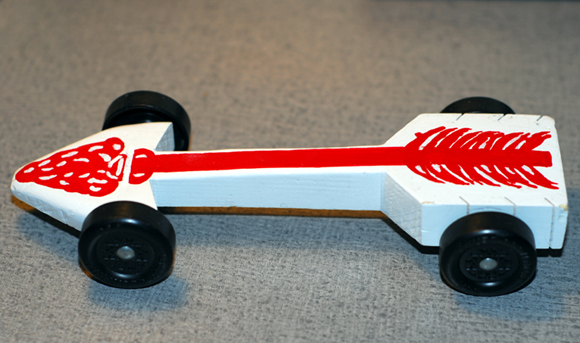
Long, long ago (early 2004 to be exact) we did an adult Pinewood Derby race with modified/extended rules (not a full Outlaw race), and I ended up falling in love with your Arrow plans. So I bought the booklet and built the Arrow. Not being too much of a shop geek, it took me a little longer than your average adult male, but the plans are well laid out and easy to follow.
I ended up hand-painting an “Order of the Arrow” design on the car, and it turned out pretty darn good. My car even ended up being dead- on at 5.0 ounces, so I didn’t have to change a thing. A few days later, I won First Place at the derby. Truth be told, it wasn’t even close… I’m sure the NyOil II helped, but I’m more certain it was the actual design of the car and the distribution of the weight that made the difference.
I still have it, proudly displayed on my office desk, most of the time. The kids played with it and the wheels are probably out of alignment, and it has some dings on the corners, but it still looks good. They still find it and play with it when I’m not looking. I guess they know a good thing when they see it.
’56 Ford Pickups: Lyle and Ben Leis
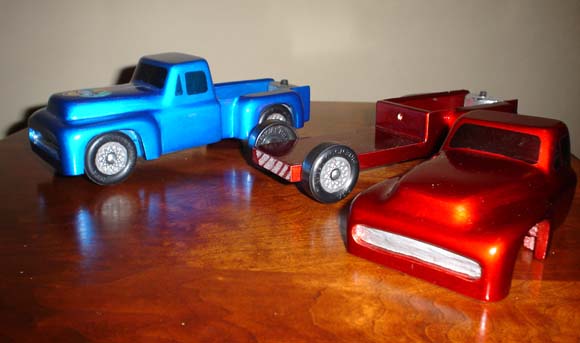
2009 was the last year for my son to compete in the Pinewood Derby since he was a Webelos II. He has done well in the past with a variety of cars, but for his last year, he wanted to build a pickup truck. We bought a ’56 Ford Step side die cast car to copy and scratch built from there. Since we only had two weeks to get it completed, it was an ambitious project.
In the past, I have built several exhibition cars while my son built more conventional cars. Using the profile of the die cast car, we started with a sketch of the top and side view of the truck using the Boy Scout wheelbase and overall dimensional requirements. Since this project required a hollow scratch built body and woodcarving skills, we each built a truck with me working step by step ahead of my son while he followed/copied my work on his truck. The original Pinewood block was cut down to 3/8″ thick and thin pine stock was added to form the bed and truck cab. The panels were carved and sanded to final shape followed by many coats of primer with sanding between. Since the colors are transparent, a silver base coat was used under the transparent top coats. The hollow lead tanks in the rear of the beds are formed from stick on wheel weights and final weight adjustment was made using lead shot. A wood screw between the truck bed and the cab secures the cab to the chassis.
Although the truck didn’t do well in the races due to aerodynamic considerations, for the first time, my son has taken interest in woodcarving, so I consider it a huge success. His truck also won a trophy for the Most Unique design, although the judges were probably not aware of the hollow cab and woodcarving required for the build.
Q&A
We are in the process of building a wedge , and we were thinking of sanding the nose from the bottom up to the top. But I have been thinking that this may cause the front end to lift. Could that happen?
On a typical pinewood derby track, there isn’t enough speed involved for a car to lift due to air movement.
After reading your article regarding the Moment of Inertia, it looks like a longer car has more inertia and is more stable, so should we re-design a full length car as opposed to a shorter car?
You absolutely want a full-length car. Shorter cars generally do not perform as well, as the balance point cannot generally be set as far back as desired.
When looking at designs and using the block (we must stay with the 4-3/8 inch wheelbase), should I just use the pre-cut slots or is it advantageous to move the slots back, keeping the same separation?
If you can shift the wheelbase back, it generally is an advantage. Set the rear axle at 11/16 inch and the front axle at 4-3/8 in front of the rear.
Want Answers?
Do you have a pinewood derby-related question? If so, e-mail us your question.We answer all questions by e-mail, but not every question will appear in the Q&A section of the newsletter.
Back Issues
Are you a new subscriber, or have you missed some of the previous newsletters? Don’t miss out; all of the issues for Volume 5 through Volume 17 are posted on our web site.
Newsletter Contributions
We welcome your contributions. If you would like to contribute an article, a web site review, a speed tip, or a pinewood derby memory, please e-mail us.
Subscription Information
The Pinewood Derby Times is a free e-newsletter focused on pinewood derby racing. It is published biweekly from October through March.
If you haven’t already done so, please forward this issue to your pinewood derby friends. But please don’t subscribe your friends. Let them decide for themselves. Thanks.
If this newsletter was forwarded to you, why not subscribe to receive this newsletter. There is no cost, and your e-mail address is safe, as we never sell or share our distribution list.
To subscribe, send a blank e-mail to
[email protected]
You will receive a confirmation e-mail. Reply to the confirmation e-mail and you will start receiving the Pinewood Derby Times with the next issue.
Randy Davis, Editor, Pinewood Derby Times
E-Mail: [email protected]
(C)2018, Maximum Velocity, Inc. All rights reserved. Please do not reprint or place this newsletter on your web site without explicit permission. However, if you like this newsletter we grant permission, and encourage you to e-mail it to a friend.
Maximum Velocity disclaims any personal loss or liability caused by utilization of any information presented in this newsletter.
The Pinewood Derby Times is not specific to, and is not affiliated with the Boy Scouts of America, YMCA, Awana, or any other organization.
(R)Maximum Velocity is a registered trademark of Maximum Velocity, Inc.
(R)Pinewood Derby is a registered trademarks of the Boys Scouts of America.
(R)Awana is a registered trademark of Awana Clubs International.
All other names are trademarks of their respective owners.