– Feature Article – Working With Needle Axles
– Pinewood Derby Car Showcase
– Q&A
Working With Needle Axles
Since late 2006, Outlaw style wheels equipped with needle axles (actually pins) have been available from DerbyWorx (RSN Wheels). When properly implemented, these needle components have a distinct advantage over regular Outlaw wheels (RS Wheels). Due to the smaller bore diameter, the amount of bore to axle contact per revolution is reduced by approximately 56 percent. This equates to approximately 44 less inches of linear contact on a typical 32 foot track.
Of course this type of wheel is not allowed in most races. But in races that allow any wheel type, the RSN Wheels can provide some serious performance. However, RSN wheels are trickier to implement than RS wheels. In this article, I’ll share my experience with RSN wheels and provide an alternate implementation.
First Experience
In the spring of 2007, my daughter and I built a car using needle axles for a parent-sibling race. As I was looking at the pins, I saw a flashing under the head (just like on nail axles), which I thought would be very difficult to remove without bending the axle.
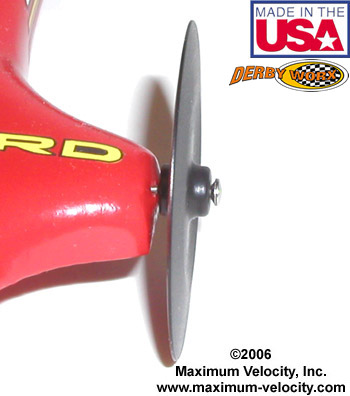 Figure 1 – RSN Wheel and Axle
So, I decided to replace the pin heads with the beads from some “ball head pins”. These are pins that have a small plastic bead as a head. I simply cut off the metal head of each needle axle, pulled the plastic beads off the pins, and then used a touch of epoxy to attach the beads to the needle axles.
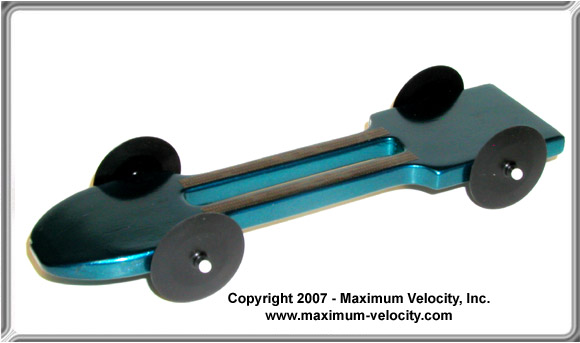 Figure 2 – 2007 Car with Ball Head Pins
The ball heads worked great. The car was easily the fastest car for the first two heats. However, on the third and fourth heat the car ran much slower and ended up in third place. After the race I checked the car and found that one of the front pin axles had been severely bent (either due to the abrupt stops or mishandling). I bent the axle back, reran the car, and found the performance was once again quite good.
I did not implement another car with needle axles until 2009, but in the meantime I did accept some custom work to drill cars for needle axles. After a few of these jobs, I quit offering the service. Why? Even with the softest wood, and the most careful technique, it was very difficult to drill such tiny holes with good accuracy. The drill bits are so flexible that they bend when they hit a hard spot in the wood. I even increased the drill bit size and used cobalt bits, but still the reject rate was too high.
So, my experience with needle axles was not the best: burrs, bent axles, and very difficult drilling. There had to be a better way.
Second Experience
In the spring of 2009, my son wanted to run a car in the parent-sibling race, and he wanted a car that was “screaming fast”. Since the race did not allow motors or bearings, I knew that we needed to attempt needle axles again. But this time I took a different tactic. The result was the “Green Stealth”, which easily took first place and continued to perform run after run.
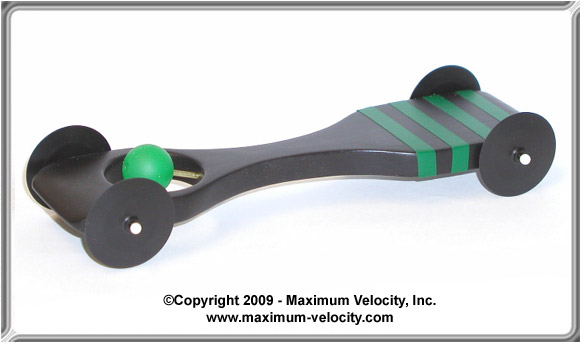 Figure 3 – 2009 Car: “Green Stealth”
How did we do it? Read on to find out.
Alternate Needle Axle Implementation
Remembering the three issues with needle axles, I determined to address each one. The burrs under the axle heads were easily addressed with the ball head beads that we used on the first car. The second problem, bent axles, could only be solved by using axles of a much harder material. So, we decided to use #65 drill bits (.035 in diameter, same size as needle axles). The solution for the third problem (difficult drilling) required a bushing that was large enough in diameter to allow for easy drilling, but had a small enough hole to accept the #65 drill bits. I found a perfect material from K&S: 1/16 x .014 aluminum tubing (KS1008), which was cut into 3/4 inch long pieces.1 Figure 4 shows these materials.
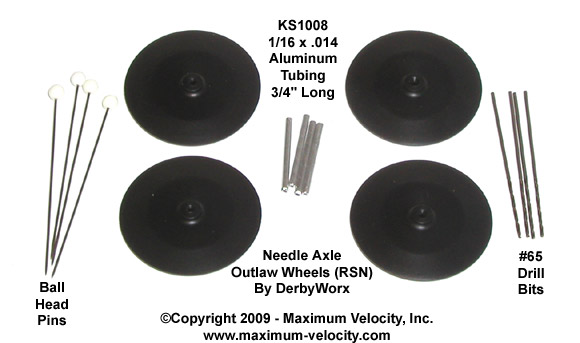 Figure 4 – Required Materials
The first step is to pull the heads off the pins. This is easily done with two pairs of pliers. Then, use a #65 drill bit to ream out the hole in each bead (this is most easily done with a Pin Vise).
Next, polish the smooth part of four, #65 drill bits. This is most easily done before the beads are installed. A little metal polish on a rag works well. Then attach the beads to the drill bits with a touch of epoxy (I used one of the headless pins to apply a touch of epoxy in the bead hole). Figure 5 shows the results of these steps.
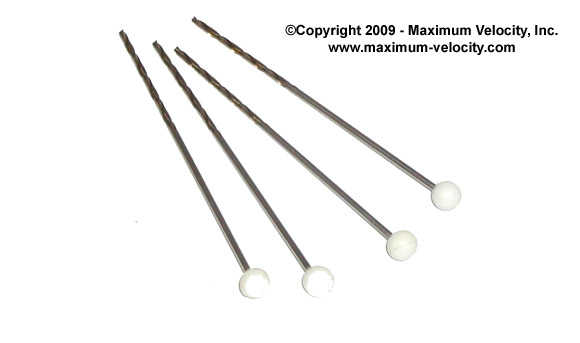 Figure 5 – Beads Installed on Drill Bits
At this point, the drill bits can be cut to length with a pair of diagonal cutters (or similar). I cut them to 7/8 inch. Make sure to wear eye protection as the cut off pieces will go flying!
Now, lubricate the axles with Krytox 100, install the wheels, and insert the drill bit axles into the aluminum bushings. Leave a small gap (30 thousandths or so) between the bushing and the wheel. Use a pair of diagonal cutters to crimp the bushing to lock the axles in place.2 If you look carefully in Figure 6, you can see the crimp.
 Figure 6 – Axles Installed in Bushings
Now, turn your attention to the car. The axle holes will need to be drilled with a 1/16 inch drill bit. Since the bit is still a little small, I recommend using a very soft piece of pine. Drill slowly and carefully. If desired you can put a slight down angle (1 degree or so) on the rear holes to keep the wheels off of the car body. We used these techniques on both the “Green Stealth” and its sister car, the “White Stealth” (see Figure 7).3
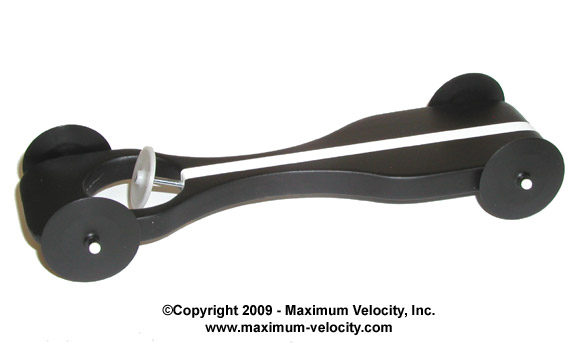 Figure 7 – White Stealth
Once the car is painted and weighted, you can install the wheel assemblies. First, ream out the axle holes with a 1/16 inch drill bit mounted in a Pin Vise.
The tubing tends to run slightly under 1/16 inch, so the bushings should install with little effort. If they are a little loose, put some epoxy in the axle hole before installing the bushings. But don’t glue the front dominant wheel until the alignment is set.
Since the axles cannot be bent, you will need to use one or more shims of paper to adjust the alignment of the car. On the White Stealth, the front left wheel is raised, and the front right adjusted for rail- riding. Two thicknesses of Post-it Note paper placed at the back of the front right axle set the alignment perfectly.
How did this car perform? Typically, a car with RSN wheels will beat a similar car with RS wheels by over a car length. On the 32 foot aluminum Freedom Track in our shop, the White Stealth ran under 2.48, beating a similar RS wheel car by about 10 inches.
Conclusions
If you have the opportunity to run RSN wheels on a car, go for it. But consider using the implementation method described here. I found it to be relatively easy to implement, and it produced top results.
Editor’s Note: Since the writing of this article Maximum Velocity introduced a Needle Axle Upgrade Kit, which works better than the method described in this article, and is easier to implement.
1Since the tubing tends to crush when it is cut, you will likely only get two pieces from each tube (one from each end). However, the KS1008 package has 3 pieces, so you can easily get six bushings from the package.
2If you need to remove the wheel for cleaning and lubing, you can pull on the bead. Either the bead will come off, or the axle will come out of the bushing. In either case you can clean, relube, and reinstall the axles.
3We built two cars in order to have a backup. My son preferred the green ball instead of the white “deflector dish” on this car.
Pinewood Derby Car Showcase
Red Snake: Steve Truver
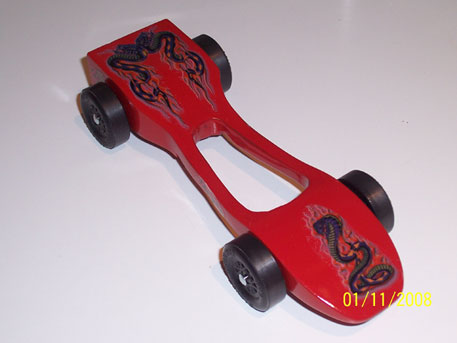
This car was built by my grandson, Nathan and me in 2008. It took first place for speed in his pack, and placed in the top five in the regionals.
Mater: Jeff Trush
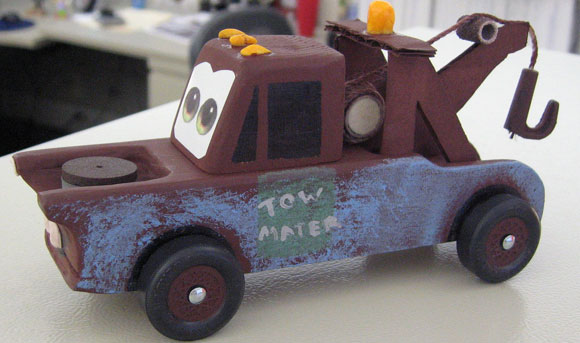
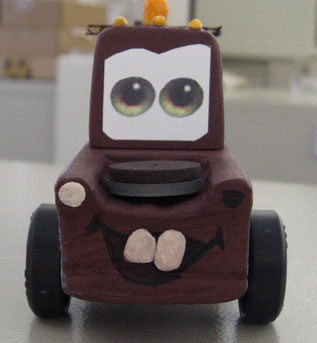
This car was my son, Nicholas’ idea. It actually won first in his den (it was a lot faster than I expected). While it was not quite as aerodynamically competitive in the overall pack derby (over 80 cars) he did end up winning the “Best Overall Car” trophy, and the kids loved watching Mater run down the track — it was quite funny to watch to say the least.
I am a big fan of details, and we tried to stay pretty true to Mater from the movies. We used Play-Doh for the top lights, teeth, and headlight. The Play-Doh was swabbed with super glue to firm it up. We also used several Dremel Tool sanding drums and grinder wheels for the air cleaner and the rollers for his tow hook. The structure in the rear is just pieces of cardboard painted and glued together. For the faded paint effect, we dabbed the colors with a paper towel.It was great fun building it together, and we hope you enjoy it.
Q&A
What is your opinion on the new BSA wheels, and do they need just as much work as the old one’s did?
The new wheels are more accurate than the old ones. They can be improved with work, but they are nicer than the old one’s in raw condition.
Do you think there is any benefit to using the Pro-Outer Hub Shaver on the new wheels since it seems that the new BSA wheels have been smoothed a little better in that area?
The recess on the new wheels can interfere with beveled axle heads. So it is best to remove the recess using the Pro-Outer Hub Shaver. This has already been done on most of our speed wheels.
I see a lot of cars every year with the center cut out of them. Is there some kind of weight distribution theory behind this or is it just something that looks cool?
Body holes are normally implemented to remove wood weight to allow a more aggressive balance point. I guess there is also a coolness factor as well.
Want Answers?
Do you have a pinewood derby-related question? If so, e-mail us your question.We answer all questions by e-mail, but not every question will appear in the Q&A section of the newsletter.
Back Issues
Are you a new subscriber, or have you missed some of the previous newsletters? Don’t miss out; all of the issues for Volume 5 through Volume 17 are posted on our web site.
Newsletter Contributions
We welcome your contributions. If you would like to contribute an article, a web site review, a speed tip, or a pinewood derby memory, please e-mail us.
Subscription Information
The Pinewood Derby Times is a free e-newsletter focused on pinewood derby racing. It is published biweekly from October through March.
If you haven’t already done so, please forward this issue to your pinewood derby friends. But please don’t subscribe your friends. Let them decide for themselves. Thanks.
If this newsletter was forwarded to you, why not subscribe to receive this newsletter. There is no cost, and your e-mail address is safe, as we never sell or share our distribution list.
To subscribe, send a blank e-mail to
[email protected]
You will receive a confirmation e-mail. Reply to the confirmation e-mail and you will start receiving the Pinewood Derby Times with the next issue.
Randy Davis, Editor, Pinewood Derby Times
E-Mail: [email protected]
(C)2018, Maximum Velocity, Inc. All rights reserved. Please do not reprint or place this newsletter on your web site without explicit permission. However, if you like this newsletter we grant permission, and encourage you to e-mail it to a friend.
Maximum Velocity disclaims any personal loss or liability caused by utilization of any information presented in this newsletter.
The Pinewood Derby Times is not specific to, and is not affiliated with the Boy Scouts of America, YMCA, Awana, or any other organization.
(R)Maximum Velocity is a registered trademark of Maximum Velocity, Inc.
(R)Pinewood Derby is a registered trademarks of the Boys Scouts of America.
(R)Awana is a registered trademark of Awana Clubs International.
All other names are trademarks of their respective owners.