– Feature Article – Modifying the Wheelbase
– Pinewood Derby Car Showcase
– Q&A
Modifying the Wheelbase
by Randy Davis
(An update of an article originally published December 11, 2002).
It is not entirely clear to me how the various organizations established the location of the axle slots on their kits. Years ago, the BSA wheel base1 was longer than the current 4-3/8 inches of today’s kits. Choosing to be different, Awana kits use a wheel base of about four inches. Other organizations and kit makers use slightly different measurements.
Unfortunately, none of the current standard wheel bases are really the best for speed and alignment. The best wheel base for going straight is always the longest possible wheel base. Top fuel dragster competitors know this, as is evident from the design of the rail-type dragster. Not only is the wheelbase very long, but the car is made very long as well.
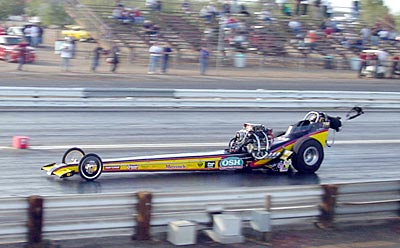
Top Fuel Dragster
Why Extend The Wheelbase?
For pinewood derby cars, extending the wheelbase provides an advantage due to the following reasons:
- On Ramp-flat tracks2, best speed is attained by locating the center of gravity (COG) of the car as far back as possible while still maintaining stability (typically this is about one inch in front of the rear axle). If the rear axle is moved as far backwards as possible, the COG can also be moved backward, thus increasing performance.
- The longer the wheel base, the greater the turning distance (a short car turns much more quickly than a long car). A pinewood derby car should go as straight as possible, so a longer wheel base is an advantage.
Assuming a seven inch maximum length and approximately 1-1/4 inch diameter wheels, the best placement for the axles is 11/16 of an inch from the front and back of the car. This insets the wheels a small amount, protecting the front wheels from abrupt stops. If you are allowed to use a long wheel base, then I will describe how to modify the block to attain that wheel base under “Method 2” below.
Check Your Local Rules
But before making any modifications to your wheel base, make sure to check your local rules. Generally, the rules will offer one of the following:
- No choice – The wheel base on the kit must be used, and the location of the slots on the block must be retained. If this is the case, make sure to use the slot that is closest to the end of the block as the rear axle slot.
- Choice 1 – Wheel Base Restricted: The wheel base on the kit must be maintained, but the location of the slots on the block is not restricted. That is, the spacing between the axles must be retained, but the slots can be shifted as desired.
- Choice 2 – No Restrictions: The wheel base may be adjusted as desired.
If choice one is available, then consider Method 1. If choice two is available, then consider Method 2.
Method 1
Method 1 retains the existing wheel base but moves the wheel base as far to the rear of the car as possible. This can be accomplished by drilling new axle holes, cutting new axle slots, or using the existing slots. If you choose to drill new holes or cut new slots, locate the rear axle 11/16 inch from one end of the car. Then locate the front axle at a distance from the rear slot equal to the wheel base on the original block (or the maximum allowed in the rules). See the following sections for tips on drilling/cutting new axle holes/slots.
If you choose to use the existing slots, then measuring from an axle slot towards the closest end of the car, make a line 11/16 inch from the axle slot. Use a saw to cut through the car on that line. Then glue the removed piece onto the opposite end of the car
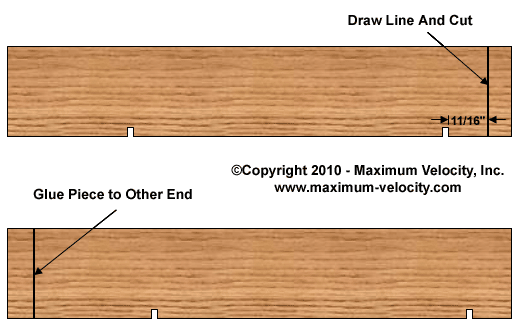
The block will now have the rear axle slot at a distance of 11/16 inch from the rear of the car, which will allow the COG to be moved further backward.
Method 2
Method 2 creates the optimum wheel base by creating new holes/slots at a distance of 11/16 inch from the ends of the car.
Cutting New Axle SlotsIn the absence of power tools, new axle slots can be cut using a ruler, a square (Combination or Carpenter’s), and two hacksaw blades.
- With the ruler, make marks on the block a distance of 11/16 inch from each end of the block. You will probably want to do this on the side of the block opposite of the existing slots.
- Using the square, at the pencil marks draw a line across the block.
- On the sides of the block even with the pencil marks made in step 2, make a pencil mark at the depth of the original axle slots.
- Clamp the block in place, with the axle lines facing up.
- Mount two hacksaw blades in the hacksaw frame. Squeeze the blades together in the center with a binder clip.
- Saw the new axle slots. Make sure the cuts are exactly on the axle lines, and the cuts go no deeper than the marks on the side of the block.
Drilling New Axle HolesA more accurate method for creating an extended wheel base is by drilling axle holes. This can be done with a drill press, or with the Pro-Body Tool and a hand drill or Pin Vise.
Drill Press Method
The following tools are required for the drill press method:
- Drill Press
- Drill Bit (#44 for BSA axles, 3/32 for Awana axles, other kits will be similar but always drill a test hole on a scrap piece of wood to make sure your axles fit properly)
- Ruler
- On each side of the block, make a pencil mark 11/16 inch from each end of the block and 1/8 inch from the bottom of the block. If one front wheel will be raised, then on the left side of the block make a pencil mark 11/16 inch from the front of the block and 3/16 inch from the bottom of the block.
- Insert the drill bit into the drill chuck with about one inch exposed and set the drilling depth to about 7/8 inch.
- Place the block of wood with the right side facing upwards on the drill platform. Use a drill press fence to make sure all holes are drilled the same distance from the bottom of the block.
- Drill the front and rear axle hole on the right side of the block. Then repeat for the other side of the block.
Pro-Body Tool Method
The following tools are required:
- Hand Drill
- Drill Bit (#44 for BSA axles, 3/32 for Awana axles, other kits will be similar but always drill a test hole on a scrap piece of wood to make sure your axles fit properly)
- Ruler
- Clamp – C or bar type
- Optional – Square (combination or Carpenter’s)
To use the Pro-Body Tool:
- Test Fit – Test fit the Pro-Body tool on the bottom of the block with the two “ears” positioned on the sides of the block. If the block is too wide for the tool, use coarse grit sandpaper to reduce the width of the block until the tool fits snuggly onto the block. If the block is too narrow for the tool, insert a piece of paper – folded as many times as needed – between one ear of the tool and the block such that the tool fits snuggly onto the block.
- Mark the Block – Make a pencil mark 11/16 inch from each end of the block. Extend the marks from the bottom of the block to the top of the block using a square (or measure and mark near the bottom of the block and near the top of the block, and then join the line with a pencil and ruler).
- Clamp Tool and Drill – Position the tool on the bottom of the car with the two “ears” on the sides of the block. Align the index marks with the line on the block. Clamp the tool in place, using paper if necessary to ensure a snug fit (see step 2). Hold the block firmly against a work surface, position the drill bit in the desired hole, and drill 3/4 of an inch into the block. Without releasing the clamp, turn the tool and block over, and drill the second hole. Repeat for the other 2 holes (or one hole, and then drill the raised wheel).
Conclusion
Extending the wheelbase can be a distinct advantage for your car. So if allowed by your local rules, don’t miss out on this performance advantage.
1Wheelbase – The distance from the center of the front wheel to that of the rear wheel in a motor vehicle, usually expressed in inches – from The American Heritage Dictionary of the English Language.
2A Ramp-flat track starts on a slope, then transitions to a long flat section.
Pinewood Derby Car Showcase
Some great looking models of real (or almost real) vehicles.
Mini Cooper – Leon Dixon
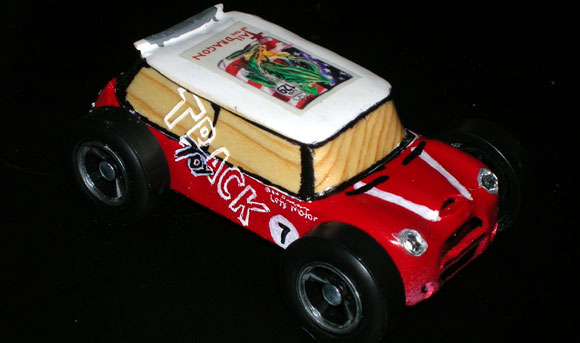
Our Mini Cooper club runs our own “pinewood-derby-type” race. We have been using your MV Car Kits for four years now. Our event has expanded so much we almost don’t know what to do with it! You can read a bit about it at:
minisonthedragon.com/draggin_dragons.php
(There’s a typo on that page, this is actually our 4th time running the event).
Jeff Gordon Stock Car – Tim & Elisabeth Stephens
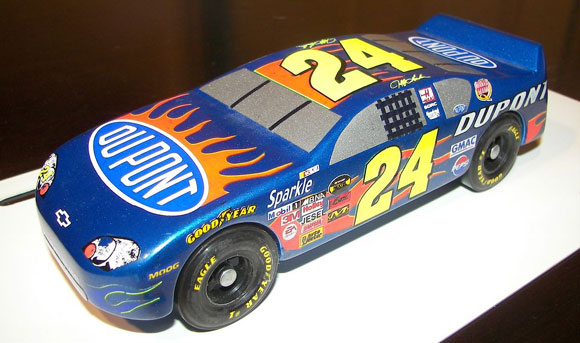
We had a great time working on this car. We like Jeff Gordon and when we saw your idea for making one, we jumped on it. Speed axles and wheels came from Maximum Velocity. I used your tips to dress it out in decals from a model kit I purchased online. Some automotive pin striping on the window decals you supplied really added detail to the finished project. Elisabeth won all her heat races, and when they put all age level winners together, including the adult winner, she beat them all. Whoo, hoo – great fun for all! Thanks for all your advice and products.
School Bus – Nathan & Brenden Paul
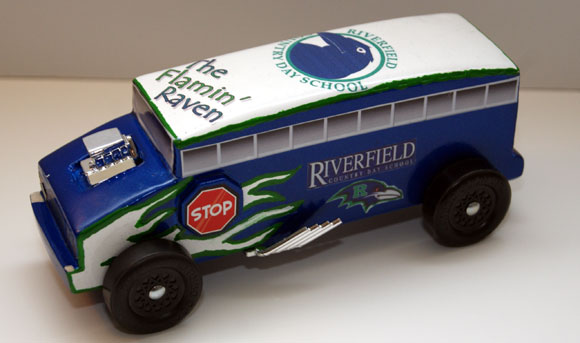
This is my son’s Pinewood Derby School Bus. While it was not the fastest (finished 6th out of 24), it did take home the trophy for the “Best School Themed Car”.
Sideswipe – David Bodoh
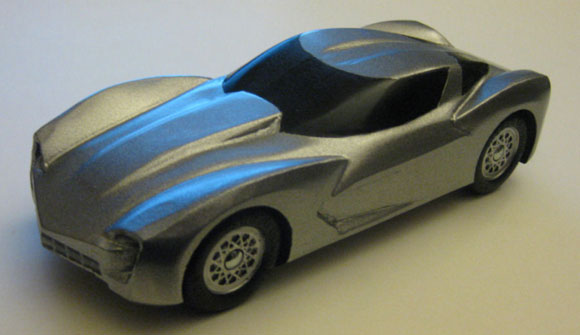
In the movie Transformers 2 there is a Corvette Stingray named “Sideswipe”. I challenged myself to turn it into a derby car (just the car, not the robot). It took 3 attempts, but ultimately it required cutting the main block into seven pieces to be shaped separately, and then reassembled (roof, hood scoop, four fenders and the body). There’s even four exhaust pipes in the back. We raced it in the family event at our pack’s pinewood derby, and it posted the second fastest run of the whole day. Speed and design – just like the real car.
Q&A
Is a standard wedge design too heavy to use a 3.5 ounce canopy? Am I better off with a 2.5 ounce canopy if I want to use a wedge, or is it better speed-wise to go with a thinner design and a 3.5 ounce canopy.
Generally, a Wedge is too heavy to support the 3.5 ounce canopy, so you would need to use the 2.5 ounce version. All other things being equal (wheels, axles, lube, alignment — all of which are critical) a lower profile body tends to perform better. To use the 3.5 canopy the car body needs to weigh less than 1 ounce.
I’ve used Hob-E-Lube in the past, and now we are using your Max-V- Lube. I used to soak the wheels and axles in the graphite using a sandwich bag. Do you recommend this with your lube prior to setting the axles and wheels to the car?
I don’t believe that soaking the wheels/axles in graphite is beneficial. The goal is to build up a graphite coating inside the bore of the wheel. This is done by repeated applications of graphite and wheel spinning.
I noticed that Revell is marketing “Officially Licensed” Pinewood Derby wheels. These wheels look identical to the stock BSA wheel. I was wondering if these wheels were the same exact wheels supplied in the BSA PWD kits, or if Revell was making their own wheels?
Originally, I believe that Revell was selling official BSA wheels. However, I have heard from several people that Revell is now having their own wheels made in China. The quality of the knock offs does not appear to be as good as the “official” BSA wheels. I have not been able to independently confirm this information. When I recently purchased a set of Revell wheels, they still showed “Made in USA”. However a customer just sent me this photo of a US-made and a Chinese-made wheel: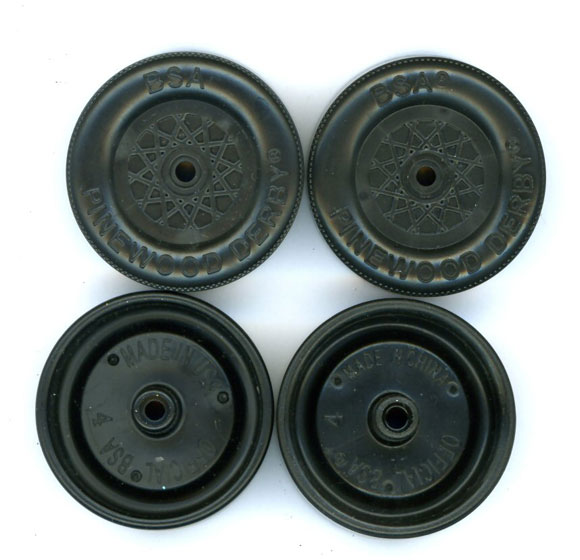
Want Answers?
Do you have a pinewood derby-related question? If so, e-mail us your question.We answer all questions by e-mail, but not every question will appear in the Q&A section of the newsletter.
Back Issues
Are you a new subscriber, or have you missed some of the previous newsletters? Don’t miss out; all of the issues for Volume 5 through Volume 17 are posted on our web site.
Newsletter Contributions
We welcome your contributions. If you would like to contribute an article, a web site review, a speed tip, or a pinewood derby memory, please e-mail us.
Subscription Information
The Pinewood Derby Times is a free e-newsletter focused on pinewood derby racing. It is published biweekly from October through March.
If you haven’t already done so, please forward this issue to your pinewood derby friends. But please don’t subscribe your friends. Let them decide for themselves. Thanks.
If this newsletter was forwarded to you, why not subscribe to receive this newsletter. There is no cost, and your e-mail address is safe, as we never sell or share our distribution list.
To subscribe, send a blank e-mail to
[email protected]
You will receive a confirmation e-mail. Reply to the confirmation e-mail and you will start receiving the Pinewood Derby Times with the next issue.
Randy Davis, Editor, Pinewood Derby Times
E-Mail: [email protected]
(C)2018, Maximum Velocity, Inc. All rights reserved. Please do not reprint or place this newsletter on your web site without explicit permission. However, if you like this newsletter we grant permission, and encourage you to e-mail it to a friend.
Maximum Velocity disclaims any personal loss or liability caused by utilization of any information presented in this newsletter.
The Pinewood Derby Times is not specific to, and is not affiliated with the Boy Scouts of America, YMCA, Awana, or any other organization.
(R)Maximum Velocity is a registered trademark of Maximum Velocity, Inc.
(R)Pinewood Derby is a registered trademarks of the Boys Scouts of America.
(R)Awana is a registered trademark of Awana Clubs International.
All other names are trademarks of their respective owners.