PINEWOOD DERBY TIMES
Volume 16, Issue 1
October 5, 2016
In this Edition
– Editor’s Notes
– Feature Article – Now, How Did We Build That Car Last Year?
– Humor
– Product Showcase – T-Tool Weight Drilling Jig
– Pinewood Derby Memory – The Duck
– Pinewood Derby Car Showcase
– Q&A
Editor’s Notes
Welcome to the New Pinewood Derby Season
It’s fall, and time for the new pinewood derby season again. I’m looking forward to a super race season, and I hope you are too. Here at Maximum Velocity we have developed some great new products to help you be successful in your upcoming races.
Here at Maximum Velocity, we have a full agenda of articles and photos to educate, entertain, and (hopefully) inspire you. But we are always looking for your input. So, please send us your photos, speed tips, articles, memories, etc.
New Products for the 2016-17 Season
New Plan Booklet: “Car Plans 9” is now available with plans for the Jaguar, the Annihilator, and our new Raptor design.
New Car Kits: We are introducing two new car kits: the Detonator II and the Raptor. The Detonator II is a 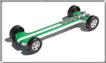
 redesign of our popular Detonator design. The Detonator II is much more aggressively weighted
to accommodate rail-riding. The Raptor is an aggressively weighted kit, and it looks intimidating. We even designed a paint stencil especially for this kit.
Specialty Tools: We are pleased to offer the T-Tool Weight Drilling Jig. The T-Tool is a precision-machined, aluminum jig that allows you to drill precise 3/8 inch (or 25/64 inch) weight holes into the side, back, or bottom of a pinewood derby block with a hand drill.
We also have a 1-1/16 inch Forstner Drill Bit for recessing our tungsten rounds in your car body.
MV Wheel & Long Axle Sets: We now offer lower prices on our MV Wheel & Long Axle Sets, and offer a bulk package of these popular sets.
Inventory Clearance Sale
We are clearing inventory on several items including:
– Discount slotted blocks
– Formula One car kit
– Wheel Flares and Paint Stencils
– Raingutter Regatta Decals
We don’t have many left, so don’t delay. You can find these items Here.
Pinewood Derby Memory
Again this season I plan to re-run some of the pinewood derby memories from earlier issues. If you would like to contribute a memory, please see the submitter information in the Pinewood Derby Memory section.
Can We Help?
If we can help you in any way with your pinewood derby project, or if you have any feedback regarding this newsletter, please Contact Us.
Feature Article
Now, How Did We Build That Car Last Year?
By Randy Davis
I am in a unique situation; I talk about, write about, and think about pinewood derby racing all year long. Since this is my job, I can readily rattle off information about every aspect of building cars, sourcing supplies, race management, etc. I’m sure you can readily talk about the various aspects of your job as well.
The only area where I get a little hazy is preparing for the annual race that we stage. Since I only stage one race per year, there are some details that are a bit hazy. So, I have a checklist that I can refer to each year to help me remember the items that I need for the workshop, the check-in, and the race itself. Without this checklist, I would be less organized and would likely forget something important.
Most people build one or two cars per year, so they are in pinewood derby mode for only a week or so per year. Like me and my annual race, when pinewood derby time rolls around, it can be difficult to remember some of the basics of building cars. In today’s article I want to provide a check-list to help you remember the key aspects of building a car. Typical questions include:
1. In what order do I build the car?
2. Which is the front and back of the block?
3. Where does the weight go?
4. How and with what do I lubricate?
5. What kind of paint should I use?
6. What kind of glue should I use?
My hope is that you will keep this article, and use it during the next racing season to get up to speed on car building. You may think of some other items that you wish to remember, so feel free to add them to the list.
Preparation
1. Start Early – Don’t wait until the last minute. Start work as soon as the car kits are passed out. This reduces stress on you, and will likely give better results on the track.
2. Order or Shop Early – If you plan to order supplies, get the order in several weeks before the race. You will save on shipping, and won’t have to search around at the last minute to find a store that is not out of stock.
3. Check Rules – Oftentimes rules change from year to year. Don’t assume that the rules are the same as the previous year – get a copy of the rules and read them.
Design
1. Design for Speed – On many kits, including BSA kits, the wheelbase is offset. Use the axle slot closest to the end of the block as the rear axle.
2. Weight Location – Before cutting out the car, decide where the weight will be placed. A good “rule of thumb” is 1/3 of the added weight behind the rear axle, and 2/3 of the added weight just in front of the rear axle.
3. Prepare Axle Slots (or Drill Axle Holes) – Before doing any cutting on the block, pre-insert a spare axle into each slot location, then twist and pull it out with a pair of pliers (or use a Pro-Body Tool to pilot drill the slots, or drill axle holes – if allowed by the rules).
4. Full Length and Width – Don’t shorten the car, and don’t narrow the car body more than 1/16 inch at the axle slots.
Building
1. Build Progression:
a. Drill weight holes or create weight pockets.
b. Cut out the car shape.
c. Do the final shaping with coarse sandpaper, a Dremel tool, or a wood rasp.
d. Sand with 120, 220, and 400 papers.
e. Paint, apply decals, then clear coat.
f. While the paint is drying, polish the wheels and axles.
g. Lubricate the wheels (before putting them on the car). Do this thoroughly, and use a high-quality graphite (not a cheap hardware store brand).(1)
2. When painting, use an acrylic brush paint, or a lacquer spray paint.(2) Avoid enamel paints.
3. Use a clear coat that is the same brand and formulation as the paint.
4. Glue in weights with hot glue or epoxy. Don’t use any expanding glue (like Gorilla Glue). Only use super glue in an emergency.
Check-In
1. Bring the car to the weigh-in a little low on weight. Use the official scale to determine how much weight to add.
2. Have a hole in the bottom of the car for adding weight.
3. Resist the temptation to add more lube before checking-in the car.
Conclusion
I hope that you find this list helpful. If you have other items that you think should be on the list, please email them to me at: [email protected]
Make sure to keep the list in a place you will remember. You don’t want the next pinewood derby season to arrive and have to say, “Now, if I could just remember where I put that list!”
(1) I recommend Max-V Lube.
(2) I recommend Dupli-Color Perfect Match, available at auto parts
stores.
Humor
The Magician and the Parrot
There was once a magician on a cruise ship who performed mainly sleight-of-hand tricks. He had a regular spot on the ship’s cabaret evening entertainment. He was actually quite a good magician, but his routines were regularly ruined by the onboard parrot who would fly around squawking and giving away his secrets like:
“IT’S UP HIS SLEEVE, IT’S UP HIS SLEEVE!” or
“IT’S IN HIS POCKET, IT’S IN HIS POCKET!” or
“IT’S IN HIS MOUTH, IT’S IN HIS MOUTH!”
The magician was getting pretty sick of this and threatened to kill the parrot if it ruined his act one more time. That evening right at the climax of his act, just as he was about to disappear in a puff of smoke, the ship hit an iceberg and sank in seconds.
Amazingly, the magician and the parrot were the only two survivors. The magician was lying on a piece of driftwood in a daze. As he opened his eyes he could see the parrot staring at him out of its beady little eyes.
The parrot sat there for hours just staring at him and eventually said, “Okay, I give up, what did you do with the ship?”
Product Showcase
T-Tool Weight Drilling Jig – $2.00 Off
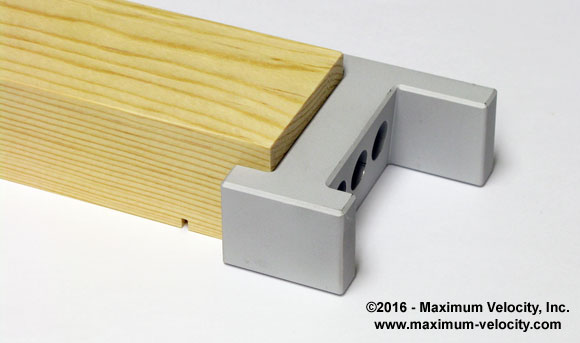
For top speed, weight needs to be accurately placed. Now anyone can create accurate weight holes for tungsten cylinders, lead wire, or tundra rod with only a hand drill.
The T-Tool is a precision-machined, aluminum jig that will improve the speed of your pinewood derby car through accurate weight placement. The T-Tool:
– Ensures accurate weight placement by allowing you to drill precise weight holes into the side, back, or bottom of a pinewood derby block.
– Can drill straight holes, or holes at a slightly downward angle for wedge-shaped cars.
– The guide holes in the T-Tool are sized for a 25/64 inch drill bit (perfect for tungsten and lead). The drill bit is not included; it is sold separately Here (part 5001).
Through October 18, 2016, you can get a T-Tool Weight Drilling Jig for $2.00 off. To take advantage of this limited time offer, add part 5070 to your shopping cart, and use coupon code OCT05NL during checkout.
Pinewood Derby Car Showcase
Batman 4 Ever – Mark McGrew
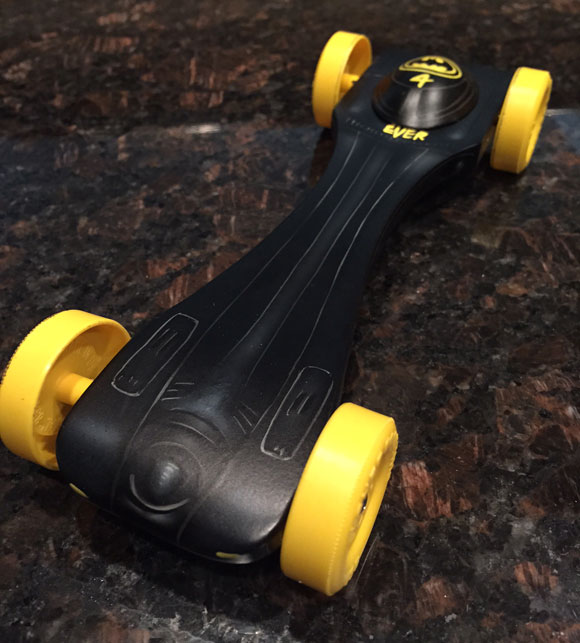
My son Ethan is a Cub Scout with severe hearing loss – however pinewood derby has been something he can win at.
In an attempt to make a really cool car we reached out to Count’s Kustoms (from the television show Counting Cars) to paint our car. Ryan Evans agreed and custom air brushed the car. We told him we were going for something like the movie Batman car.
We had won our first race with a Batman car, so we stuck with it in our 4th and final race. So the car was named “Batman 4 Ever”. It took 1st place at pack and district.
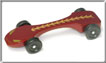
Hot Rod – Scott Hoffmaster
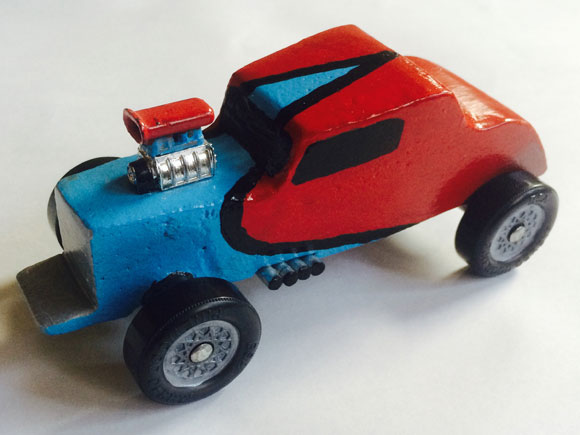
This hot rod was built by Christian Hoffmaster from Pack 39 in Douglasville, Georgia.
X-Wing Fighter – Ken Koziol
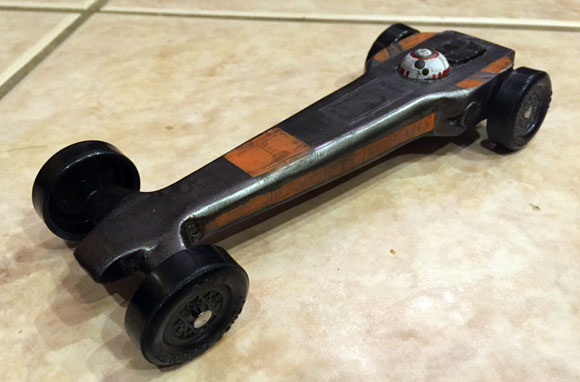
I wanted to show off my son’s first car. Alex is in his first year of cub scouts and is a Tiger. He was so excited about the Pinewood Derby. In the Pack race he took first in his Den, and then he took first in the District race too. My favorite memories will be of him jumping up and down with his hands in the air when he heard his name called as the winner. He congratulated everyone he saw on their work and was proud of himself too.
This car is modeled after an X-Wing fighter. It has bent axles, one raised wheel, polished axle shafts and filed heads. The car weighs right at 5 ounces with the weight just under 1″ forward of the rear wheels. Wheel base is extended to maximum.
Share Your Car With Our Readers
Do you have a car you would like to “show off” to our readers? If so, send us a photo of your car along with a description of any special features to:
[email protected]
Please include your full name. If selected, we will include the photo and description in this newsletter.
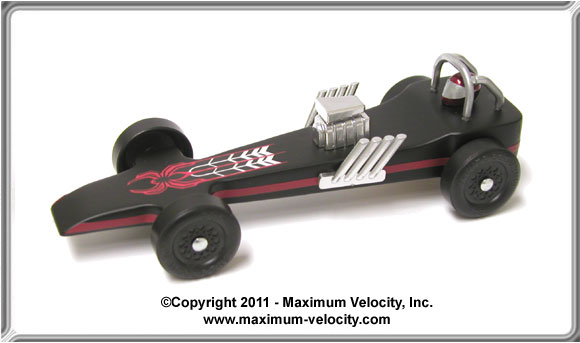
Photos must be sent by e-mail in JPG format (minimum size of 640×480, maximum size of 1280 x 960). Please shoot photos from the front left of the car, similar to the orientation of this car:
For better focus, keep the camera four or five feet away from the car, and then use the camera’s zoom to fill the frame with the car. Also, use a solid (preferably white) background for the photo.
Send only one photo per car, unless an additional photo is needed to adequately show a feature. Also, only one car per subscriber per year please. Thanks.
Pinewood Derby Memory
The Duck
When the car was placed on the inspection table, I immediately knew there was a problem.
The car body had been nicely carved by the young girl to resemble the body of a duck, and additional wood had been added to create the curving neck and the duck head. It was an incredible piece of work. But it was also too tall to race. If it had been run on the track, the duck would likely have been decapitated by the finish line bridge. Not a pleasant thought.
The height of the car was measured and as I had estimated, the duck was nearly two inches too tall. The rules had clearly stated the height limitation, but it was not unusual that the rules had been ignored.
Another official and I held a brief consultation and agreed that the only possible course of action was surgery. To race, the neck had to be shortened.
As I explained the procedure to the girl, the area of the room where we were located got very quiet. Tears welled-up in her eyes, and the emotion of the moment spread through the onlookers.
But time was of the essence, so carefully selecting a fine-toothed hack saw blade, I went to work. Anesthesia was not required for “the patient”, but it would have been helpful for the young girl.
After the neck section was removed, some Elmer’s Glue served to close the wound. After a bit of cleanup, the surgery was declared a success – the patient would race in the derby.
Although it was still recognizable as a duck, the car no longer appeared graceful. Much of the craftsmanship that had gone into creating the car had gone by the wayside.
As I write this account many years later, I still wonder if we did the right thing. Maybe we should have counseled the young girl to keep the duck intact and skip the race. Maybe I was so focused on the race that I didn’t take into account the entire scope of the situation.
One can only speculate what would have been best since nothing can change the past. But I hope that should a similar situation confront me in the future that I will consider the larger picture before offering my counsel.
Randy Davis
Do you Remember?
If you have a pinewood derby story that is funny, unusual, sad, heart-warming, etc., please send it to me in an e-mail. Don’t worry about literary polish. We will edit as needed before publishing.
If your story is used, you will receive a $10 coupon in May of 2017.
Q&A
Q: I just purchased the “Tungsten COG Weight”, can you please tell me how long each piece is and, if the weight of each piece is 2 ounces or is that the weight of the two pieces combined?
A: Each COG weight is 0.5 oz. You get four of them in a pack of 2 ounces.
Each COG weight is 5/8 inch long, excluding the stud. The stud nests into another COG weight, so they can screw in or out in tandem.
Q: I just read your article entitled “Transforming that Block into the Ultimate Derby Car” (Volume 15, Issue 10). It was my understanding that the weight should be placed 3/4 to 1 inch in front of the rear axle. The article suggests that it should be placed behind the rear axle. Where should I really put it?
This is the fourth year I have helped my grandson with his Pinewood Derby car. In the past den leaders have told us to put the weight in front of the rear axle. We have followed this advice and have never come close to 1st place.
A: What you were told is a common misconception.
The goal is for the finished car to balance on the edge of a ruler (or balance stand) at 3/4 to 1 inch in front of the rear axle. To make that happen, you will likely need to place 1/3 or more of the added weight behind the rear axle, and the remaining weight just in front of the rear axle.
This will vary a little depending on the weight of the car body, but is a good “rule of thumb”.
However, weight is only one factor. I have found that the number one thing you can do to make a fast car is to do a proper lube job with a high-quality graphite (such as our Max-V-Lube). Before mounting the wheels and axles on the car, spend five minutes per wheel/axle adding graphite, spinning the wheel on the axle, adding graphite, spinning the wheel on the axle, etc. Always end by spinning the wheel several times. To get a good lube job you have to spend the time.
Q: How do you attach a stand-up windshield to a car body? The kit instructions really doesn’t show us how to do that. By the way, are all pinewood derbies the same time of the year (ours is in February)?
A: I would use epoxy (2 part adhesive) to glue it to the top of the car. Just use a clear brand such as Super glue Brand.
Pinewood Derbies can be anytime throughout the year, but the majority seem to be in the first quarter.
Want Answers?
Do you have a pinewood derby-related question? If so, e-mail us your question.
We answer all questions by e-mail, but not every question will appear in the Q&A section of the newsletter.
Back Issues
Are you a new subscriber, or have you missed some of the previous newsletters? Don’t miss out; all of the issues for Volume 5 through Volume 16 are posted on our web site Here.
Newsletter Contributions
We welcome your contributions. If you would like to contribute an article, a web site review, a speed tip, or a pinewood derby memory, please e-mail us.
Subscription Information
The Pinewood Derby Times is a free e-newsletter focused on pinewood derby racing. It is published biweekly from October through March.
If you haven’t already done so, please forward this issue to your pinewood derby friends. But please don’t subscribe your friends. Let them decide for themselves. Thanks.
If this newsletter was forwarded to you, why not subscribe to receive this newsletter. There is no cost, and your e-mail address is safe, as we never sell or share our distribution list.
To subscribe, send a blank e-mail to
[email protected]
You will receive a confirmation e-mail. Reply to the confirmation e-mail and you will start receiving the Pinewood Derby Times with the next issue.
Randy Davis, Editor, Pinewood Derby Times
E-Mail: [email protected]
(C)2016, Maximum Velocity, Inc. All rights reserved. Please do not reprint or place this newsletter on your web site without explicit permission. However, if you like this newsletter we grant permission, and encourage you to e-mail it to a friend.
Maximum Velocity disclaims any personal loss or liability caused by utilization of any information presented in this newsletter.
The Pinewood Derby Times is not specific to, and is not affiliated with the Boy Scouts of America, YMCA, Awana, or any other organization.
(R)Maximum Velocity is a registered trademark of Maximum Velocity, Inc.
(R)Pinewood Derby and Regatta are registered trademarks of Boys Scouts of America.
(R)Awana is a trademark of Awana Clubs International.
All other names are trademarks of their respective owners.