Description
In pinewood derby racing, winners and also-rans are often separated by fractions of an inch. Although many factors affect car performance, precision alignment is a key to reaching the winner's circle.
Setting the alignment of a car has always been a tricky process. If a bent front axle is used to make the adjustment, getting a precise bend in the axle has literally been a "hit or miss" process.
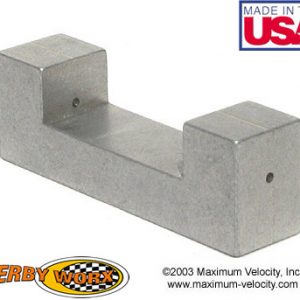
But now this has all changed. Introducing the Pro-Rail Rider Tool, which works with the Pro-Axle Press II to put precise bends in axles for alignment adjustment and/or for running with angled axles. When coupled with the Rail-Rider™ alignment technique, significant performance improvements can be achieved.
The Pro-Rail Rider tool:
- Assists in Alignment Adjustment - The tool will make a precise bend in a front axle for adjusting the alignment of the car.
- Supports Two Angles - Either a 1.5 and 2.5 degree bend can be made in an axle.
- Implements Angled Axles - If angled (canted) axles are desired, the tool will precisely bend the axles for running on the inside edge of the wheels.
Notes:
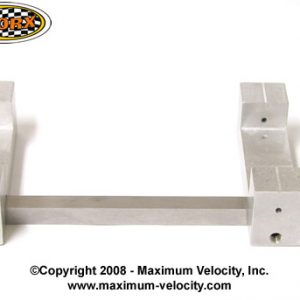
- A Pro-Axle Press II (Part 5130) is required to use the Pro-Rail Rider Tool.
- The Pro-Rail Rider Tool is intended for axles measuring approximently 0.087, which include BSA axles, and MV Speed Axles. The tool will work on larger axles, such as those offered by Awana and PineCar, however the angle will be slightly less than 1.5 or 2.5 degrees.
- The Pro-Rail Rider Tool will bend the following axles: 4025, 4055, 4056, 4094, 4095, 4096, 4097, 4099, 5440, 5451, and 5465
- The Pro-Rail Rider Tool will not bend the following axles. 4051, 4052, 4093, 4098, and 4100. Attempting to bend one of these axle types will void the warranty.
From Randy:
"In our tests, the Rail-Rider alignment technique provides a significant performance improvement. The Pro-Rail Rider Tool makes this technique easy to implement. For a discussion of the Rail-Rider technique, please refer to the main article in Pinewood Derby Times, Volume 16, Issue 10"
Pro-Rail Rider Usage Instructions

Mark Axle Head
Prepare Axles and Slots/Holes
- For best results, prepare the axle slots (or drill axle holes) with a Pro Body Tool.
- Prepare the axles by removing the burrs and crimp marks, and optionally beveling the head. Then polish the axles.
- Place a location dot on one side of each axle head with a marker. If bending both front and back axles, use one color of marker for the front axles, and a different color for the rear axles.
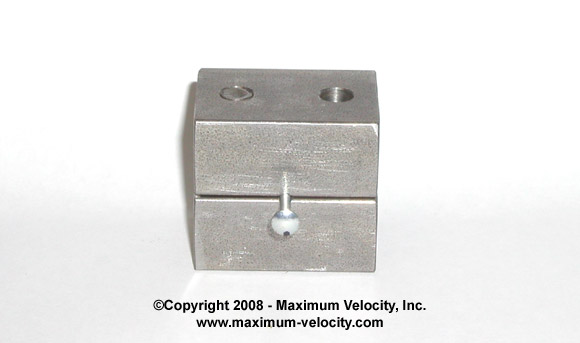
Insert Axle
Apply Pro-Rail Rider Tool
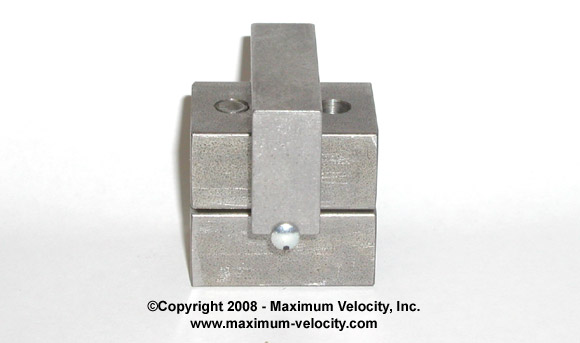
Set Up Tool
- Install an axle into the Pro Axle Press, with the axle head extended out about 1/2 inch.
- Rotate the axle so that the dot on the head is located at the 6:00 (down) position.
- Slide the Pro Rail Rider Tool over the top of the axle press. Locate the axle shaft in the groove of the Pro Rail Raider Tool. Use the 2.5 side of the tool for rear axles(1), and the 1.5 side for front axles.
- Press the axle head against the Pro Rail Rider Tool; make sure the dot is still at the 6:00 position.
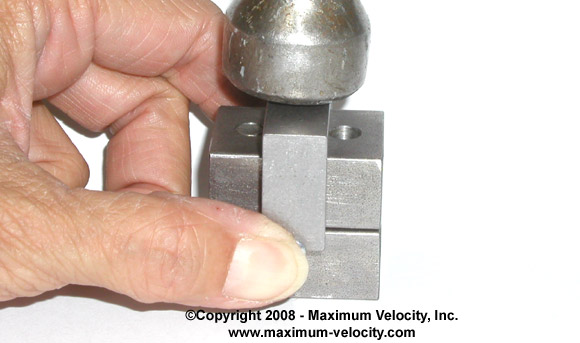
Bend Axle
Bend Axle
- With the assembly on a solid surface (concrete floor is best), hold the axle head against the tool with your thumb, and place your index finger on the opposite end of the tool.
- Squeeze firmly and with a hammer, tap the top of the tool lightly two to three times. This will accurately bend the axle the indicated 1.5 or 2.5 degrees.
- Repeat for all axles using the correct angle for each axle. If you have a raised axle hole, leave one axle straight for the raised wheel.
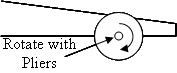
Rotate Axle
Aligning the Car
- After lubricating, install the wheels and axles with the location dots for the rear axles at the 12:00 position (upward angle), and the location dot for the front dominant axle at the 6:00 position (downward angle).
- Check Rear Wheels - On a clean, level surface (8 feet long is best), roll the car forward and backwards one to two feet, and make sure that the rear wheels stay against the axle heads. This is an indicator of correct rear alignment. If a wheel moves towards the body, rotate the axle head slightly and retest until the wheel stays against the axle head when traveling the in the forward and reverse direction.
- Locate Front Dominant Wheel - If one front wheel is off the ground, the front wheel on the ground is the dominant wheel. If both front wheels are on the ground, then press gently on each of the front wheels. If the car rocks slightly when pressing on one of the wheels, the other wheel is the dominant wheel. If the car does not rock with either wheel, both wheels are dominant.
- Steering the Car - The goal of Rail Riding is to gently steer the car into the guide rail with the front dominant wheel. Gently roll the car across the test area and notice which way the car drifts. Using a pair of pliers, rotate the front dominant axle slightly, then retest until the car rolls 8 feet with approximately 5 inches of drift towards the non-dominant wheel (if both front wheels are dominant, then rotate both axles equally in opposite directions). For example, if the front-right wheel is dominant, the car should drift to the left; if the front left wheel is dominant, the car should drift to the right.
- Glue Axles - Once the correct drift is established, (if using axle slots) glue the axles in place with white glue.
Additional Notes
- For best results, the test surface should be smooth, level from side-to-side, and slightly inclined. Levelness can be verified by rolling a steel marble (or similar) down the incline. Adjust the surface with shims of wood or paper until the ball rolls straight down the board.
- Narrowing the front of the body 1/16 inch on the side with the dominant wheel will help keep the rear wheels from touching the guide strip.
Storage
To minimize rust or corrosion, apply a coating of a light oil (3-in-1, WD40, etc.) to all surfaces of the tool, and store the tool in an air and water-tight container such as a zip lock bag.
Angling the rear wheels by bending the rear axles is optional - it is not required for rail-riding. If you choose to angle the rear wheels you will need to align the rear wheels.
(1)Angling the rear wheels by bending the rear axles is optional - it is not required for rail-riding. If you choose to angle the rear wheels you will need to align the rear wheels.