Description
Axle Mounting Accuracy = Greatest Speed!
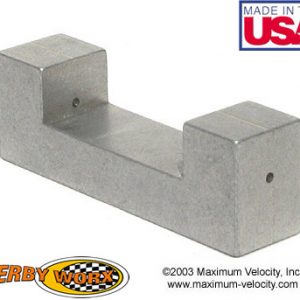
For a fast car, axle slots or holes must be absolutely square to the car body and parallel to each other. For a really fast car, a properly set up Rail Rider will help you dominate your competition. One of the hardest parts about correctly setting up a Rail Riding car has been getting the rear alignment just right. With the New Derby Worx Pro Body Tool 3.0 the rear end setup of your pinewood derby car is a breeze. The Derby Worx Pro Body Tool 3.0 will allow you to accurately drill your rear holes on a 3 degree negative cant. The Pro Body Tool 3.0 also allows proper drill height for the front dominate wheel using a 2.5 degree bend to keep the car nice and level. The tool features 3 hardened steel bushings for 1000's of drills with out any worry of damaging the tool. Never has such a quality drill tool been offered at this price point.
Introducing the Pro-Body Tool 3.0, a precision-machined, aluminum device with hardened drill bushings that will improve the speed of your pinewood derby car through accurate axle mounting. The Pro-Body Tool 3.0:
- Ensures accurate axle positioning by allowing you to drill precise 3 degree negative cant guide holes into the existing axle slots with a hand drill!(1) The guide holes ensure that the axles are mounted square and true on the car. Improved axle mounting accuracy equals greater speed!
- Serves as a guide for drilling accurate axle holes with a hand drill.(2) Again, improved axle mounting accuracy equals greater speed!
- Equipped with a third hole to easily drill the dominate front hole at the proper height with a 2.5 degree bent axle, for greater alignment accuracy and for faster performance.
The Pro-Body Tool 3.0 #44; For BSA is equipped with a #44 guide hole for use on BSA, PineCar, and other kits with nail type axles. A #44 bit is included.
The Pro-Body Tool 3.0 #43; For larger Diameter aftermarket speed axles, is equipped with a #43 guide hole. A #43 bit is included.
To use the Pro-Body Tool, follow the instructions included with the kit, or the instructions below. Click on any of the small pictures to view a larger picture.
(1) A clamp or vise is required to use the tool (not included).
(2) Check your local rules before drilling axle holes.
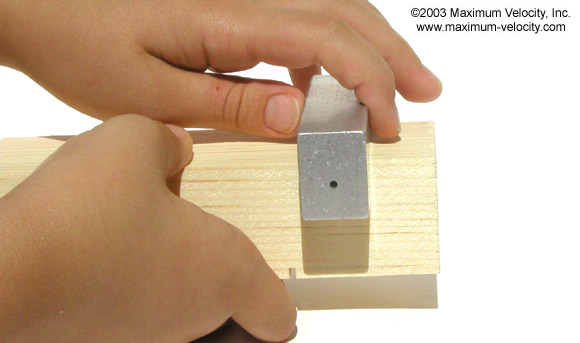
Test Fit
Test Fit
- Test fit the Pro-Body Tool on the bottom of the block with the two ‘ears’ positioned on the sides of the block. If the block is too wide for the tool, use coarse grit sandpaper to reduce the width of the block until the tool fits snuggly onto the block. If the block is too narrow for the tool, insert a piece of paper - folded as many times as needed - between one ear of the tool and the block such that the tool fits snuggly onto the block.

Axle Slots Only:
Mark the Block
AXLE SLOTS ONLY: Mark the Block
- Use a square to draw a straight line on the side of the car starting at the middle of the axle slot, and extending to the top of the car (or measure the distance from one end of the block to the middle of an axle slot and transfer that measurement to the top-side of the block. Then use a ruler to draw a line from that measurement to the center of the axle slot).
- Repeat step 2 for the other slot. Then continue with step 4.
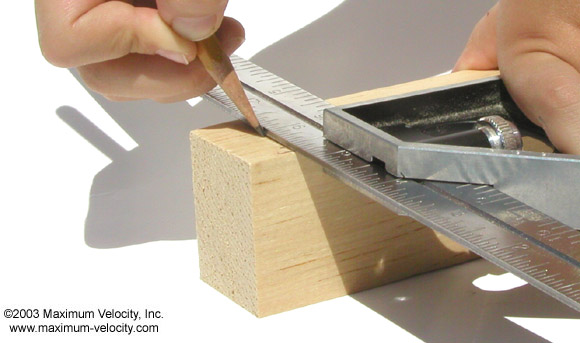
Axle Holes Only:
Mark the Block
AXLE HOLES ONLY: Mark the Block
- Measure and mark the desired position of the new axle holes on the side of the block. Extend the mark from the bottom of the block to the top of the block using a square (or measure and mark near the bottom of the block and near the top of the block, and then join the line with a pencil and ruler). Holes for extended wheelbases are typically positioned 11/16 inch from each end of the block.
- Repeat step 2 for the other end of the block. Then continue with step 4.
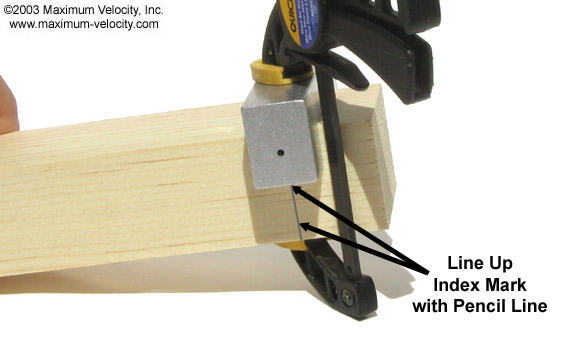
Clamp Tool
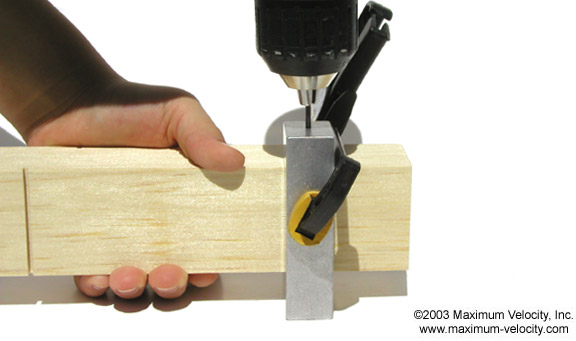
Drill
Clamp Tool and Drill
- Position the tool on the bottom of the car with the two ‘ears’ on the sides of the block. Align the index mark with the line on the block. Clamp the tool in place, using paper if necessary to ensure a snug fit (see step 1).
- Hold the block firmly, position the drill bit in the hole, and drill 3/4 inch into the block.
- Without releasing the clamp, turn the tool and block over, and drill the second hole.
- Repeat steps 4 to 6 for the other two holes (or one hole if you will be making a raised hole).
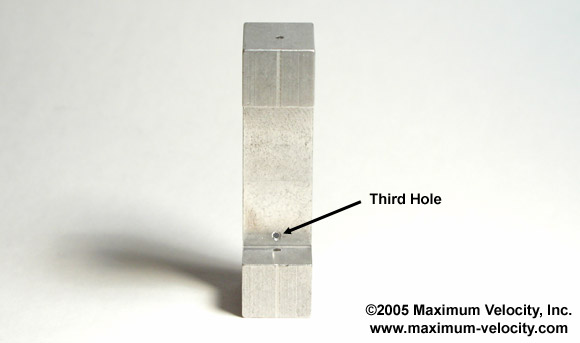
Third Hole
Raised Hole
- Transfer the line on the side of the block to the bottom of the block.
- Position the tool on the desired side of the block, and align the index mark on the tool with the line on the bottom of the block. Make sure that the third hole on the tool is positioned near the bottom of the block.
- Clamp the tool in place and drill the raised hole.