– Feature Article – Using a Mini-Lathe
– Pinewood Derby Car Showcase
– Memory – Some Things Never Change
– Q&A
Using a Mini-Lathe
Okay, I know that many of our readers will have no desire to ever use a lathe for pinewood derby car preparation. But for the small percentage of our reader’s that would like to have a lathe (and for the readers who don’t know if they would like one or not), today’s article will give you an introduction to using a lathe to prepare pinewood derby wheels.
What Is A Mini-Lathe?
A mini-lathe is a small version of a machinist’s lathe. A machinist’s lathe is a power tool which rotates the target material (in our case a pinewood derby wheel) allowing it to be shaped with a cutting tool. Unlike a woodworker’s lathe, where the cutting tool is held by hand, a machinist’s lathe has a fixture (Tool Post) to rigidly hold the cutting tool, and a Carriage and Cross Slide to adjust the position of the cutting tool. (see Figure 1).
The configuration of lathes varies from model to model, but several key parts are always present. These parts are identified in Figures 1 and 2, and described below. Figure 1 is a photo of a Taig mini-lathe 1. Figure 2 is a photo of the more full-featured MicroLux mini- lathe2.
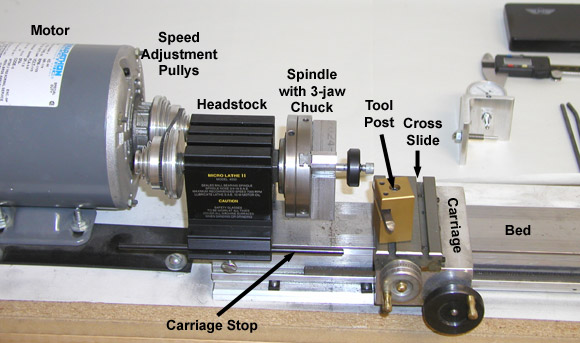 Figure 1 – Taig Mini-Lathe
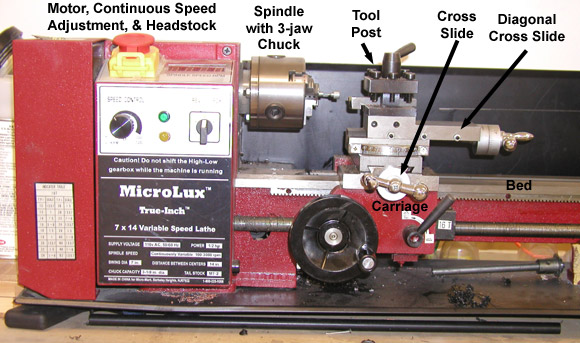 Figure 2 – MicroLux Mini-Lathe
Motor – A 110 V motor to drive the spindle. In the case of the MicroLux which has an optional carriage power feed, the motor also drives the carriage.
Speed Adjustment – Pulleys, gears, or a motor with an adjustable speed are used to vary the spindle speed.
Headstock – Contains precision bearings to minimize the amount of rotational error (run-out) in the spindle. Generally, higher quality (read “expensive”) lathes have less run-out.
Chuck – Jaws to grasp the part to be machined. A three-jaw chuck is used to hold cylindrical items, and a four-jaw chucks for square items. Lathes can also be fitted with collets for small items.
Tool Post – Holds the cutting tool (high-speed steel or carbide). The tool post on the Taig lathe can be turned in any direction. The MicroLux tool post is limited to 90 degree increments, but the diagonal cross slide feature provides the additional adjustment to cover 360 degrees.
Cross Slide – Moves the cutting tool perpendicular to the work item.
Carriage – Moves the cutting tool parallel with the work item. The Taig lathe has a manual carriage. The Micro-Lux carriage can be moved manually or with the power feed. For pinewood derby wheels the power feed is too fast.
Bed – A precision ground support for the carriage.
Most lathes also have a tail stock (not shown in photos). The tail stock supports the end of long work pieces, but is not really needed for pinewood derby work.
Using The Mini-Lathe On Pinewood Derby Wheels
The most common use of a mini lathe (as it relates to the pinewood derby) is to true the tread surface of pinewood derby wheels. This operation makes the wheel round and the tread smooth. But a mini- lathe can also be used to reduce the weight of the wheel and reduce the tread width (if allowed by local rules). Axles can also be prepped with the mini-lathe.
Truing the Tread Surface
To true the tread surface, a wheel is mounted in a wheel mandrel, the motor is started, and the tool is moved across the tread surface removing a small amount of material. This is repeated until the wheel is fully cleaned up.
Here are some tips for truing wheels:
- WEAR EYE PROTECTION AT ALL TIMES.
- Chuck the Pro-Wheel Mandrel as far into the jaws as possible.
- Set the Carriage Stop so that the tool or carriage cannot touch the jaws of the chuck.
- Set the cutting tool to a fairly low attack angle (see Figure 3).
- Wheels made from harder plastics can be lathed dry (no coolant). However, wheels made of a softer plastics, such as those distributed by Awana, require application of water as a coolant. This can be done by an assistant with an eyedropper. But make sure to wipe up water right away as it can tarnish/rust the lathe bed.
- Remove 2 to 4 thousandths of material on each pass. Remember that 2 thousandths (.002) of material removal results in a diameter reduction of 4 thousandths.
- After the last material removal pass, make a final pass at the same depth, moving slowly and smoothly. This will provide a better finish on the tread surface.
- To ensure consistency from wheel to wheel, take off a little more than is needed on the first wheel, and then note the reading on the cross slide. Machine the other three wheels to the same setting.
- Always finish the tread truing process on a wheel before removing it from the lathe. Once a wheel is removed from the lathe, it is virtually impossible to re-mount it and remove just a few thousandths of material.
- After using the lathe, apply a thin film of machine oil to the lathe bed, and lube the carriage and cross slide.
 Figure 3 – Tool Attack Angle
Figure 1 shows a raw wheel mounted in the lathe using a Pro-Wheel Mandrel. Figure 4 shows the finished wheel.
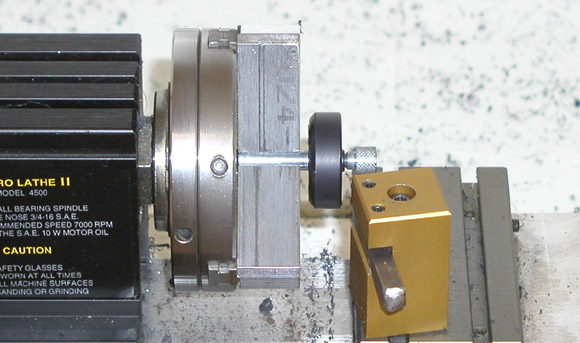 Figure 4 – Tread Surface Trued
Trimming the inside edge
The inside edge of a wheel can be easily trimmed with the same cutting tool. But don’t cut into the side of the wheel by moving the carriage horizontally. Instead, position the knife so that it will just barely touch the side of the wheel, and then use the cross slide to move the knife towards the bore. Back out the tool, and then check if the edge is trimmed enough. If more material must be removed, move the carriage a few thousandths and repeat.
Removing Weight
Weight can be removed from the underside of the tread surface by repositioning the cutting knife as show in Figure 5. You may need to use a different knife in order to get clearance on the wheel. Some cutting knives will drag on the wheel before the cutting edge makes contact. I use a knife that has a 90 degree radius on the bottom, which allows for adequate clearance.
Position the knife to just barely touch the inside of the tread surface, and set the carriage stop so that the knife doesn’t cut through the sidewall of the wheel. Then start the lathe and move the carriage left and right. Then move the cross slide out a few thousandths. Eventually, you will thin the tread enough to get a noticeable weight reduction. With the proper cutting tool, and proper positioning, the hub can be narrowed and the inside sidewall thinned.
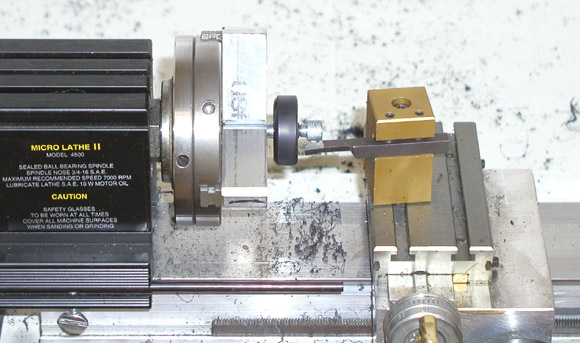
Figure 5 – Weight Removal
Reducing Tread Width
If allowed by local rules, the tread of the wheel can be reduced in width, resulting in a large mass reduction. This can be accomplished by repeated trimming of the inside edge. But a faster way is to use a cutoff tool (see Figure 6) to cut through the tread.
Position the cutoff tool to run perpendicular to the tread surface. You will need to apply water as a coolant/lubricant, so have an assistant stand ready with an eye dropper of water. This operation puts quite a bit of stress on the wheel and the mandrel, so you will need to work very slowly, applying plenty of water. I recommend backing the knife out several times to allow the wheel and knife to cool.
Accessories
Several tools (shown in Figure 6) are handy when using a lathe.
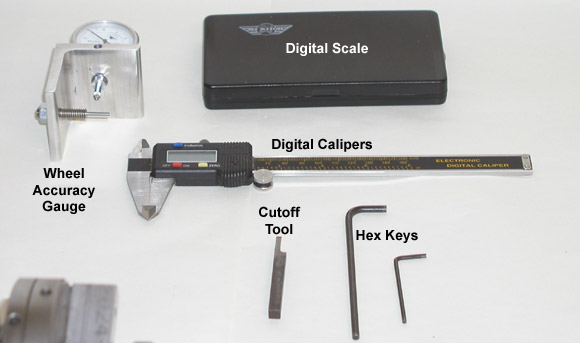
Figure 6 – Accessories
- Digital Calipers – These are an absolute necessity as they measure the diameter of the work piece (wheel).
- Wheel Accuracy Gauge – Measures the run-out of the wheel before and after lathing.
- Digital Scale – For weighing a wheel before and after lathing.
- Cutoff Tool – For reducing the tread width.
- Hex Keys – Used to adjust the lathe. Typically, the lathe will include the required keys.
In addition, spare cutting tools, and a good hone stone with cutting oil will be handy.
Conclusion
Owning a mini-lathe is certainly not for everyone. But it can be very beneficial for pinewood derby wheel work.
I mostly use the Taig lathe, as it is convenient and relatively quiet. It is also quite portable, so that you can store it under your work bench, or transport it if needed. It works well for polishing axles and bores, and for the occasional machining job.
1The Taig lathe is sold by Taig Tools.
2The MicroLux lathe is sold by Micro-Mark.
Pinewood Derby Car Showcase
Twins: Bruce Larson
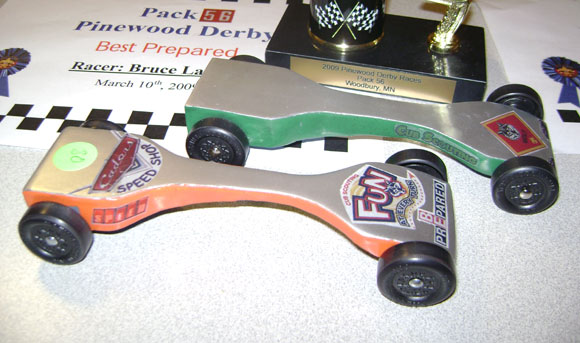
Caden Larson won his pack championship with the green car. He used your Pro-Axle Guide and Axle Polishing Kit. Caden’s car went on to place in the top 3 at districts. That qualified him to race in the council Wolf race at the Mall of America where he finished 14th. The orange car won the pack’s parent and sibling race (avenging my loss to a little girl from the year before).
Sharkboy: Jeff Heath
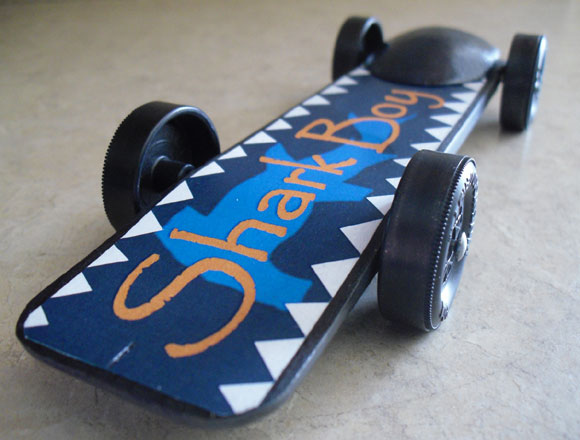
Here is my son’s Bear entry for the Pinewood Derby. We have been using this design for a couple of years. He cuts, sands, and paints the car. The dome on the back is a lead fishing weight that we beat into submission with a hammer. We then created a design on the computer, printed it, cut it out and glued it to the top of the car. It was first at pack, second at District, and second at Council for speed. We had a great time thanks for all the great tips!
Silver Fork: Rick Ellis
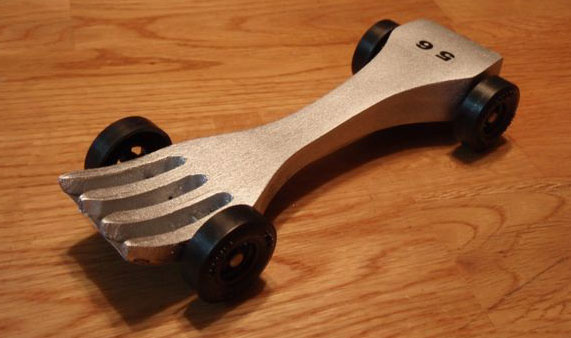
My nine year old daughter ran this car in the Awana Truth and Training division. She designed it, painted it, and did the axle and wheel work. I helped with the layout and did the power tool work I didn’t think was safe for her to do. It took first place for speed and received the award for best workmanship in her division. It came in fourth in the Speed Finale where they race the winners of each division against each other.
Pinewood Derby Memory
Some Things Never Change
I just celebrated my 75th birthday. I had five sons all who eventually became Eagle Scouts, and of course all five sons were in Cub Scouts also, and we began to participate in pinewood derbys beginning in 1970. My oldest son is now 50, and my youngest son, 35, so it has been a long time since I have been involved with pinewood derbies in any way. However, my sons won every single pinewood derby that they entered over a 15 year period of time, and whenever we encountered a track with timers, we invariably broke the track record.
However, now my grandsons have reached Cub Scout age, and recently several of their fathers told their sons to contact Opa (that’s me), because I knew all the secrets to winning. On a hunch, last week I began surfing the Internet to see if there was anything regarding pinewood derbies. What a shock! After poring through your website, I see you have revealed every single trick we used, and not only that, but you now provide specialty tools making it much easier to accomplish what once took us 100’s of hours.
Examples:
- In those days there were no rules against extended wheels, so we created our own wooden jig to re-drill the holes often with many mistakes and many trashed blocks.
- There was also no rule against lightening the wheels, so we bought a small hobby lathe and lightened the wheels in many different ways, including making them into discs, and drilling a dozen holes in them (quite similar to what you now sell). As a young man, I used to race sport cars, and had already learned the rule about lightening of unsprung weight (i.e., wheels, flywheels, crankshafts, piston rods, etc.), as well as allowing more weight in the body.
- We reasoned logically that as much weight as possible should be as far to the rear as possible, thus leaving more weight on the downhill portion of the track. So we would actually saw a square hole into the rear of the block, temporarily clamp two pieces of wood on each side of the hole, then melt core-less lead solder into the hole, then after cooling, un-clamp the two pieces of wood, thus leaving a perfectly square hunk of lead at the extreme far rear of the car (If tracks had an abrupt change from the downhill portion to the flat, this would not work with our an extended wheel base, because when hitting the “dip”, the front wheels would sometimes rise up). When rules began to be touchy about the wheel base, no one ever seemed to care if the rear wheels were moved further back, they seemed more concerned about the front wheels. So sometimes we left the front wheels standard with the rear moved back a bit.
- Our car shapes were always very similar to two of your kits (Detonator and Velocinator), except that the wood area between the front and rear wheels was always sanded down to about the size of a pencil, then just in front of the rear wheels we would shape the wood up to about an inch high. Our logic of having a higher rear end with a square back was based upon the sports car theory that if the front of the car is very aerodynamic with the back of the car squared off, the wind supposedly whips around and pushes the car forward. I have no way of knowing if this really worked, but that is what we always did.
- Our major secret which we never revealed, was to balance the wheels. I never heard of anyone doing this in those days. The older pinewood derby wheels were always very much out of balance. We balanced them by putting two razor blades into a rubber eraser, cutting and putting a tight-fitting nail into the wheel hole and placing it between the two razor blades. Just like when using your balancing tool, the heavy side always went down. Since we had always drilled eight holes into the wheels (similar to a mag wheel), we balanced the wheel with a normal hand drill by making the hole on the heavy side slightly larger.
Obviously everyone in those days would make sure the car ran straight by testing it on a hardwood floor. However, even though many cars were running on three wheels, we were never able to make any of our cars faster by using that method. We had built a single wooden track with a 1/1000 timer, and could never find a difference using the same car before and after raising one wheel.
All of the tracks in those days were made of wood, often causing accidents due to a car jumping tracks. Since we had to lathe our own wheels, and with all the holes we put in them, they were very fragile. Each time we would create a set of wheels we would always create 8 wheels in each of the lathe passes. A couple would always break during the lathing process, but we would always have two or three spares that were exact matches. There was hardly ever an event where we didn’t have to replace at least one wheel.
As to axle polishing, grooving, and the utilization of graphite, we did about the same as you are doing today.
In conclusion, tweaking one of your car kits and using your wheel accessories is obviously the way I will go with my grandsons. Thank goodness for your website. As costly as some of those items are, it is certainly a cheaper and quicker way to go than the hundreds of hours that we used to spend in the olden days.
Roger Walton
Q&A
What is the advantage of using an extended versus the standard wheel base car? Would the extended be faster?
If allowed by your local rules, extended wheelbase cars tend to be faster. This is due to two reasons:
- The longer wheelbase helps the car go straighter.
- The rear axle is further back which allows the weight to be shifted further to the rear of the car. This helps the car achieve a higher speed on most tracks.
I purchased a couple of your tools to drill an extended wheel-base and to install the wheels. Since I am using drilled holes instead of slots, do I still need to apply glue to the axles prior to insertion?
Generally, the holes are snug enough to hold the axles in place. But if they seem to not be tight enough, put a small drop of white glue on a toothpick, swish it inside the hole, remove the toothpick, make sure no glue is on the side of the car, and then insert the axle.
Another way to glue axles in place is to drill access holes in the bottom of the car which expose the tips of the inserted nails. Glue can then be placed into the holes. This method has the advantage of allowing the axles to be glued in place after the alignment is set correctly.
Is there an advantage to minimizing the clearance to the 3/8 inch limit or should the car ride taller? I noticed in the race that some other cars appeared to have a better start than my son’s car, but he made up time on the flat part of the track with his COG. With the car being slightly lower than most, I am thinking that the lever action of the gate may result in his car leaving the starting line just a split second later and could be the difference in the finish order?
Generally, cars with low clearance are more stable, and perform better. Likely, the cars that had the jump at the gate either had a raised wheel (and yours didn’t), or used weight reduced wheels.
The starting pin can be an issue on tracks that have a manual gate where the speed of the operator’s hand affects the speed of the gate. But most modern tracks have spring-loaded gates which negates this issue.
Want Answers?
Do you have a pinewood derby-related question? If so, e-mail us your question.We answer all questions by e-mail, but not every question will appear in the Q&A section of the newsletter.
Back Issues
Are you a new subscriber, or have you missed some of the previous newsletters? Don’t miss out; all of the issues for Volume 5 through Volume 17 are posted on our web site.
Newsletter Contributions
We welcome your contributions. If you would like to contribute an article, a web site review, a speed tip, or a pinewood derby memory, please e-mail us.
Subscription Information
The Pinewood Derby Times is a free e-newsletter focused on pinewood derby racing. It is published biweekly from October through March.
If you haven’t already done so, please forward this issue to your pinewood derby friends. But please don’t subscribe your friends. Let them decide for themselves. Thanks.
If this newsletter was forwarded to you, why not subscribe to receive this newsletter. There is no cost, and your e-mail address is safe, as we never sell or share our distribution list.
To subscribe, send a blank e-mail to
[email protected]
You will receive a confirmation e-mail. Reply to the confirmation e-mail and you will start receiving the Pinewood Derby Times with the next issue.
Randy Davis, Editor, Pinewood Derby Times
E-Mail: [email protected]
(C)2018, Maximum Velocity, Inc. All rights reserved. Please do not reprint or place this newsletter on your web site without explicit permission. However, if you like this newsletter we grant permission, and encourage you to e-mail it to a friend.
Maximum Velocity disclaims any personal loss or liability caused by utilization of any information presented in this newsletter.
The Pinewood Derby Times is not specific to, and is not affiliated with the Boy Scouts of America, YMCA, Awana, or any other organization.
(R)Maximum Velocity is a registered trademark of Maximum Velocity, Inc.
(R)Pinewood Derby is a registered trademarks of the Boys Scouts of America.
(R)Awana is a registered trademark of Awana Clubs International.
All other names are trademarks of their respective owners.