– Feature Article – Five Keys to Performance
– Pinewood Derby Car Showcase
– Memory – Pinewood Derby Perspective
– Q&A
Five Keys to Performance
(This article first appeared in Volume 3, Issue 12, March 3, 2004)
I can’t count how many times I have been asked, “How do I make my pinewood derby car go fast?” If you have been involved in pinewood derby racing for any time at all, or if you have been a subscriber to this newsletter, then you understand that there is no simple formula for success, and thus no simple answer to this question. But since I am asked the question, I provide five keys to unlock the performance of pinewood derby cars.
1 – MAXIMIZE MOMENTUM
Maximum weight; Add weight towards the rear of the car
In an automobile, momentum helps the car keep rolling when you take your foot off the gas. In a similar way, momentum helps a pinewood derby car to continue rolling as fast as possible on the flat section of the track. Momentum must be maximized for top performance, and the key to momentum is weight. In each race, there is a maximum allowable weight for the car (usually five ounces, but certainly check your local rules). Momentum is maximized when your car has the maximum allowable weight for your race.
For a five ounce maximum weight, you will likely need to add two or three ounces of weight to the car. But where on the car do you add the weight? Add the weight towards the rear of the car.
Tests show that best performance is achieved on most tracks when the weight is added towards the rear of the car. This can be overdone, but a simple test to make sure the car is properly weighted is to balance the finished car on the edge of a ruler. The car should balance somewhere between 1 and 1-1/4 inches in front of the rear axle.
Does the type of weight matter? The maximum weight can be achieved with any type of weight; however, the type of weight does affect how easily the desired weight can be achieved. Denser weights (such as Lead or Tungsten) take up less space, so it is easier to reach the maximum weight. Also, since denser weights require a smaller volume of space, they allow creation of more aerodynamic cars (which is Key 2).
By the way, if you are in a BSA-sponsored race, ignore the picture on the front of the BSA kit. Use the slot closest to the end of the block as the rear axle.
2 – AERODYNAMICS
Profile and body features minimized to improve air flow
If you asked me a year ago, “How do I make my pinewood derby car go fast?” I would not have included aerodynamics as a key. However, since that time I have read one study and performed another, both of which showed that the effect of aerodynamics on pinewood derby car performance is not trivial (see Volume 3, Issue 9 – “The Big Debates – Aerodynamics”).
There are many elaborate ways to improve aerodynamics, but to simplify matters, let’s use the following principles:
- Low-profile cars (smaller surface area as viewed from the front of the car) will tend to outperform higher-profile cars.
- Cars should taper from a smaller surface area in the front to a (possibly) larger surface area in the rear.
- Edges running across the car should be rounded or tapered.
- Wings, sails, flags, pennants, etc. add to the surface area, thus they tend to decrease performance.
- Unfilled (major) holes can catch air and slow down a car.
To add some balance to this topic, Key 2 (aerodynamics) is not as important as the other four Keys, so I don’t suggest that you sacrifice looks to achieve an aerodynamic shape. If your child wants to build a car that is not particularly aerodynamic, don’t worry about it. Just make sure that the other four Keys are carefully followed.
3 – WHEEL/AXLE PREPARATION
Axles – no flaws, straight, polished; Wheels – no flaws, polished
All of the frictional losses in a pinewood derby car come from the wheels and axles. Start by inspecting the parts in your kit to make sure they are usable. If a part has a serious flaw, replace it.
Next, prepare the nails.
- Place the nail in the chuck of a drill and use a Mini-File to remove the flashing under the nail head and minimize the ridges on the shaft. Beveling the nail head slightly is also a good idea.
- Optionally use the Pro-Axle Press to ensure that the nails are straight and round.
- Finally, polish the axles with an Axle Polishing Kit until they are bright and shiny.
To prepare the wheels, use the Pro-Hub Tool to square the wheel hub. Then use a Pro-Wheel Mandrel and some fine grit sandpaper to polish the wheels. If allowed by your local rules (and the configuration of your wheels), use the Pro-Hub Tool to cone the inside wheel hubs.
4 – LUBRICATION
Quality lubricant; applied properly
Lubrication is an extremely important key. The difference in time between a well-lubricated car and a car without lubrication can be one-half second or more (this translates into several feet on the track).
Most people use graphite for lubrication. Graphite is carbon that has been ground up into a fine powder. There are many varieties and qualities of graphite available at hobby and hardware stores, so make sure to get a good brand. We offer Tube-O-Lube brand, which has been proven to produce top results in pinewood derby racing.
When lubricating with graphite, take the time to work it in thoroughly; a casual puff before the race is not sufficient. After lubricating, make a few test runs to break in the lubricant (or free spin the wheels several times). Since graphite works best after a break-in period, don’t re-lubricate between race heats.
If you use a liquid lube (such as NyOil II), make sure to follow the recommended application procedure. With liquid lubes, less is best.
5 – ALIGNMENT
Car goes straight
In order for the car to get to the finish line as quickly as possible, it needs to go straight. If it zigzags down the track, it will travel a longer distance, but worse it will continually lose speed as it bumps and rubs against the guide rail.
To minimize the amount of alignment adjustment needed, make sure that the axle slots/holes are perfectly parallel to each other and the axles are straight. Also, when using axle slots, make sure that the axles are inserted perfectly straight. The Pro-Axle Press and the Pro-Body Tool are great tools to help minimize the need to align the wheels. In addition, the Pro-Axle Guide will help you insert the wheels and axles properly.
There are a few different alignment procedures, and they vary depending on the use of axle slots or holes. The best procedure is to use shims made from wax paper to adjust the alignment. This procedure is documented in our booklet Speed to the Finish. But a simpler method is as follows:
- Determine which of the front axles appears to be the most out of alignment (or with a raised wheel, adjust the wheel/axle that is on the ground).
- Make a mark on that axle where it comes out of the car body.
- Remove the axle from the car and remove the wheel.
- Using a vise, pliers, etc. very slightly bend the front axle at the point marked in step 2 (the Pro-Axle Press works well as an axle holder).
- Replace the wheel and re-insert the axle.
- Roll the car on a smooth and level surface.
- If it does not roll straight, slightly rotate the bent axle by grasping the axle head with a pair of pliers.
- Repeat steps 6 and 7 until the car rolls straight.
CONCLUSION
There are many other things you can do to create a competitive pinewood derby car. If you want to read further, our booklet, Speed to the Finish thoroughly documents the techniques and tips needed to get top speed out of your car.
But whatever you do, just remember that to create a competitive pinewood derby car, don’t lose your Five Keys!
Pinewod Derby Car Showcase
Thrasher: Dave & DJ DeFelice
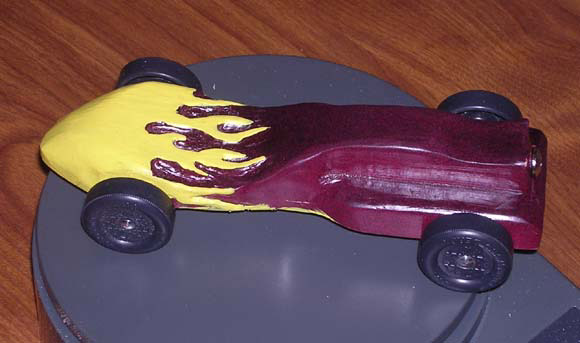
This is my son DJ’s car. He is 7 years-old, and a Wolf in Pack 196 in Milford, Connecticut. I cut the shape out on my band saw, and helped him carve out the flame design with a Dremel tool. DJ sanded the car, and then I painted the burgundy and black and DJ painted the yellow flames. He then polished the axles and added the weights.
Yoshi: Jim Mason
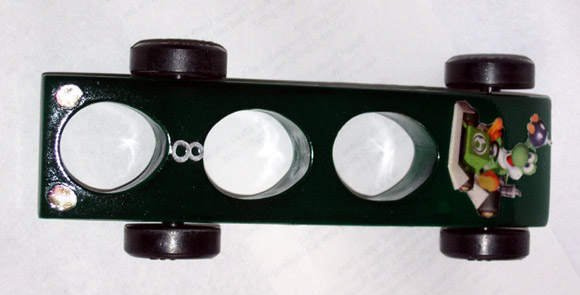
My Bear Cub wanted something different this year, while still wanting to produce a fast car. He decided to use a Yoshi theme (the character from Nintendo’s Super Mario Kart, a video game we’ve tackled together), but he said he still wanted his car to be different. After browsing the Internet, as I’m sure many dads do, I borrowed the cut hole design in the body and suggested we modify the design to make our holes to have an egg shape, because Yoshi throws eggs in the game.
We painted it green, pasted on some photos of Yoshi and were off to the races. We took first in the pack, setting a new track record, and took third overall in our district race. (The tungsten cylinders and axle polishing kit are a must have for any serious racers. Plus, the Pro-Axle Guide was a huge hit in my pack and with several leaders at the district race. I can’t say enough about it other than it’s another must have.
Blue Venom: Larry Cox
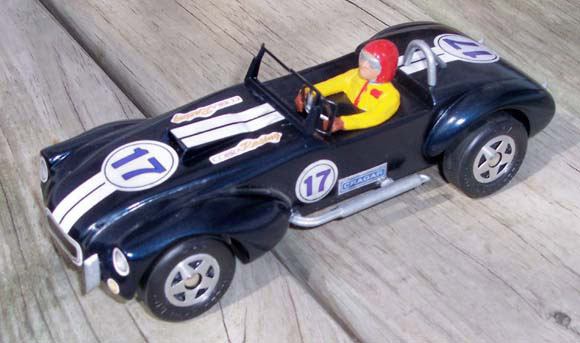
This is a Dad’s car we built this year. We used a PineCar kit with your matched BSA wheels and axles. The paint is Dupicolor and we used the kit decals. It looks good, but I lost to my son in the open class!
Pinewood Derby Memory
Pinewood Derby Perspective
My scout has officially run his last race and moved on to Boy Scouts, so I would like to pass along some of my memories, both good and bad as I end this chapter of our scouting trail.
I grew up as a scout but in my pack we never had a pinewood derby; until my son’s race I hadn’t even heard of it. But I enjoy building things and I was ready to give it a shot when we heard about the pinewood derby.
Our first year neither of us knew anything about weighting, aerodynamics, or any of the many things that can speed up a car. I did a little research and found out about deburring and polishing and that was about it for our first year.
My son and his coping saw cut out his car and I helped him use a drill to hollow out the bottom for the stock triangle shaped weights. We hot glued it together, put some stickers on it, and called it a car. It looked like a 7 year-old build it, but we thought it was great.
When we arrived at the race I realized there were some parents who took this a little more seriously than I ever dreamed possible. My hope was my son would enjoy the race, have a good time, and learn a little about building something. When they announced the double elimination rule – two losses and you were out – I had this terrible feeling my son was going to lose early, he would be upset that all his hard work was for nothing, and the night was heading downhill.
In the end he wound up the winner of his den and one of the 3 overall winners that went on to the District race. He didn’t do well at the district race but he was just happy he made it. I was, to say the least, astonished.
Everyone assumed that since I worked around cars during the day, I obviously knew some kind of trick and built the car for him. Whatever, I brushed it aside till next year; at which point I got hooked.
I did hours of research, I told my son when things were wrong, and I did more work than he did. It didn’t look much better than the previous year’s car, it didn’t win and we didn’t have as much fun building it.
There were some track problems and some questionable rulings, and due to some incorrect handwritten postings we lost earlier than we should have. But I let it go and decided if I didn’t like the way it worked I better get involved and do it myself.
The next year we needed a new committee chair for the derby and I volunteered. I researched all the different ways to run a race and equipment available, and wound up buying the race management software to avoid the posting problems of the past.
I borrowed our church basement, bought a copy of the Maximum Velocity movie, and showed it at a workshop. A few parents brought tools and supplies. I found a few designs for those who needed help getting started, and even the parents who didn’t have the slightest idea on how to build a car were able to build something together with their kids. Some needed very little help, some needed a lot of help, but they all walked out of the workshop able to bring a race car to the practice and the event.
However, while I was spending all this time working on making the program better for all the kids I gave my son less help than ever before. It wasn’t till the night before the race I realized I may have made it better for all the other Scouts, but I didn’t make it better for my son.
The race had tons of technical difficulties with the old 4 lane wooden track throwing cars, and the timer showing cars that obviously did not win as winning. The worst scenario was when a fairly slow car finished fourth on our 4 lane track the timer, but the timer recorded it as 8th place.
My son did pretty good taking 2nd in his Den with the minimum amount of help I gave him, but we didn’t get to do much of it together.
The only bright spot was the parents. They told me how much more they enjoyed the derby than in years past. The kids really got to run their cars, and having refreshments and food made it more like a party.
It wasn’t so much that they told me that, but they made it a point to thank my son for the work I did. In his eyes I did something really special, even if it wasn’t specifically for him. To have your 9 year-old son tell you he is proud of you is more tremendous a feeling that I can ever begin to put into words.
OK that was it!! The next year was going to be the jewel of all races, the one that people would talk about across the land. As it turned out I think people are still talking about it. We held a Popcorn sale and made enough money to buy (what my research determined) the biggest, baddest, Pinewood Derby Track combination on the market – a 44 foot, 6 lane aluminum track with laser gate timing, and double-sided remote display. If you could get it, we got it.
We set up a camera for replays, connected the computer to a projector, and had the Boy Scouts come in to run the concessions with coffee and donuts in the morning progressing to pizza, candy and drinks in the afternoon. We had special driver’s licenses laminated with the kid’s pictures holding their cars. This was going to be cool …
… right up until the battery died on the camera and the projector couldn’t be set up in a good place. The quicksand continued. One lane of our new track was unusable as it had a big bump we couldn’t adjust, and it was throwing cars everywhere. We reconfigured the races which extended the time. Then the gate didn’t trip and we had to power the system down fairly often. Then the back side of the display was reading different from the front side of the display, and people were getting frustrated.
I had built in enough time that even though things went wrong by missing lunch and a break, by the finals we were caught up. Then the timer froze: no times, no places, no results.
I was extremely fortunate that year to have a family out of the blue step up and help. They, for all intensive purposes, ran the show as if they had planned it themselves. They helped solve the problems, they helped keep everything running, they were the ones who, in the end, really made a bad situation turn out as well as could be expected. Pinewood LaserGate2005. I am sure people are still taking about it.
Then this year, our last year, the same family took the track and spent hours fixing the lanes, and running countless hours of tests to finally determine our problem from the year before (most likely a combination of an overheated power supply and a bad serial port cable). They set up the races, they organized the location, they did every aspect of the show and it turned out tremendous.
As for my son and his car, he and I spent quite a few hours working on it together. Now that he is 11, I showed him the information I had and we discussed together what type of weight to use, where to place it, and which design he wanted. I got all the tools out and I put all the tools away, but he used them. He deburred his own axles, he polished them, and he picked the weights. He built his car and I got to watch how it was supposed to be done.
He built it, he won it, and he went on to the district races again, a great way to end his Cub Scout racing career.
The Scouts (and /or parents) who built those District cars were serious contenders. I overhead a few comments that made me realize that even though we didn’t win I guarantee we got more out of our experience than those so called winners will ever know.
“Oh his dad just bought one already assembled on E-bay; it’s supposed to be a winner.” or “… and when he grows up then he can build one for his kids.”
I saw the movie Down and Derby; I was almost there. Parents don’t let this opportunity to work WITH your kids pass you by.
RJ Irwin
P.S. I want to once again give Maximum Velocity a huge thank you for all the help over the years. Please continue to help others as you have helped me.
Q&A
What is the best method to cut lead wire into lengths? A hacksaw?
I recommend cutting the lead with a pair of heavy cutters, like diagonal cutters. If you don’t have those, you can place the lead on a concrete surface, set the edge of a flat-blade screwdriver on the lead, and drive the screwdriver through the lead with a hammer.
Avoid using a saw as it creates lead particles that can be difficult to clean up. Whatever you do, make sure to wash your hands thoroughly after handling lead, and reuse or properly dispose of any lead fragments.
I am a demonstrator of the Dremel company, and during a pinewood derby car demonstration using the Demel line of tools I was told by one of the adults that he placed a drop of Elmer’s glue around each axle opening on the car body. When the glue dried there was a glassy smooth surface to reduce friction between the wheel hub and the car body. Is this legal?
Well, it depends on interpretation. The vast majority of races have a rule such as “Wheel bearings, washers, and bushings are prohibited.” The key question is: “What is a bushing, bearing, or washer?”.
Per The American Heritage Dictionary of the English Language:
Bushing: “A fixed or removable cylindrical metal lining used to constrain, guide, or reduce friction.”
Bearing: “A device that supports, guides, and reduces the friction of motion between fixed and moving machine parts.”
Washer: “A flat disk, as of metal, plastic, rubber, or leather, placed beneath a nut or at an axle bearing or a joint to relieve friction, prevent leakage, or distribute pressure.”
So, in the strictest interpretation of the rules the glue would be considered a ‘bearing’ or a ‘washer’, and would be illegal. However, in practice, this technique would likely pass inspection in most races, as most people would consider a bushing, bearing, or washer as a separate, movable part on the axle shaft.
I was wondering about the center of gravity (COG). Your guidance has always been 1 to 1-1/4 inch in front of the rear axle. I am wondering if this is overly conservative? It seems that I read somewhere on your site about 7/8 of an inch. Would this be pushing things too far?
I am now recommending 3/4 to 1 inch for most tracks, so 7/8 inch is fine. If your track is very smooth (surface and track joints), the wheels have been trued, and the alignment is dead-on, then you can have a more aggressive balance point. I have not heard of anyone successfully going past 1/2 inch, but many people successfully race at 5/8 inch. Just recognize that the more aggressive the balance point, the greater the risk of disaster.
Want Answers?
Do you have a pinewood derby-related question? If so, e-mail us your question.We answer all questions by e-mail, but not every question will appear in the Q&A section of the newsletter.
Back Issues
Are you a new subscriber, or have you missed some of the previous newsletters? Don’t miss out; all of the issues for Volume 5 through Volume 17 are posted on our web site.
Newsletter Contributions
We welcome your contributions. If you would like to contribute an article, a web site review, a speed tip, or a pinewood derby memory, please e-mail us.
Subscription Information
The Pinewood Derby Times is a free e-newsletter focused on pinewood derby racing. It is published biweekly from October through March.
If you haven’t already done so, please forward this issue to your pinewood derby friends. But please don’t subscribe your friends. Let them decide for themselves. Thanks.
If this newsletter was forwarded to you, why not subscribe to receive this newsletter. There is no cost, and your e-mail address is safe, as we never sell or share our distribution list.
To subscribe, send a blank e-mail to
[email protected]
You will receive a confirmation e-mail. Reply to the confirmation e-mail and you will start receiving the Pinewood Derby Times with the next issue.
Randy Davis, Editor, Pinewood Derby Times
E-Mail: [email protected]
(C)2018, Maximum Velocity, Inc. All rights reserved. Please do not reprint or place this newsletter on your web site without explicit permission. However, if you like this newsletter we grant permission, and encourage you to e-mail it to a friend.
Maximum Velocity disclaims any personal loss or liability caused by utilization of any information presented in this newsletter.
The Pinewood Derby Times is not specific to, and is not affiliated with the Boy Scouts of America, YMCA, Awana, or any other organization.
(R)Maximum Velocity is a registered trademark of Maximum Velocity, Inc.
(R)Pinewood Derby is a registered trademarks of the Boys Scouts of America.
(R)Awana is a registered trademark of Awana Clubs International.
All other names are trademarks of their respective owners.