– Feature Article – Wind Tunnel Testing
– Car Showcase
– Memory – The Guest
– Q&A
Wind Tunnel Testing
In a previous article (Volume 3, Issue 9 – The Big Debates: Aerodynamics), I shared the results of track tests using a car with a varying cross-section. The tests showed that there is an aerodynamic effect on the speed of the car, and the effect was virtually linear with regard to the area of the cross-section. However, since aerodynamics is just one of many factors affecting the performance of a pinewood derby car, it is virtually impossible to gather any more meaningful data regarding the effect of using track tests. What is the recourse? A wind tunnel!
Wind Tunnel Design
Wind tunnels can be quite sophisticated (and expensive). So I chose to build my own using some clever information that I found on the internet.
Figure 1 shows the overall wind tunnel. On the left is a high velocity blower fan that I purchased at Sam’s Club. The acrylic door provides access for placing the car into the tunnel. The digital scale is used for measuring the force on the car (more on this later). The total cost to build this wind tunnel was less than $120, with the major portion being the blower fan and the digital scale (of course I had a few of those lying around).
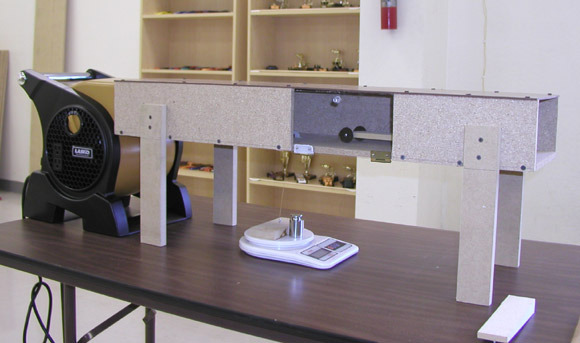
Figure 1 – Wind Tunnel
Figure 2 shows the inside of the tunnel and the air flow grid. The purpose of the grid is to align the air flow parallel with the tunnel to minimize turbulence. The grid is especially important when using a standard bladed fan, but is likely less important when using a blower fan. The grid is made from a fluorescent light diffuser. I cut three equal-sized pieces and then super-glued them together to increase the thickness.
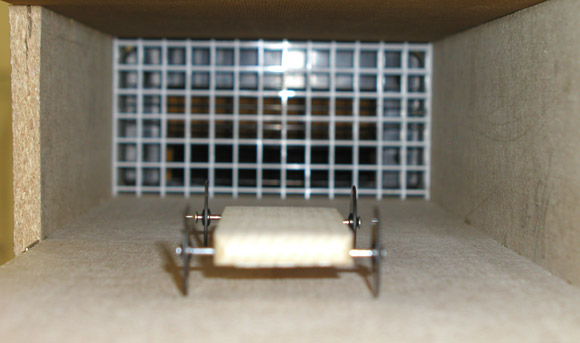
Figure 2 – Flow Grid
Figure 3 shows additional inside detail. The car is attached to a thread which runs over a lightweight, lubricated pulley and down to the scale. An eye hook is screwed into the bottom of the test car, and a small hook is tied to the end of the thread.
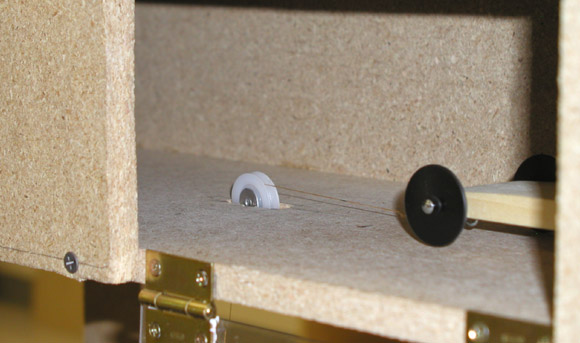
Figure 3 – Interior Detail
Figure 4 shows the scale. The board with the eye hook is glued to the scale. When the scale is turned on, it will zero. It is of course important to make sure there is no pull on the thread while the scale is zeroing. A weight (in this case a 200 gram weight) is then placed on the scale and the reading is recorded. When the fan is started, the car will pull on the thread, unloading the scale. To calculate the force on the car, the new reading is subtracted from the baseline reading previously recorded.
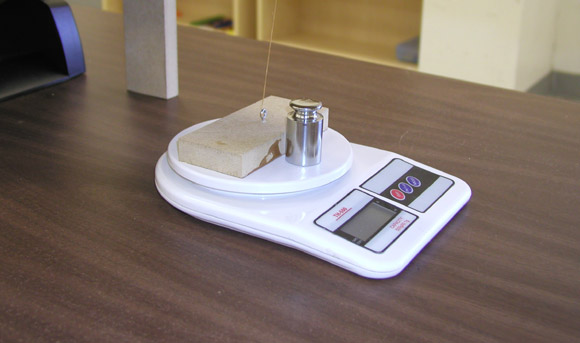
Figure 4 – Scale Detail
There are two additional factors to note. First, because I could not measure wind speed, the results from this wind tunnel cannot be compared with those from another tunnel. Secondly, I used Outlaw style wheels so that the cross-sectional area contributed by the wheels would be minimized. This amplifies the effect of the body shape. If standard (e.g., BSA) wheels are used, the cross sectional area is increased. This will lessen the percent difference in the cross-sectional area between the wedge and the wing, resulting in closer numbers.
Test Detail
To ascertain the aerodynamic effect on various shapes, I prepared the car bodies shown below. Each car weighed 5.0 ounces and the balance point was essentially 1-1/4 inches front of the rear axle. The cross section (in square inches) of each body is listed below.
| Body | Square Inches | Detail |
|---|---|---|
| Block | 2.510 | Blunt Front and Rear |
| Wedge | 1.580 | Blunt Front and Rear |
| Wedge | 1.480 | Tapered Front and 180 Degree Rounded Rear |
| Wing | 0.740 | Tapered Front and Blunt Rear |
| Wing | 0.740 | Tapered Front and 180 Degree Rounded Rear |
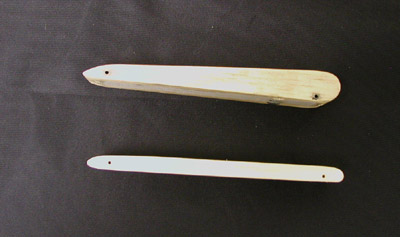 Wedge and Wing, Rounded Rear
A set of our Outlaw wheels and axles were lubed with NyOil II were used for every experiment. As you can see in Figure 2, I didn’t insert the axles all the way as I wanted to minimize any possible damage to the axles during removal.
For each test, the car was placed into the tunnel and aligned parallel with the walls. The thread was attached, the scale zeroed and then loaded, and then the wind was applied. Once the scale reading stabilized, it was recorded. During the experiment I found that the reading fluctuated, so the average reading was used. It’s interesting that the amount of fluctuation was greatest for the least aerodynamic car (the block), and was virtually zero for the most aerodynamic (the rounded Wing). I believe the fluctuation is due to wind eddies that occur as the air moves around the car. So the smoother the path, the fewer eddies occur.
Test Results
The test results are shown in Figures 5 and 6. Note that Figure 5 shows the actual force on the car (that is, the amount of wind drag) in ounces. This is the reading that affects how fast the car goes. The numbers in Figure 6 show the forces divided by the cross sections, and are in ounces per square inch. These numbers relate to the efficiency of design. Note that I tested the rounded wedge forwards and backwards. I had expected the result to be the same, but as you can see the forward facing numbers are better. I believe this is due to the importance of having a rounded rear. If the front of the wedge had been rounded instead of tapered, the forward and backward numbers may have been better.
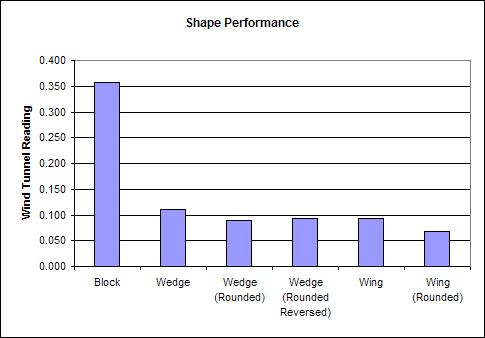
Figure 5 – Shape Performance
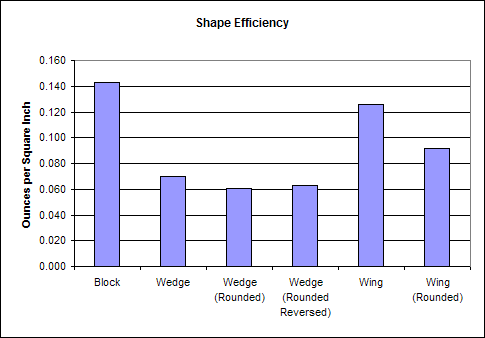
Figure 6 – Shape Efficiency
Interpretation
Here is my interpretation of the results:
- The car with the least wind resistance is the rounded wing. However, the most efficient design is the rounded wedge. This design channels the air the most efficiently; however, due to the larger cross-section it would still run slightly slower than the wing.
- A rounded rear is extremely important to fast speeds and efficient air movement. I was surprised to find that the rounded wedge performed better than the standard wing. But simply rounding the rear of wing significantly improved both the performance and efficiency.
So, if you want the fastest car, keep the cross section small, and round the rear end. This will give you the best bet for a fast car!
Pinewood Derby Car Showcase
Twin Cars: Dave Kaczenski
These car were built by my children, Ed and Sarah Kaczenski, and they had a lot of fun making them. Their cars ended up in the top of his or her class, and to date all of Dad’s cars have lost to Ed and Sarah.
Jeff Gordon Truck: Patrick Henderson
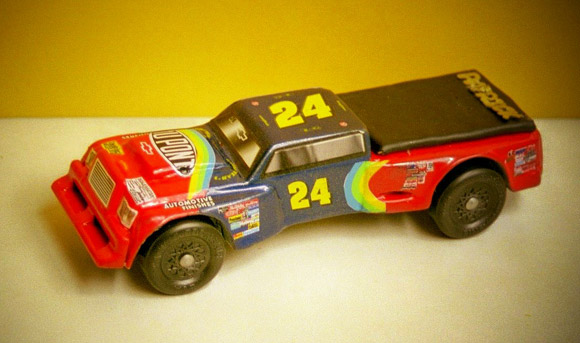
I am Patrick Henderson, and I am in Cub Scout Pack 124 in Indianapolis, Indiana. I am Jeff Gordon’s #1 fan so my dad and me made a Jeff Gordon Truck to race in the Pinewood Derby.
I got the decals at an Indy 500 race car show for a dollar. The man said the decals were in the wrong bin and worth more, but he let me have them for a dollar anyway. All the people there were nice and some of them gave me free Jeff Gordon stuff.
Dad and I started with the block of wood and cut it to the truck shape. I sanded it down and added fenders and the front piece to the truck. I painted the car part red and part blue to look like Jeff Gordon colors. Dad showed me how to put on the decals. I looked at one of my Jeff Gordon cars and put the decals on my truck. My dad’s real truck has a cover on the back and I wanted one on my Jeff Gordon truck. I made a cover for my truck from part of an old glove and glued the Patrick on it.
Dad showed me how to straighten and polish the axles using a drill and supplies we got from your store. It took me a long time to do the axles and my fingers got sort of tired, but they were real shiny when I got done. I put graphite on the axles and tires to make them spin really fast.
I had fun making and racing my car, and showing my car to all my Cub Scout friends. I finished third in my pack and won the Webelos at our district race and I got a trophy and two medals.
We showed my Jeff Gordon truck at the Cub Scout “Race into Scouting” show at the Indianapolis 500 this year. Everybody thought it was pretty cool. I am making a Jeff Gordon Billion Dollar car for the pinewood derby this year.
Lizard: Jeffrey & Chris Corron
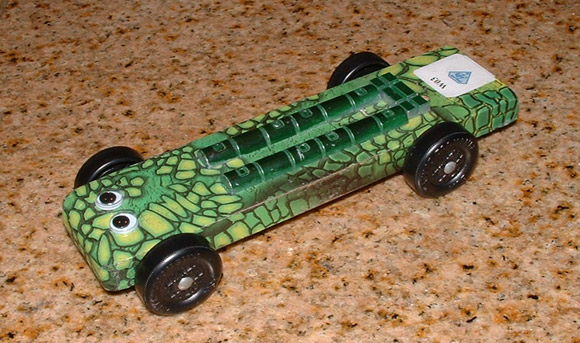
This is Jeffrey’s car from last year. He chose a simple design that was easy to make. The body is a flat 1/2 inch thick plank. The body was thick enough to allow us to inlay a plate of zinc weights in the bottom of the car but not so thick to cause a great deal of wind resistance. He used a Gator Body Skin and painted the weights on top green to make them look like scales. The eyes were the finishing touch. The car ran fast; Jeffrey won the overall district championship. Often, the simplest designs are the best.
Pinewood Derby Memory
The Guest
It was Robby’s second pinewood derby and his bright yellow car was named the “Jedi Knight”. It had won his Cub Scout Pack’s pinewood derby and finished a close second to his older brother’s entry in the ‘Open’ competition that followed. But his pack was small, only eight Cubs, and the local scout council had discontinued the local District Pinewood races several years earlier (they said it made ‘too many losers out of previous winners’), so Robby was left to wonder what it must be like to compete in a BIG Pinewood competition.
Then he received a phone call from his assistant Scoutmaster, who had recently moved from another larger Cub Scout Pack several miles away. He told Robby that he thought he could arrange to enter Robby’s car in the other pack’s pinewood derby the following Saturday. He said there would be over sixty cars competing and so one more couldn’t possibly matter. Robby was thrilled to have the opportunity to compete with so many other Cub Scouts and represent Pack 400 in their race!
When his second derby day finally arrived, Robby was just busting with anticipation! The large room at the church was buzzing with nearly seventy Cub Scouts and their family members, checking in their cars, enjoying refreshments and the pre-race excitement that always seems to precede the derbies in larger packs.
Pack 199’s track was longer and a full five lanes wide! Robby watched as the cars were staged in groups and noticed that his Jedi Knight would race first in Heat #3. Then the competition began!
To Robby’s delight (and my amazement), the Jedi Knight won its first heat! Then the second, and the third!
The competition moved into hour number two, then hour number three and Robby’s car hadn’t lost a single heat!
More and more cars were eliminated, but the bright yellow Jedi Knight remained. In the last of the qualifying heats another car, a shiny black dragster design nosed him out at the finish line! But Robby’s car had enough points to be included in the championship round anyway. Everyone’s excitement grew as the derby officials lined up the five finalists for the finals. There would be three heats with only the top three finishers in each heat receiving points, then the Championship heat would be run with the three cars receiving the most points.
To our continued amazement, the Jedi Knight finished in the final group of three and would compete in the Championship heat!
As they lined up the final three cars, Robby’s yellow Jedi Knight was in lane #2. A bright red car was in lane number one, but the Jedi Knight had beaten it in an earlier heat. But wait, who was that in lane number 3? Yes, it was that same black dragster that had nosed-out the Jedi Knight in the last qualifying round! Robby’s car would race for the championship against the only car that had beaten it all day!
Before we could catch our breath, the championship heat was ready to begin! At the command of the official starter, the cars were released. Down the steep incline came the three cars wheel-to-wheel! Into the straightaway they flew as first the red car then the black dragster seemed to take a slight lead. Then as they reached the final few feet the yellow Jedi Knight in the center lane slipped past the others and across the finish line in FIRST PLACE! Everyone cheered and remarked how close all three cars had been at the finish. What a thrill for all the contestants!
But suddenly, the officials realized that there was a bit of a problem. Sheepishly, the race chairman approached me. “I have a bit of a political problem,” he whispered. “Not really,” I replied, realizing immediately the chairman’s concern. “Robby was here as a guest. He’s had a wonderful time and never expected to win, much less take home a trophy. This is Pack 199’s derby, and the trophies rightfully belong to Pack 199 scouts.”
After a quick huddle with Robby, the race chairman announced the surprising results to the crowd that never suspected that the winning car belonged to their one guest! To Robby’s delight, everyone cheered and applauded and the other contestants hoisted him on their shoulders and carried him around in a big circle chanting his name. “Robby, Robby, Robby! Hurray for Pack 400!” It was their way of saying thanks for being such a good sport as well as a gracious guest!
There was no trophy in the world that could have made Robby’s smile any bigger on that wonderful Pinewood Derby Day!
Rob Roper
Q&A
My pinewood derby rules allow for a shorter length but no adjustment to the wheel base. I am thinking about shaving off the ends of the car. What do you think?
I recommend keeping the cars at full length. This allows you to set the balance point as far up the track as possible, providing the greatest potential energy and acceleration distance for the car. The only exception to this is if you can take some material off the back of the car, but by the use of a very dense weight (like tungsten) can keep the balance point back at the optimal position. We did this on the standard wheelbase version of the Bolt. The car is slightly shorter than normal (length removed from the rear), but the balance point is still optimally placed due to the dense weight in the rear.
On a car with three wheels touching the track, would there be any advantage to staggering the rear wheels so that one was farther forward than the other? What I was considering was locating the rear wheel slightly ahead of the center of gravity on the side of the car that has the raised front wheel. I think that would give the 3 wheel design more stability. Would I reduce the performance of this car, or should I just run it as is?
You may be able to get some advantage from staggering the rear wheels. But don’t move the wheel ahead of the balance point, as the car would tend to rock back towards the rear corner with the offset wheel when it travels through the transition on the track. The offset wheel needs to remain behind the balance point.
I have heard from some people the weight should be at the back of the car, others the front, some say the bottom in the middle what is your opinion?
For a track with an initial slope followed by a long horizontal section, rear weighting will increase performance. However, as the length of the horizontal section increases, the rear weighting should be less aggressive. For a 32 to 35 foot track (fairly standard length), a front to back balance point of 1 to 1-1/4 inches in front of the rear axle works well.
For a track with a continuous slope from start to finish, middle weighting is best.
I am not aware of any track where front weighting is beneficial. I think this erroneous idea stems from people thinking that the weight ‘pulls’ the car down the slope.
In any case, it is best to keep the weight as low as possible on the car. This improves stability and speed.
Want Answers?
Do you have a pinewood derby-related question? If so, e-mail us your question.We answer all questions by e-mail, but not every question will appear in the Q&A section of the newsletter.
Back Issues
Are you a new subscriber, or have you missed some of the previous newsletters? Don’t miss out; all of the issues for Volume 5 through Volume 17 are posted on our web site.
Newsletter Contributions
We welcome your contributions. If you would like to contribute an article, a web site review, a speed tip, or a pinewood derby memory, please e-mail us.
Subscription Information
The Pinewood Derby Times is a free e-newsletter focused on pinewood derby racing. It is published biweekly from October through March.
If you haven’t already done so, please forward this issue to your pinewood derby friends. But please don’t subscribe your friends. Let them decide for themselves. Thanks.
If this newsletter was forwarded to you, why not subscribe to receive this newsletter. There is no cost, and your e-mail address is safe, as we never sell or share our distribution list.
To subscribe, send a blank e-mail to
[email protected]
You will receive a confirmation e-mail. Reply to the confirmation e-mail and you will start receiving the Pinewood Derby Times with the next issue.
Randy Davis, Editor, Pinewood Derby Times
E-Mail: [email protected]
(C)2018, Maximum Velocity, Inc. All rights reserved. Please do not reprint or place this newsletter on your web site without explicit permission. However, if you like this newsletter we grant permission, and encourage you to e-mail it to a friend.
Maximum Velocity disclaims any personal loss or liability caused by utilization of any information presented in this newsletter.
The Pinewood Derby Times is not specific to, and is not affiliated with the Boy Scouts of America, YMCA, Awana, or any other organization.
(R)Maximum Velocity is a registered trademark of Maximum Velocity, Inc.
(R)Pinewood Derby is a registered trademarks of the Boys Scouts of America.
(R)Awana is a registered trademark of Awana Clubs International.
All other names are trademarks of their respective owners.