– Shop Talk – Making Weight Pockets
– Pinewood Derby Car Showcase
– Q&A
Shop Talk
Making Weight Pockets
Mounting weights on pinewood derby cars can be done in many ways. The easiest way is to screw plates on the bottom of the car. The next simplest is to drill holes into the side, back or bottom of the car, and then insert lead or tungsten into the holes.
Another way to weight a car is with pockets in the bottom of the car. To create a very low-profile car and to focus the weight in one area, tungsten cubes are oftentimes used. These cubes are tightly packed and glued into pockets in the bottom of the car.
Although weight pockets can be made with more sophisticated machinery such as routers and mortising machines, they can also be made with a hand drill and a chisel. Today, I will share some tips to take the pain out of making pockets by hand.
Drilling
Before we start drilling, let’s cover some preliminary steps:
- To make clean pockets, you must use a Brad Point or Forstner drill bit. These bits create relatively flat-bottomed holes with straight sides, which greatly reduce the amount of chiseling which will be required, and minimizes the risk of damaging the car.
- Always make the pockets on the raw block. It is much easier to clamp, drill, and chisel into a block than it is to work on a shaped car. Also, if damage is done, then you can easily start again.
- Select a drill bit that is properly sized for the work you are doing. If you are a making pocket to hold one row of 1/4 inch cubes, then a 1/4 inch drill bit is perfect. If you are making a pocket for multiple rows of cubes, then use a larger bit (3/8 or 7/16 inch).
- After marking the perimeter of the pocket, clamp the block firmly to a work bench, or place it in a vise. Don’t try drilling into a block that is not firmly locked in place.
Now, let’s move on to the actual drilling. First we need to establish the depth of the pocket. With a hand drill, the easiest way is to wrap a piece of masking tape around the bit at the pocket depth. Then when drilling, you can stop when the masking tape reaches the wood.
 Figure 1 – Masking Tape on Drill Bit (marking 1/4 inch of depth)
Start by drilling one hole at each corner of the pocket, making sure to stop at the masking tape. Then continue drilling holes around the perimeter of the pocket, and the interior of the pocket. The goal is to remove as much wood as possible with the drill bit.
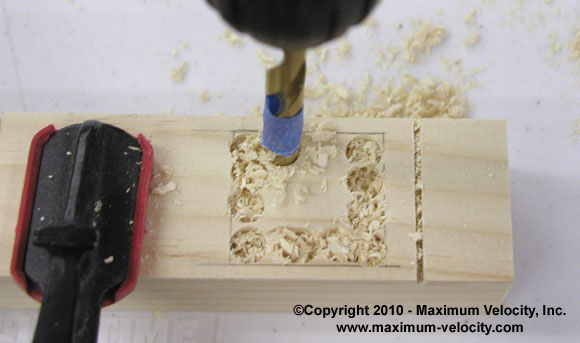 Figure 2 – Drilling Holes
Chiseling
Now let’s look at chisels. Similar to selecting a drill bit, select a wood chisel that is appropriately sized. For a 1/4 inch wide pocket, use a 1/4 inch chisel. For larger pockets, a 1/2 inch chisel will work fine. Next, make sure the chisel is very sharp – a dull chisel will lead to a damaged car. Finally, be very careful with a chisel. NEVER, EVER pull a chisel towards you, or push a chisel towards your hand.1 Treat the chisel like a knife and handle it accordingly.
Now with the block still clamped in place, hold the chisel vertically and press it down along the perimeter of the pocket – generally a hammer is not needed. Work around the pocket, squaring out the corners. Then, clean out any remaining wood in the interior of the pocket. Two tricks:
- When squaring corners, square along the grain of the wood first, then square across the grain.
- Cut a small amount of material at a time – taking too much material can result in a damaged block.
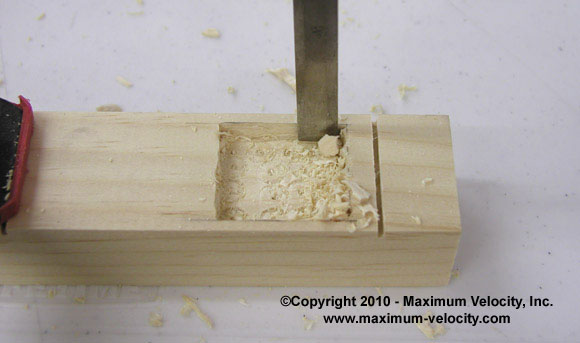 Figure 3 – Chiseling
Test fit the weight into the pocket. If it doesn’t quite fit, then expand the pocket slightly with the chisel.
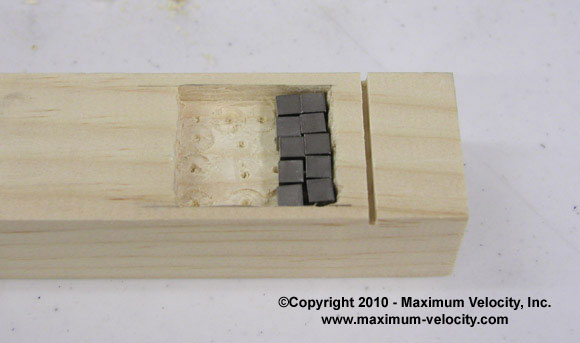 Figure 4 – Testing the Pocket
The bottom of the pocket will have tiny holes from the center tip of the drill bit. If the car will be thicker than the depth of these holes, then they can be left alone. But if the car will be just a little thicker than the depth of the pocket, from the bottom of the pocket fill the holes with some wood filler. Allow the filler to dry before slicing the car.
Now that the weight has been accommodated, you can shape and finish your car. Good luck with the race!
1Since Maximum Velocity began over 10 years ago, we have only experienced two significant accidents in our shop. One of the accidents occurred during a workshop for our local race. A father broke a chisel rule (Never push a chisel towards your hand) resulting in a decent sized gash on the palm of his hand.
Pinewood Derby Car Showcase
Tres Pooches – Bob Richardson
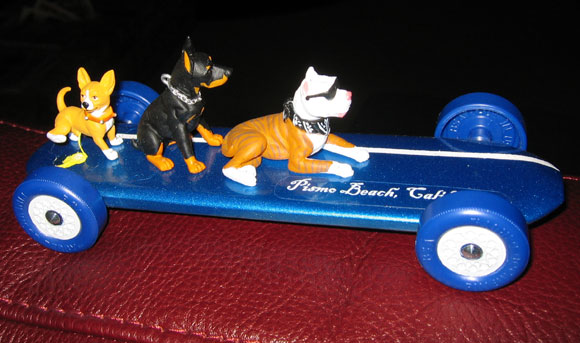
We have a family pinewood derby every year after the Cub Scout derby. This year I won a ribbon for the funniest car. The car also won 2nd in the men’s division. Lots of fun!
Luke’s Ride – Bob Richardson
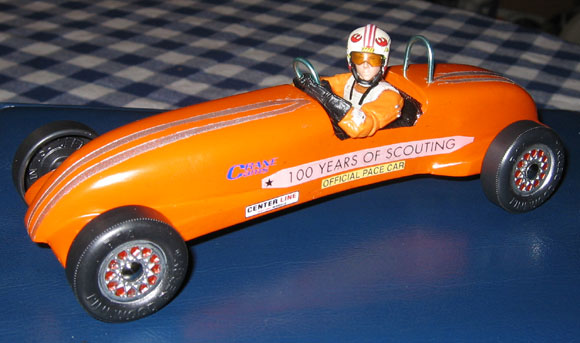
Luke’s Ride was a fun car to build. It took first place at the Scout- O-Rama race in Santa Maria, California, on February 6th in the bandit class, which was open to adults and kids alike. Luke Skywalker was bought as an action figure and cut in half. The wheels were colored with an orange Sharpie pen. When my wife Carol saw the car, she said,”Where in the world did you find a figure that looks like our son Gene!”
King Boo – Justin Martin
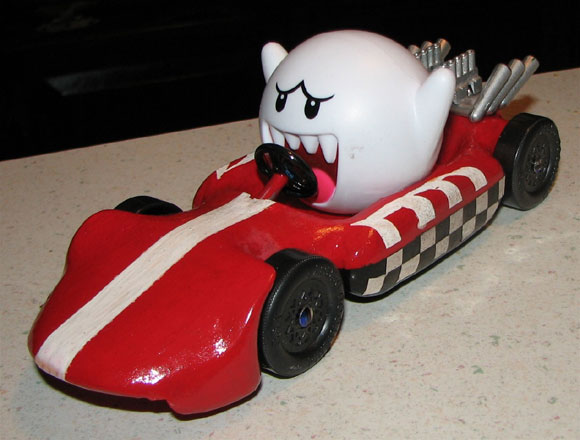
Inspired from the character in the Mario Kart video game from Nintendo, King Boo took 2nd (by a very close margin) in our pack race. My son picked the design and helped sketch it on the block of wood and did most of the base paint work. He was too young to use the tools for the most part, and didn’t have the patience that was needed to make the car win just a few races. I didn’t have the greatest tools with which to work with, but it was all worth it to see the smile and excitement on his face as he won race after race. The car was the talk of the race.
To get the long nose on the front I had to re-drill the axle holes as far back on the car as possible. The Boo figurine was from a Burger King kid’s meal; I epoxied it in, hoping it wouldn’t fly off when it hit the stop at the bottom. The aluminum engine and plastic exhaust pipes were from toy cars. Because of the design of the car I could not get the center of gravity as far back as I wanted, but tried by drilling lots of holes and filling them with BB’s. If I could do it all over I might tweak a few things, but I can’t complain about the results — plus I got some great memories, pictures, and video.
Q&A
Can you tell me where I can get clear coat for my cars? It seems like a good solution to get the contact area smooth where the wheels touch the side of the body.
It is best to use the same brand of clear coat as the paint. But if you can’t find that brand, you can try Duplicolor clear coat (sold at Autozone, Checker, etc). Just make sure to test the clear coat on a scrap of wood painted with the same paint as your car. There can be incompatibilities between paint and clear coat.
However, if you are just trying to get a hard finish where the wheel will touch the car body, you can coat that area with clear nail polish.
How do you measure the relative speed of a pinewood derby car? I see so many cars claiming that their car went over 200 MPH. How do you figure that out?
The 200 MPH speed is, of course, a scale speed, not an actual speed. To calculate the scale speed, you would measure the distance between the starting pins and the finish line in inches, then convert to miles by multiplying the measurement by 0.00001578 miles/in. Next, convert the heat time to hours by multiplying the time by 0.0002778 hours/sec. Then, divide the distance in miles by the time in hours. This gives you the actual MPH. To convert to scale speed, you measure the length of an actual car and divide it by 7 inches. Generally this results in a number between 25 and 27. Then multiply the actual MPH times the scale factor.
Note that times or speeds cannot be compared from track to track, as times and speeds are dependent on the track length, composition, starting height, and slope angle.
If you have race management software, most of these products will calculate the scale speed. In Grand Prix Race Manager, for example, you configure the software with the track length and the vehicle scale — the software does the rest.
Want Answers?
Do you have a pinewood derby-related question? If so, e-mail us your question.We answer all questions by e-mail, but not every question will appear in the Q&A section of the newsletter.
Back Issues
Are you a new subscriber, or have you missed some of the previous newsletters? Don’t miss out; all of the issues for Volume 5 through Volume 17 are posted on our web site.
Newsletter Contributions
We welcome your contributions. If you would like to contribute an article, a web site review, a speed tip, or a pinewood derby memory, please e-mail us.
Subscription Information
The Pinewood Derby Times is a free e-newsletter focused on pinewood derby racing. It is published biweekly from October through March.
If you haven’t already done so, please forward this issue to your pinewood derby friends. But please don’t subscribe your friends. Let them decide for themselves. Thanks.
If this newsletter was forwarded to you, why not subscribe to receive this newsletter. There is no cost, and your e-mail address is safe, as we never sell or share our distribution list.
To subscribe, send a blank e-mail to
[email protected]
You will receive a confirmation e-mail. Reply to the confirmation e-mail and you will start receiving the Pinewood Derby Times with the next issue.
Randy Davis, Editor, Pinewood Derby Times
E-Mail: [email protected]
(C)2018, Maximum Velocity, Inc. All rights reserved. Please do not reprint or place this newsletter on your web site without explicit permission. However, if you like this newsletter we grant permission, and encourage you to e-mail it to a friend.
Maximum Velocity disclaims any personal loss or liability caused by utilization of any information presented in this newsletter.
The Pinewood Derby Times is not specific to, and is not affiliated with the Boy Scouts of America, YMCA, Awana, or any other organization.
(R)Maximum Velocity is a registered trademark of Maximum Velocity, Inc.
(R)Pinewood Derby is a registered trademarks of the Boys Scouts of America.
(R)Awana is a registered trademark of Awana Clubs International.
All other names are trademarks of their respective owners.