– Feature Article – Derby Kits: Many Choices for Buyers
– Pinewood Derby Car Showcase
– Memory – Peter’s Car
– Q&A
Derby Kits: Many Choices for Buyers
Although the Cub Scout kit and the PineCar kit are likely the most widely distributed kits, there are a large variety of kits on the market today. In many cases, the kits are sold through the sponsoring club, but several of them are available to any group that would like to use them.
In this article, I will identify each kit, and provide details on kit preparation. You can find this same information along with an applicability chart for our specialty tools here.
Cub Scout Grand Prix Pinewood Derby® Kit
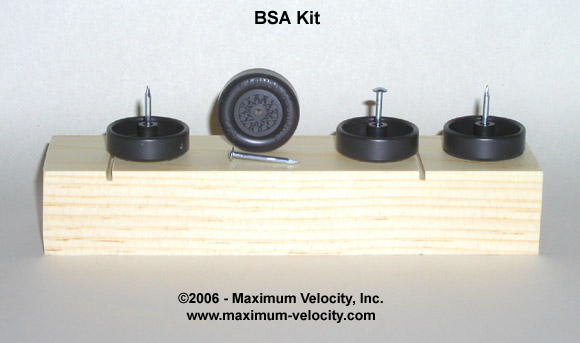
The Cub Scout Grand Prix Pinewood Derby Kit consists of the following:
- 1 Wood Block: 1-3/4W x 1-1/4H x 7L inches, offset 1/8 inch deep axle slots, with a wheelbase of 4-3/8 inches
- 4 Nail Axles
- 4 Wheels: hard plastic, full profile, solid sidewall, raised lettering “BSA Pinewood Derby”
Block Tips
- Use a square to verify that the axle slots are square to the block. If not, replace the block.
- Use the axle slot closest to the end of the block as the rear axle.
- Use the Pro-Body Tool to pilot drill the axle slots (or if allowed by the local rules, use the Pro-Body Tool to drill axle holes on the opposite side of the block).
Axle Tips
- Remove the burrs under the nail head, and the crimp marks on the shaft with a Mini-File. Place the axle in the chuck of a drill (head outwards), and apply the file to the spinning axle. To minimize contact with the wheel hub, slightly bevel the axle head with the file.
- Straighten and round the axle shaft with the Pro-Axle Press
- Polish with an Axle Polishing Kit
Wheel Tips
- Optionally, use the Pro-Wheel Shaver to true the wheel before polishing. – Using a Pro-Wheel Mandrel, polish the tread surface and inside edge with wet, 600 grit sandpaper.
- Use the Pro-Hub Tool to bevel the inside wheel.
- Polish inside the wheel bore with Wheel Bore Polish.
- Lubricate with graphite or specialty oil.
Awana Grand Prix Car Kit
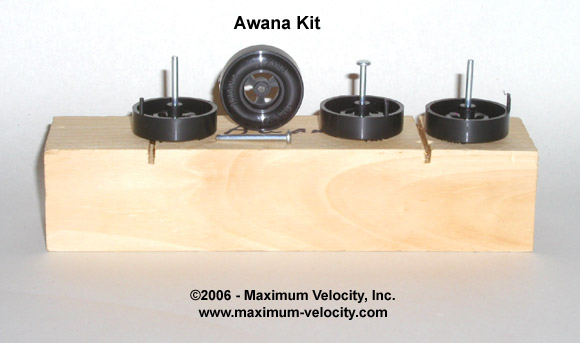
The Awana Grand Prix Kit consists of the following:
- 1 Wood Block: 1-3/4W x 1-1/2H x 6-13/16L inches, centered 3/16 inch deep axle slots with a wheelbase of 3-13/16 inches
- 4 Axles: hinge-pin type
- 4 Wheels: soft plastic, full profile, see-through sidewall, 3 spokes, raised lettering “Awana Grand Prix”
Block Tips
- Most Awana blocks are shorter than 7 inches. If so, replace the block. – In many Awana races, the wheelbase can be extended. If an extended wheelbase is allowed in your race, purchase an Extended Wheelbase Block, or use the Pro-Body Tool (Part #5145) to drill axle holes in your existing block.
- If you are using the slots on an official Awana block, use a square to verify that the axle slots are square to the block. If not, replace the block.
Axle Tips
- To minimize contact with the wheel hub, slightly bevel the axle head with the file. Place the axle in the chuck of a drill (head outwards), and apply the file to the spinning axle.
- Polish with an Axle Polishing Kit. Skip the two coarsest papers in the kit.
Wheel Tips
- If present, use a sharp knife to cut off the molding spike.
- Using a Pro-Wheel Mandrel, polish the tread surface and inside edge with wet, 600 grit sandpaper.
- Use Pro-Hub Tool to bevel the inside wheel hub.
- Polish inside the wheel bore with the Pro-Bore Polisher.
- Lubricate with graphite or specialty oil.
CSB “Shape N Race” Car Kit
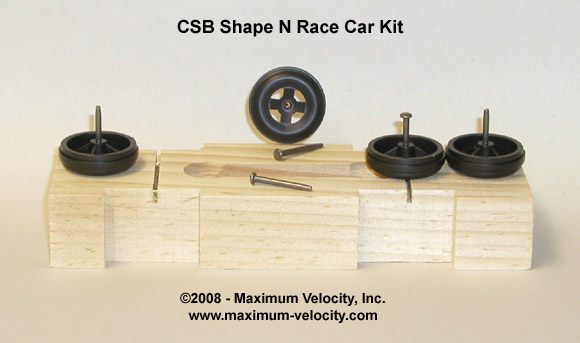
The CSB Shape N Race car kit consists of the following:
- 1 Wood Block: 2-1/4W x 1-1/8H x 6-15/16L inches, offset 7/32 inch deep axle slots with a wheelbase of 3-11/16 inches. The wheels inset into the block. A weight pocket is pre-milled into the bottom-middle of the block.
- 5 Axles: hinge-pin type
- 4 Wheels: hard plastic, full profile with a raised ridge, see-through sidewall, 4 spokes, no raised lettering
Block Tips
- Use a square to verify that the axle slots are square to the block. If not, replace the block.
- Use the axle slot closest to the end of the block as the rear axle.
Axle Tips
- To minimize contact with the wheel hub, slightly bevel the axle head with the file. Place the axle in the chuck of a drill (head outwards), and apply the file to the spinning axle.
- Polish with an Axle Polishing Kit. Skip the two coarsest papers in the kit.
Wheel Tips
- You can use a Pro-Wheel Mandrel to lightly polish the tread surface and inside edge with wet, 600 grit sandpaper. However, due to the raised ridge, it is quite easy to remove too much tread surface material. So polish lightly.
- Use the Pro-Hub Tool to bevel the inside wheel hub.
- Polish inside the wheel bore with the Wheel Bore Polish.
- Lubricate with graphite or specialty oil.
Mv Basic Car Kit
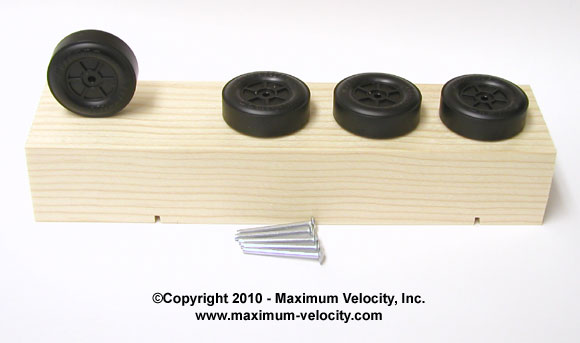
The MV Basic Car Kit consists of the following:
- 1 Wood Block: 1-3/4W x 1-1/4H x 7L inches, offset 1/8 inch deep axle slots with a wheelbase of 4-3/8 inches
- 5 Axles: hinge-pin type with beveled head
- 4 Wheels: hard plastic, full profile, solid sidewall, raised lettering “Maximum Velocity”
Block Tips
- Use a square to verify that the axle slots are square to the block. If not, replace the block.
- Use the axle slot closest to the end of the block as the rear axle.
- Use the Pro-Body Tool to pilot drill the axle slots (or if allowed by the local rules, use the Pro-Body Tool to drill axle holes on the opposite side of the block).
Axle Tips
- Polish with a metal polish such as “Brasso” (hardware store) or “Mother’s Chrome Polish” (auto parts store).
Wheel Tips
- Optionally, use the Pro-Wheel Shaver XT to true the wheel before polishing.
- Using a Pro-Wheel Mandrel, polish the tread surface and inside edge with wet, 600 grit sandpaper.
- Use the Pro-Hub Tool to bevel the inside wheel hub.
- Polish inside the wheel bore with Wheel Bore Polish.
- Lubricate with graphite or specialty oil.
Pinecar Basic Kit
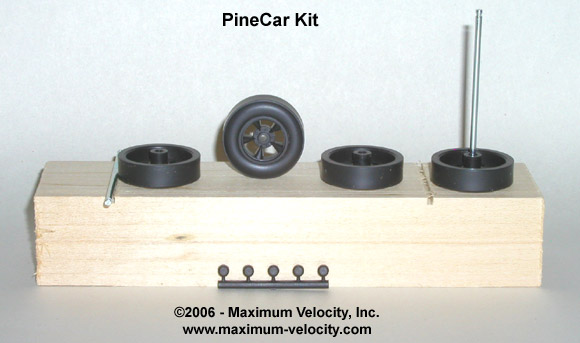
The PineCar Basic Car Kit consists of the following:
- 1 Wood Block: 1-3/4W x 1-5/16H x 7L inches, offset 1/16 inch deep axle slots with a wheelbase of 4-7/16 inches
- 2 Axles: Solid rods with retention grooves for hubcaps (the newer kits also include four nail axles)
- 4 Plastic Hubcaps
- 4 Wheels: hard plastic, full profile, see-through sidewall, 5 spokes, no raised lettering
Block Tips
- Use a square to verify that the axle slots are square to the block. If not, replace the block.
- Use the axle slot closest to the end of the block as the rear axle.
- If you cannot cut the axles (see step 1 under ‘Axles’), then make sure the block is no wider than 1-11/16 inches wide. Sand the block as needed to reach this measurement.
Axle and Hub Cap Tips
- If allowed by your local rules, use diagonal cutters to remove 1/4 inch from the middle of each of the axles. You will now have four independent axles, which allows the wheel gap to be properly set, and facilitates a raised front wheel.
- Place the axle in the chuck of a drill and polish the area near the hub cap retention ring with an Axle Polishing Kit.
- Polish the inside of the hub caps with wet, 600 grit paper.
Wheel Tips
- Optionally, use the Pro-Wheel Shaver XT to true the wheel before polishing.
- Using a Pro-Wheel Mandrel, polish the tread surface and inside edge with wet, 600 grit sandpaper.
- Use the Pro-Hub Tool to bevel the inside wheel hub.
- Polish inside the wheel bore with the Wheel Bore Polish.
- Lubricate with graphite or specialty oil.
RA Car Kit
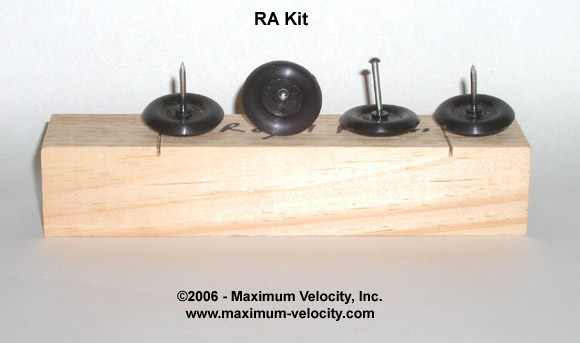
The RA Car Kit consists of the following:
- 1 Wood Block: 1-5/8W x 1-3/8H x 7L inches, offset 1/8 inch deep axle slots with a wheelbase of 4-3/16 inches
- 4 Axles: nail-type
- 4 Wheels: hard plastic, narrow symmetrical profile, solid sidewall, raised lettering “Royal Racer” on some wheels
Block Tips
- Use a square to verify that the axle slots are square to the block. If not, replace the block.
- Use the axle slot closest to the end of the block as the rear axle.
- Use the Pro-Body Tool (part #5145) to pilot drill the axle slots (or if allowed by the local rules, use the Pro-Body Tool to drill axle holes on the opposite side of the block).
Axle Tips
- Remove the burrs under the nail head, and the crimp marks on the shaft with a Mini-File. Place the axle in the chuck of a drill (head outwards), and apply the file to the spinning axle. To minimize contact with the wheel hub, slightly bevel the axle head with the file.
- Straighten and round the axle shaft with Pro-Axle Press.
- Polish with an Axle Polishing Kit.
Wheel Tips
- Optionally, use the Pro-Wheel Shaver XT to true the wheel before polishing.
- Using a Pro-Wheel Mandrel polish the tread surface with wet 600 grit sandpaper. Make sure to remove the seam around the middle of the tread.
- Use the Pro-Hub Tool to bevel the inside wheel hub.
- Polish inside the wheel bore with the Pro-Bore Polisher.
- Lubricate with graphite or specialty oil.
Note that the side of the wheel with the raised lettering is mounted away from the car.
Royal Ranger Kit
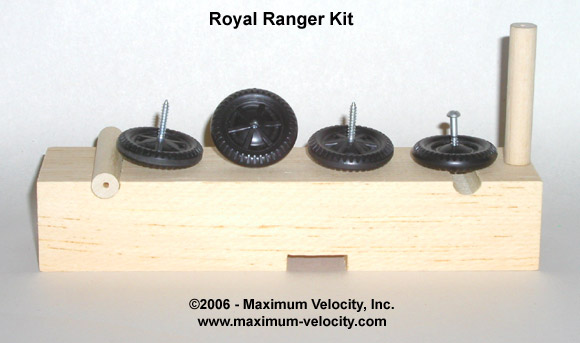
The Royal Ranger kit (same kit is also supplied by S&W crafts) consists of the following:
- 1 Wood Block: 1-3/4W x 1-5/16H x 6-15/16L inches, driver cut-out, extended-centered axle channels (3/8 semi-circular) with a wheelbase of 5 inches
- 2 Dowel rod axle struts with pilot holes
- 4 Axles: screw-type
- 4 Wheels: hard plastic, narrow profile. Some wheels have six spokes on one side and a hemisphere on the other (the inside of the wheel), while other wheels have four spokes on both sides.
Block Tips
- Use a square to verify that the axle channels are square to the block. If not, replace the block.
- Many races allow the car to be 7-1/2 inches long. Since the block is only 6-15/16 inches long, extend the length by gluing on a 1/2 inch ‘nose’ of wood or another material.
- Use the axle channel closest to the end of the block as the rear axle.
- Use the Pro-Body Tool for Royal Rangers (Part #5148) to re-drill the pilot holes in the axle struts.
Axle Tips
- Remove the burrs under the screw head with a Mini-File. Place the axle in the chuck of a drill (head outwards), and apply the file to the spinning axle. To minimize contact with the wheel hub, slightly bevel the screw head with the file.
- Polish with an Axle Polishing Kit.
Wheel Tips
- Optionally, use the Pro-Wheel Shaver XT to true the wheel before polishing. A 1/8 inch bushing is required.
- Using a Pro-Wheel Mandrel polish the tread surface with wet 600 grit sandpaper. Make sure to remove the seam around the middle of the tread.
- Polish inside the wheel bore with the Pro-Bore Polisher.
- Lubricate with graphite or specialty oil.
Pinewood Derby Car Showcase
1962 Cub Cadet: Bill Mathews
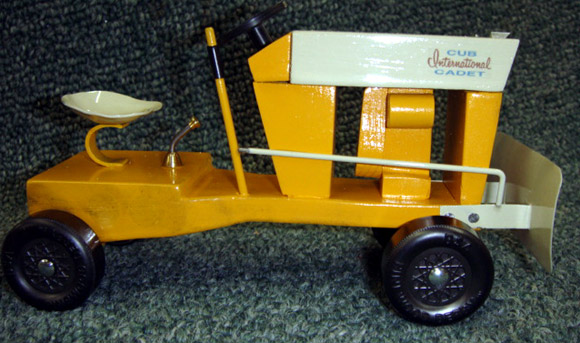
This is a model of our 1962 Cub Cadet original by father-son team Bill and Taylor Mathews. Pine and balsa wood were used in the construction. The snowplow is cut from a scout popcorn tin.
Pink Flip-Flop & Spine-O-Mite: Kevin Willhite
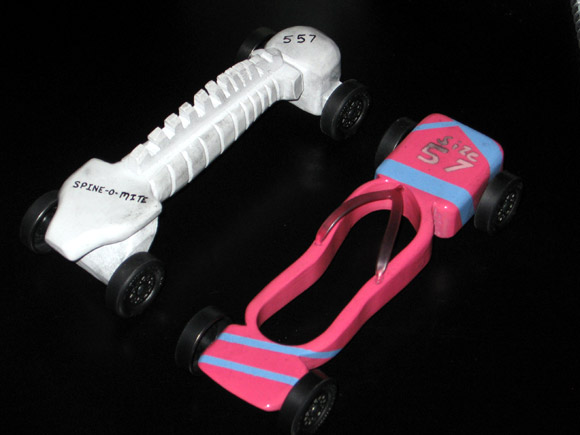
This is my daughter’s “pink flip-flop” car and my “Spine-O-Mite” car. She loves pink and flip-flops and I am a chiropractor. Both cars were made with Maximum Velocity parts, except the flip-flop thong which came off of a car air freshener.
Pinewood Derby Memory
Peter’s Car
Back in 2001, I was a Tiger Cub Den Leader. When the day of our Pinewood Derby arrived, all of the boys brought their cars to the inspection. You could tell that parental help was involved, but you could also tell that the boys had a hand in building the cars.
The exception was Peter. You could tell that Peter’s parents probably offered little help. The block was an unsanded, rough cut wedge with a coat of gold spray paint. When we inspected Peter’s car, it was way under weight. Peter went to the pit area, borrowed some duct tape and taped coins on his car until it weighed exactly 5 ounces. What a sight: rough cut, unsanded, with a clump of duct-taped coins on top. But to our great surprise, that car took 2nd Place and earned Peter a spot in the district competition. I don’t think I’ve ever seen a boy more excited at a Pinewood Derby.
Gary Holewinski, Scoutmaster, Troop 38
Erie Shores Council, Toledo, Ohio
Q&A
My grandson competed in a district meet. After the completion of the first four runs he was in second place out 106 cars. But I noticed that each heat was slightly slower than the previous. This same thing happened last year. What might be the problem?
Congratulations on building a fast car, but sorry to hear that the speed didn’t hold. Assuming you used graphite as the lubricant, it sounds like either:
- Not enough graphite was applied (so it ran out very quickly), or
- Enough graphite was applied but too much break-in was done (so, the car was past the peak of performance when it started).
Make sure to thoroughly lubricate and then simulate a few runs by spinning the wheels. Just don’t over do it.
When our car ran at the district race, the times were inconsistent with a range of about 1/10 of a second. What causes this?
Inconsistent times are generally due to:
- Inconsistent staging (common when someone other than the owner is staging the car).
- Alignment issues (car hits the guide rail a different number of times on each run). This can largely be eliminated with the rail-riding technique.
- Bad track conditions (random as to whether bad spots are hit on a given run).
- Varying lane quality. Times between different lanes do vary, so to achieve a fair race cars should always be ran a consistent number of times on each lane.
Want Answers?
Do you have a pinewood derby-related question? If so, e-mail us your question.We answer all questions by e-mail, but not every question will appear in the Q&A section of the newsletter.
Back Issues
Are you a new subscriber, or have you missed some of the previous newsletters? Don’t miss out; all of the issues for Volume 5 through Volume 17 are posted on our web site.
Newsletter Contributions
We welcome your contributions. If you would like to contribute an article, a web site review, a speed tip, or a pinewood derby memory, please e-mail us.
Subscription Information
The Pinewood Derby Times is a free e-newsletter focused on pinewood derby racing. It is published biweekly from October through March.
If you haven’t already done so, please forward this issue to your pinewood derby friends. But please don’t subscribe your friends. Let them decide for themselves. Thanks.
If this newsletter was forwarded to you, why not subscribe to receive this newsletter. There is no cost, and your e-mail address is safe, as we never sell or share our distribution list.
To subscribe, send a blank e-mail to
[email protected]
You will receive a confirmation e-mail. Reply to the confirmation e-mail and you will start receiving the Pinewood Derby Times with the next issue.
Randy Davis, Editor, Pinewood Derby Times
E-Mail: [email protected]
(C)2018, Maximum Velocity, Inc. All rights reserved. Please do not reprint or place this newsletter on your web site without explicit permission. However, if you like this newsletter we grant permission, and encourage you to e-mail it to a friend.
Maximum Velocity disclaims any personal loss or liability caused by utilization of any information presented in this newsletter.
The Pinewood Derby Times is not specific to, and is not affiliated with the Boy Scouts of America, YMCA, Awana, or any other organization.
(R)Maximum Velocity is a registered trademark of Maximum Velocity, Inc.
(R)Pinewood Derby is a registered trademarks of the Boys Scouts of America.
(R)Awana is a registered trademark of Awana Clubs International.
All other names are trademarks of their respective owners.