– Feature Article – Scaling Up Part 2
– Pinewood Derby Car Showcase
– Memory – How close? Very close.
– Q&A
Scaling Up Part 2: Design a Pinewood Derby Car from a Toy Car
In the first part of this article (“Scaling Up: Design a Pinewood Derby Car from a Toy Car”, Volume 6, Issue 12 – March 7, 2007), the various aspects and considerations of a scaling up from a toy car were considered. These considerations included scale factor, fenders, wheelbase, etc.
In today’s article, we will go through the process of scaling up a toy car, including photos and comments on each step of the process. In general, this process can be adapted for any toy car.
Car Selection
The first step is to select a car to build. In picking the car, certainly consider ease of building, as well as aesthetics. After scrounging through my son’s collection of cars, I chose a recent model VW Beetle (see Figure 1). Ever since I drove a ‘Bug’ in high school, I have always thought it would be fun to own one; at least now I will have a pinewood derby version!
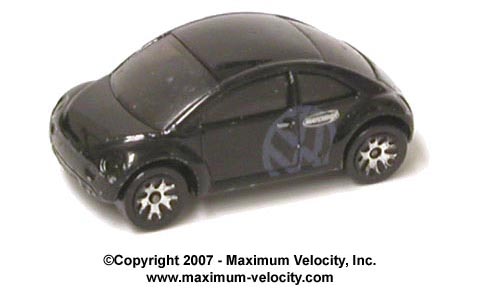
Figure 1 – VW Beetle Toy Car
Although the final result will not likely be a speed demon, it will be ‘cute’, and will adequately demonstrate the scaling process. But more to the point, it is a design that I have confidence that I can build without pulling (the rest of) my hair out!
Scale Factor, Etc.
To calculate the scale factor, first measure the length of the toy (2.46 inches) and divide this number into 7 inches, resulting in a factor of 2.85. Multiplying this factor by the height (0.85 inch) results in 2.4 inches. This is rather tall for a pinewood derby car, but will still meet the height limits and can be achieved by gluing two blocks together.
The width of the toy car measures 1.29 inches. Scaling this up results in a width of 3.26 inches. Obviously, this is too wide, so we will stick with the basic body width of 1.75 inches plus 0.375 inches of fender on each side (overall width of 2.5 inches). The resulting car will appear slightly narrow, but that’s the breaks.
To maintain the look of the car, let’s directly scale the wheelbase. This will result in a wheelbase that is longer than a standard BSA wheelbase, so the car might not be legal in all races. If desired, the wheelbase can be adjusted to match the BSA wheelbase (or any wheelbase), but for this exercise I prefer to keep the look of the car as close as possible to the model. Axle locations: Toy – 0.39 inch, Model – 1.1 inches from ends of the block
Template
Now that we have crunched the numbers, I’ll share a simple method to create a properly scaled template for the side of the car. First, take a digital photo of a side of the car. This photo must capture the side of the car as dead-on as possible; if the photo is skewed left, right, up, or down, the template will be skewed in a similar fashion. I recommend using a tripod, and then taking several photos at slightly different positions until you get a perfect side-on shot.
Next, bring the photo into a photo editing program. Crop the photo tight against the two ends and the bottom of the car. Then scale the photo to 7 inches long, allowing the height to adjust proportionally. Print out the photo onto a piece of card stock, cut out the outline, and voila, you have a perfect template (see Figure 2).
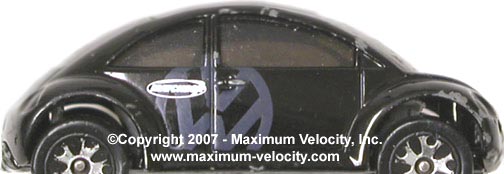
Figure 2 – Template of Side View
Building
As mentioned, the model car will require two standard blocks glued together to achieve the height, and two 3/8 inch pieces of wood, glued on either side of the car to accommodate the fenders and achieve the overall width. With that much wood, the weight of the car will likely exceed 5 ounces. So, I picked two of the lightest blocks I could find. Still, much wood weight will need to be removed; I’ll show you an easy way to do this.
First, glue the two blocks together, aligning the sides and ends as closely as possible. Make sure to clamp the blocks firmly, and allow the glue to completely dry. Then sand the sides of the blocks flat, eliminating any ‘bump’ at the glue joint.
Next use the template to mark the axle drilling locations and trace the outline. The outline will not be used for cutting out the car, but will instead be used to help mark an area of the block for removing excess wood weight. In Figure 3, the area marked with the ‘X’ will be cut out. When marking this area, make sure to leave sufficient material to glue on the sides of the car, and leave the area around the fender wells intact. I also marked two spots on the bottom of the car for weight holes.
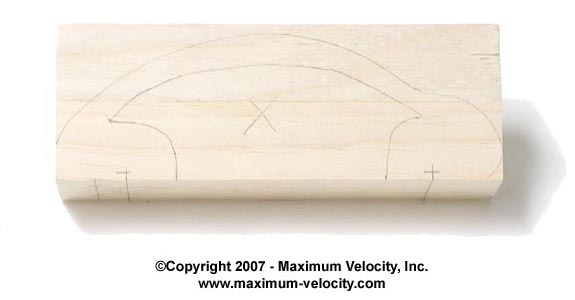
Figure 3 – Marked Block
Now it is time for the first machining steps. Drill the axle holes (#44 bit for BSA axles, 3/32 inch bit for Awana axles). I drilled the axle holes 1/8 inch off the bottom of the block, all four wheels on the ground. Then drill the two weight holes with a 25/64 inch bit (or similar – to accommodate lead wire). Next, cut out the center area. Figure 4 shows the result of these steps.
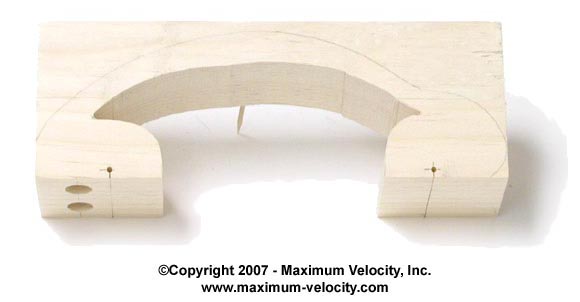
Figure 4 – Machined Block
Now we shift to the side pieces. I recommend using Basswood. This wood is clean-grained, softer then pine (simplifies shaping), and is readily available in various shapes at most hobby or craft stores. I used a piece measuring 24 x 3 x 3/8 inches. Trace the template and mark the axle locations, then flip the template over and repeat (in other words, create a mirror image for the other side of the car). Make sure to leave material below the car outline to simplify creating the wheel wells (see Figure 5).
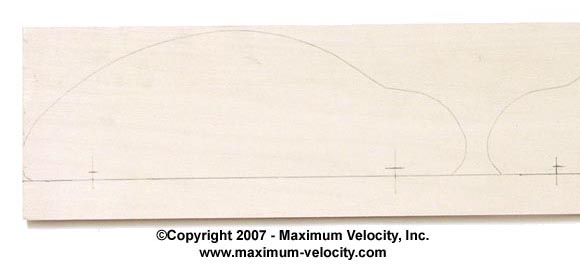
Figure 5 – Marked Sides (right side of photo is cropped off)
Now we will use an appropriate-sized Forstner bit (the diameter is calculated from the toy).1 Make sure to place the side piece on a scrap board as you drill, or the wood will ‘chip out’ as the bit exits the wood. Then cut off the excess wood from the bottom of the side pieces (see Figure 6).
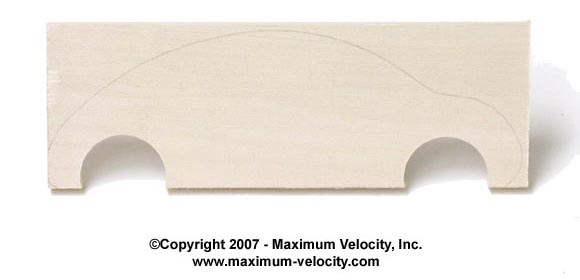 Figure 6 – Machined Sides
Now it is time to glue the side pieces onto the main body. I used two scrap BSA wheels and axles to make sure the fender wells lined up with the axle holes. Again clamp firmly, and allow the wood to dry before continuing (see Figure 7).
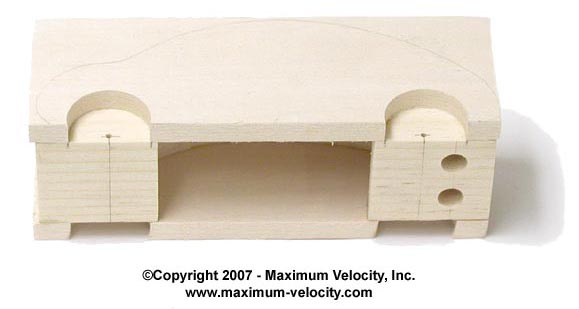
Figure 7 – Sides Glued to Body
Okay, let’s cut out the profile and sand it to a reasonable level of smoothness (this isn’t the final sanding). Now we have the basic VW Beetle without any detail work.
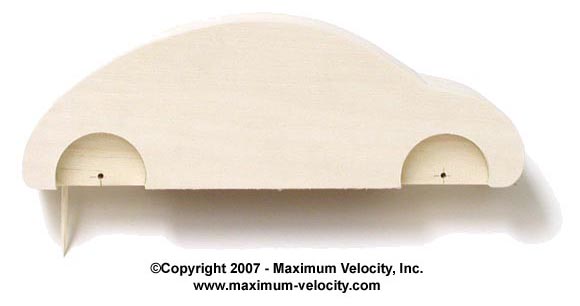
Figure 8 – Cut and Sanded Body
At this point use the toy car to pencil in detail lines. I chose to highlight the fender wells and the sides of the car, but you can do more detailing if desired (see Figure 9).
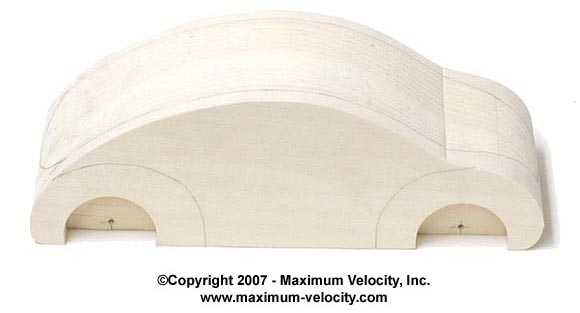
Figure 9 – Detail Lines
Here is where my skill level starts to get weak. I know many of you are very adept with a Dremel-type tool. Unfortunately, I flunked Dremel 101, so I must stick with wood rasps and sandpaper for shaping. After an hour of work, I ended up with the body shown in Figure 10. The body, without wheels, axles, or weight comes in at 3.6 ounces.
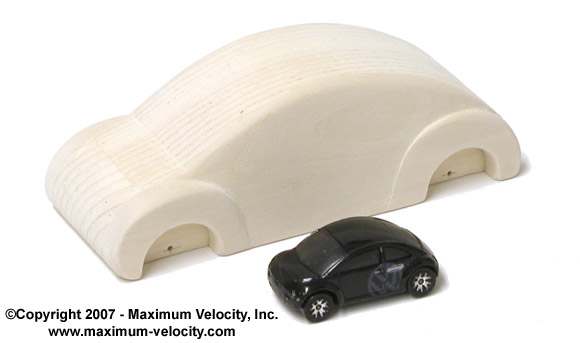
Figure 10 – Shaped Body
With a paint job provided by a talented local painter, and the addition of some window trim, the completed Beetle is shown in Figure 11.
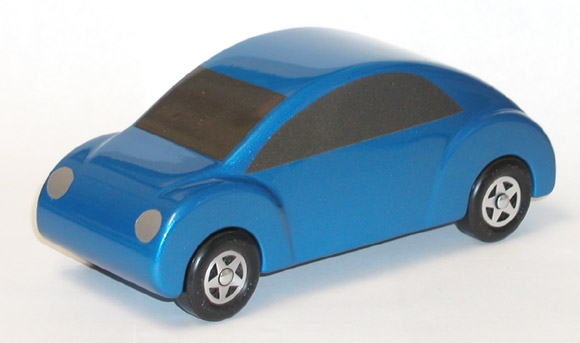
Figure 11 – Completed Car
Conclusion
This was a fun project, which resulted in a nice show car. You can use the same techniques to make a show car or a competitive car. Just make sure to plan ahead and use the step by step process I have outlined. If you do scale up a toy car, please send a photo and description. I’ll be glad to include it in a future edition of this newsletter.
1This is one mistake I made. I used a 1-1/4 inch bit, as I knew it would allow BSA wheels to fit. However, this bit was not large enough to accurately model the size of the wheel wells on the toy car. I should have used a 1-1/2 inch (or larger) bit.
Pinewood Derby Car Showcase
Today’s showcase cars are examples of scaling from model cars.
Venom: Steven & Noah Hunnicutt

Noah developed this design based on a Hot Wheels “Venom” car. The tricky part was drilling holes sideways and vertically, and carving out the shape with a Dremel tool. Two sets of tapered weights are screwed to the bottom. At the race, Noah won a trophy for “Most Creative”.
Formula One: Lawrence Eaton
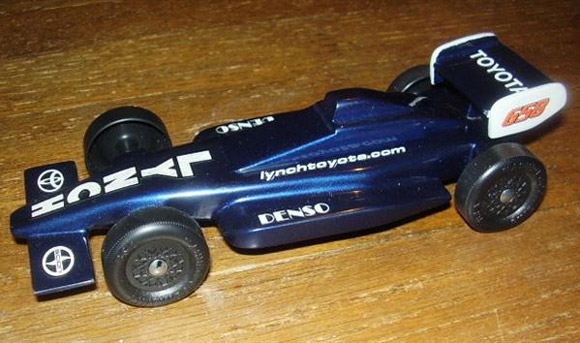
In November of 2007, Toyota (New York Region) started what (hopefully) will be an annual pinewood derby for the service technicians of all the Toyota dealerships in the region. The region is broken into districts, with the dealerships of each district competing, and those winners then compete against the other district winners at the Regional finals to be held in New Jersey. My district had its race last night (eight dealerships, thirty-one entries). Using parts, tools, and information from your web site, my Formula One car was not only the Best in Show, but also the district winner.
’69 Mustang: Lyle D. Leis
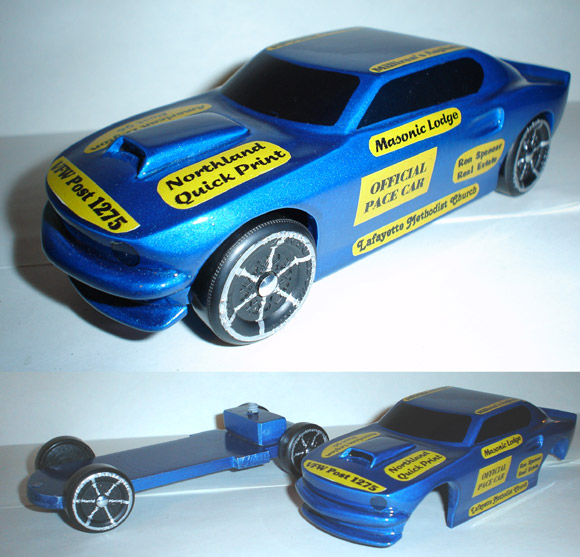
I thought you might be interested in a pinewood derby car I recently built based upon a ’69 Mustang Hot Wheels car.
My son’s Cub Scout pack recently sought donations to purchase a new pinewood derby track. To show the pack’s appreciation, I was asked to build a pinewood derby pace car that would show the track sponsor names, and be used to commemorate the opening of each year’s race.
I chose the ’69 Mustang because of its classic appeal and its easily recognizable features. I limited myself to the wheelbase, overall size and weight of a standard BSA pinewood derby car, since I wanted to show the scouts what was possible within the confines of the rules.
The hollow car body was glued up from 0.25 inch thick pine based upon the profile drawing I designed. It was shaped, sanded, primed, and painted with sapphire blue metallic enamel followed by high gloss clear coat. Since the rules required the use of only unaltered official BSA wheels, the large wheels and low profile tires had to be simulated with paint.
Unlike most pinewood derby cars, the chassis and running gear was made as a separate unit and the hollow body was attached to the chassis. This allowed the body proportions to be more realistic. The small block under the body is a hollow compartment that holds lead shot, allowing for slight adjustments in weight to meet the weight limit.
The windows and sponsor names were created using a Testors’ custom decal kit available at hobby stores.
As you can see, I could not completely capture the original, but the car is clearly a ’69 Mustang. The second photo shows the body separate from the chassis. Many people can’t appreciate the time and effort that went into this wooden car, but I think that your readers might have a pretty good idea.
The Pace Car was a big hit at the race and it was very rewarding to see the admiration of the Cub Scouts and parents. We hope to send photos to the sponsors showing their logo along with a note of thanks signed by the Cub Scouts in the Pack.
Pinewood Derby Memory
How close? Very close.
I am the Cascade Pacific Council Thunderbird District Pinewood Derby Chairman, and have been so for about five years. For several years more I have also been holding pinewood derby speed clinics for Cub Scouts in my district, as well as pinewood derby classes at the yearly council Pow Wow for adult Cub Scout leaders. The intention is to make as many as possible aware of the rules applicable to pinewood derby car building, as well as creating a level playing field by sharing building techniques and speed secrets.
In the pack I am associated with we have an Open Class division for anyone who wishes to build and race a car. The main intention is to help prevent a Dad from dominating the building process for his son’s car (much like you see in the movie Down and Derby). Of course fun for more people is the byproduct. I also have an open class division during the district race. In both cases the cars must be built to the same standards as the Cub Scouts cars.
When I hold a Speed Clinic, I hold nothing back. All the building techniques I know are shared with all. This has played against me as far as my being able to dominate in the open class races!
At last spring’s district race a man named John, who happens to also have a son in the same pack as mine, built and raced a car that was the equal of mine. Just how equal I would not have suspected.
We use a six lane aluminum Best Track and a computer program to place and track the cars for the district race. Each car runs six times, once on each lane. The races for all ages had gone smoothly throughout the day and now it was time for the Open Class to race.
The Open Class cars thundered down the track to much cheering. My car was doing well and so was John’s car. When the dust settled and the results were tabulated and compiled by the computer, the operator of the track, Tony, turned to me with a look of shock on his face. He told me I lost to John and it had been close. How close? Very close.
Over six runs of accumulated time of about 20 seconds I had lost to John by a mere one thousandth of a second! Well you just can’t get much more equal then that; and oh yeah, my 13 year old son’s car beat both of us.
Randal Veenker
Q&A
I have seen some cars just ahead of other cars right as the starting gate opens. How do you make a car do that?
To get a faster start you must have one or more of the following factors at play:
- Lighter wheels – less wheel inertia allows the wheels to start rolling faster.
- Raised front wheel – same as above.
- Rounder wheels – more accurate wheels start rolling faster.
- Slicker lube – less friction leads to faster starts.
- Cheater bar (or barge nose) – allows the car to start rolling before traditional cars.
- Good staging – wheels staged away from the rails and the car body will start rolling faster.
There may be a few other possible factors, but these are the main ones.
My daughter will be in a heavy car race, 16 ounces versus the standard 5 ounces. What do you feel would be the correct center of gravity forward of the rear axle? I believe that stability on the flats will be more crucial due to the higher speeds thus a center of gravity further forward of the rear axle versus the normal 1 to 1-1/4 inches for a 5 ounce car would be desirable.
Heavier cars do not generate more speed than lighter cars. Instead, they just tend to hold the speed longer (don’t slow down as quickly). However, I would limit the weight to 10 ounces, as graphite lubes tend to not work as well at heavier weights.
One main issue with heavier cars is strength of design. Since the mass is greater, the stopping force is greater. So they will need to be built robustly to handle the shock of stopping.
I agree with moving the COG forward. A second issue with heavier cars is that the back wheels carry the majority of the weight. By shifting the weight forward, the weight will be more evenly distributed, allowing the lube to work better. This may sacrifice some speed, but it should be made up on the flat as the car will not slow down as fast. The best spot for the COG will be based on track length and other factors.
My son and I normally wait till the last minute to work on our PWD cars. For next year, we would like to get a jump start. I was wondering if we can prepare our wheels and axles now, and store them until we need them? If we prepare them now and store them in a plastic bag in the house, will they warp or need to be touched up or redone when we go to use them next year?
I don’t see any problem with pre-preparing the wheels. But with the axles, the polishing tends to remove the zinc plating; so there is a risk of rust or corrosion. I suggest storing the axles in a baggie with a desiccant, or a light coating of oil. Also, I would wait to lubricate until closer to the event.
Want Answers?
Do you have a pinewood derby-related question? If so, e-mail us your question.We answer all questions by e-mail, but not every question will appear in the Q&A section of the newsletter.
Back Issues
Are you a new subscriber, or have you missed some of the previous newsletters? Don’t miss out; all of the issues for Volume 5 through Volume 17 are posted on our web site.
Newsletter Contributions
We welcome your contributions. If you would like to contribute an article, a web site review, a speed tip, or a pinewood derby memory, please e-mail us.
Subscription Information
The Pinewood Derby Times is a free e-newsletter focused on pinewood derby racing. It is published biweekly from October through March.
If you haven’t already done so, please forward this issue to your pinewood derby friends. But please don’t subscribe your friends. Let them decide for themselves. Thanks.
If this newsletter was forwarded to you, why not subscribe to receive this newsletter. There is no cost, and your e-mail address is safe, as we never sell or share our distribution list.
To subscribe, send a blank e-mail to
[email protected]
You will receive a confirmation e-mail. Reply to the confirmation e-mail and you will start receiving the Pinewood Derby Times with the next issue.
Randy Davis, Editor, Pinewood Derby Times
E-Mail: [email protected]
(C)2018, Maximum Velocity, Inc. All rights reserved. Please do not reprint or place this newsletter on your web site without explicit permission. However, if you like this newsletter we grant permission, and encourage you to e-mail it to a friend.
Maximum Velocity disclaims any personal loss or liability caused by utilization of any information presented in this newsletter.
The Pinewood Derby Times is not specific to, and is not affiliated with the Boy Scouts of America, YMCA, Awana, or any other organization.
(R)Maximum Velocity is a registered trademark of Maximum Velocity, Inc.
(R)Pinewood Derby is a registered trademarks of the Boys Scouts of America.
(R)Awana is a registered trademark of Awana Clubs International.
All other names are trademarks of their respective owners.