– Feature Article – Advice to the Beginner – Keep it Simple!
– Car Showcase
– Memory – The Heart of a Champion
– Q&A
Advice to the Beginner – Keep it Simple!
Countless times I have had the following phone conversation: “Hi, my son just got a pinewood derby kit, but when we opened it all we found was a block of wood, four wheels, and some nails. What the heck are we supposed to do with it? I expected it to have a car that looked like the photo on the box!”
It can be very daunting to participate in your first pinewood derby race. The event demands some woodworking skill, some understanding of physics, and access to some basic tools and supplies. For many people one, two, or three of these requirements are missing.
So, let me share some advice for those of you that are participating in your first race.
CAR BODY
Unless you have some experience with woodworking and the tools of the trade, then I suggest going with a basic wedge-type design. Not only is it a simple shape to cut, it also simplifies sanding and finishing. All that is needed to build a wedge is a saw and a hand drill. If you are missing these items, then you can purchase wedges already cut and drilled from several sources.1
I recommend recessing weight into the car body. With a wedge, the easiest way to do this is to use lead wire2, placing it into holes drilled into the car (see the next section). Holes drilled into the side or back of the car can be covered with wood plugs or with wood filler before finishing.
Note that on many kits – including BSA kits – one axle slot is closest to the end of the block. I recommend using that closest slot as the rear slot (the opposite of the car pictured on the BSA kit box).
WEIGHT AND PLACEMENT
To ensure that the car performs well, you will need to add weight to bring the completed car to the maximum weight (usually 5 ounces). An easy weight to use is lead wire. This product is 3/8 inch in diameter and can be easily cut into pieces and reshaped. Note that this product is not typically available in hobby shops, but is available from some on-line stores. Generally, you will need between 2.5 and 3 ounces of weight for a wedge-shaped car.
On most tracks, best performance is attained by locating the added weight towards the rear of the car. For a wedge-shaped car, a good rule of thumb is to place 1/3 of the added weight behind the rear axle, 1/3 on top of or just in front of the rear axle, and the final 1/3 about 1-1/2 inches in front of the rear axle.
CAR FINISH
If you are unfamiliar with painting models, and you are making a simple shape (like a wedge), then consider using a Body Skin.3 These are full body decals that work well on simple cars. If you decide to paint, then consider using Acrylic hobby paints. They generally work well and clean up with water.
WHEELS
Although the wheels can be used directly from the box, some preparation is recommended. This includes sanding the tread surface and inside edge (with the wheel mounted on a wheel mandrel and spinning on a drill), squaring or coning the inside wheel hub, and polishing the bore. Tools are available from on-line stores to assist in these preparation steps.4 As an alternative, prepped wheels are available from many on-line stores.5 Just make sure to check your local rules to find out what is allowed/disallowed in your race.
AXLES
If your kit uses nail-type axles, then you certainly want to remove the flaws by placing the nail in the chuck of a drill, point first, and then applying a small file to the spinning axle. Then polish the axles with sandpaper and/or other polishing materials.6 As in the case of wheels, prepped axles are also available from many sites.7
LUBRICANT
The wheels and axles must be lubricated. Unless restricted by your local rules, go with graphite. It is the number one lube used, and is readily available.8 Be sure to work the graphite into the wheel hub by spinning a wheel on an axle multiple times. To keep your car clean, lube the wheels and axles before attaching them to the car.
FINAL ASSEMBLY
Mount the wheels and axles onto the car by inserting the axles into the axle slots or axle holes. A new tool, the Pro-Axle Guide9 is available to help with this step. But in a pinch, you can use a dime as a gap gauge to keep the proper spacing between the car body and the inside wheel hub.
With axle slots, the axles will need to be glued in place (a dab of white glue spread over the exposed axles works well – just keep the glue away from the wheels). However, before gluing the axles in place, check the alignment of the car (see Volume 5, Issue 6, Wheel Alignment: Make It Straight!).
CONCLUSION
I hope that this break-down of the car building steps will ease your mind as you build your first car. Just remember, take your time, make sure your child is fully involved, and enjoy the process. Good luck!
1See Kits
2See Lead
3See Body Skins
4See Specialty Tools
5See Speed Wheels
6See Axle Polishing
7See Speed Axles
8See Lube
9See Pro-Axle Guide
Pinewood Derby Car Showcase
Road Hog: Chuck & Ryan Williams
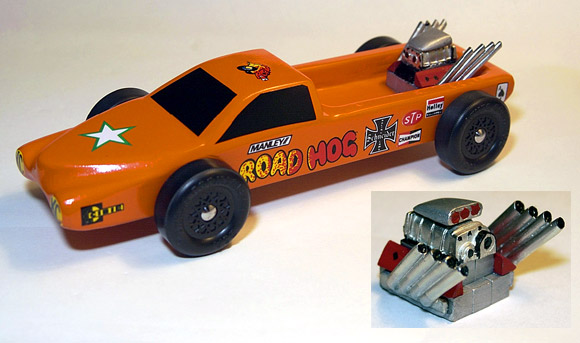
My son Ryan and I built this truck last year when he was a Wolf scout. This is a modified version of the truck plan that you were giving out for subscribing to the e-mail newsletter. Ryan loved the idea of building a truck instead of a car because we had gone to see a monster truck show recently. So, we started with the basic truck and carved out an ‘Old style’ front end, kind of like the Grave Digger monster truck. Then we were trying to decide on how to weight the truck and started stacking some tungsten in the bed but it looked kind of plain. We just happened to have some engine parts left over from the year before, and they made the perfect fit to create a ‘Tungsten Hemi’ for our little truck. The look was perfect! Ryan was elated, and it was a hit at the race – it even runs as good as it looks. Ryan finished 1st in his den, 2nd in the pack of 63 boys, and 9th at the district race out of 120 cars! I was proud of Ryan, and was happy just to see him so excited, the winning was nice, but we had a great time just designing the truck and then building it.
Jedi Knight: Rob & Robby Roper
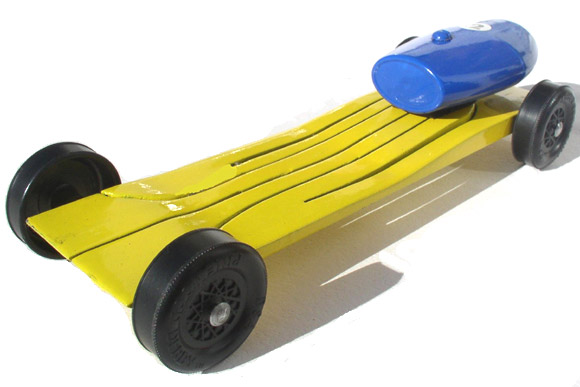
The Jedi Knight is an extended wheelbase Flex design with H-Wheels and speed axles. The blue container is actually a small plastic pencil sharpener with the cutter removed to hold the weight. This car was built by my 9 year old son, Robby. It won two pinewood derbies: his own Cub Scout 2005 Pinewood Derby and the following week he was a guest at another, larger pack’s derby! The Flex design was perfect for our hand made wooden track. The surfaces were always rough, but had warped over the years and the joints didn’t line up well. Other cars making the run made loud “clack-clack” sounds as they traversed the joints, but the Flex design seemed to glide almost noiselessly over the rough spots.
Pinewood Derby Memory
The Heart of a Champion
As the Awana race of 2005 approached, my work schedule became increasingly busy. Longer hours, more deadlines, and high-visibility projects crowded into the weeks and days preceding the race. As we approached the week before the race, we still hadn’t even cut our cars. Our church has a workshop open to the parents/kids so they can use their equipment to cut/drill cars, so we went down before Awana club, and made our cuts.
I reminded our boys (Matthew 12 and Caleb 10) that I wouldn’t have a lot of time to help them get their cars ready. In fact, I had no time before the race to really do anything except help put the wheels on their cars Saturday morning. But, I also stressed that these were their cars, they would be sanding, painting and building them. No matter how they placed, they could be proud that they did the work on their own cars.
They did a great job sanding, painting, and preparing their cars during the week. When I was putting in their axles on Saturday morning, the axle slot on Matthew’s car split. There wasn’t much I could do at that point except put it back together with some wood putty and hope it held during the race. I explained what happened to his car, and encouraged him that it would still do well.
Both boys were very excited as race time was about to begin. As we always do before a race, I reminded them that there were a lot of great cars out there and they may not win their races. In previous years, they have always either won or placed in the top three for their divisions. My parting words were, “The heart of a champion is not measured by your victories, it’s how many times you get up after you fall” (which, I’m sure is a version of a sport’s quote). They gave me that, “Yeah, we’ve heard this speech before, Dad” look, and off they went.
As the races began, I could see that Matthew’s car might have trouble. The church had bought a new, very long track. A longer track favors a more center balanced car and we had weighted ours towards the rear. The club was also going with double-elimination rather than a timer. So if their cars were matched up with the top cars first, they could be in trouble. In the double elimination, it was starting to become clear that some lanes were faster than others.
In the first heat, his car wobbled as it went along the track. I counted the cars as they crossed the finish line and knew he was already in the “2nd chance” bracket. My younger son’s car (Caleb) was in the same division, but matched with the second set. His car did fine although it slowed as it approached the distant finish line. Matthew’s car went for its second race with the same results. Although he beat several cars, it still bumped and rubbed its way down the track and did not finish high enough to advance. Caleb’s car continued to do well and he finished 1st in his division. Matthew had placed 4th and was out of the finals for the first time since we’ve been racing (2001).
I could see the disappointment in his eyes and his hurt expression in the way he walked. I went to talk to him, but he wanted to turn away. I just gave him a big hug and let him know how proud of him I was, that he worked hard on his car and it had done well overall. He was still not convinced and I reminded him again that the heart of a champion is not determined by their victories, but how they react to defeat.
He went back to the track and asked to help with the rest of the races; bringing cars from the pits and taking them back up after the end of the races. Since Caleb had made the finals, I recommended that he not handle his brother’s car, as that might be seen as an unfair advantage. Caleb’s car did great and made it to the finals and was just edged out by three-thousandths of a second! He was very excited and congratulated the winner.
We stayed to help tear down the track and clean up the gym. Both boys jumped in whenever they were asked and did a great job. We finished and headed to the cars, Caleb with two trophies, Matthew with none; but both with the heart of a champion.
James Sedlak
Q&A
Why do you recommend sanding the wheel tread with “wet” 600 grit sandpaper instead of “dry” sandpaper?
Good question. Sanding with wet paper does the following:
- Keeps the plastic cooler to prevent melting. This is especially important for wheels made of softer plastics.
- Results in a smoother finish (this is true when sanding paint, metal, or plastic).
- If you dip the paper in water during the sanding operation, some of the plastic residue on the paper will wash off, allowing the paper to work better.
I was wondering if you’ve ever heard of adding a light coat of white glue to the body of the car where the wheel hub meets the body. Mixed with graphite this is supposed to make a very slippery surface. True?
Yes, some people do place white glue or epoxy on the car body for the wheel hub to rub on. I have experimented with this, but found it somewhat difficult to accomplish without messing up the slot or hole. And actually, rubbing graphite on a clear-coated finish works quite well.
If my son and I make a ‘Sponge Bob’ car this year, would the random holes drilled in the car body slow it down due to air flow through, around, or into the holes?
Aerodynamics does have an affect, and holes in the car are not optimal. But aerodynamics is not as important as other factors, so I counsel parents to not sacrifice their kid’s design ideas for speed. You can improve things by making the car as streamlined as possible, and by rounding off both the leading and trailing edge of the car.
Want Answers?
Do you have a pinewood derby-related question? If so, e-mail us your question.We answer all questions by e-mail, but not every question will appear in the Q&A section of the newsletter.
Back Issues
Are you a new subscriber, or have you missed some of the previous newsletters? Don’t miss out; all of the issues for Volume 5 through Volume 17 are posted on our web site.
Newsletter Contributions
We welcome your contributions. If you would like to contribute an article, a web site review, a speed tip, or a pinewood derby memory, please e-mail us.
Subscription Information
The Pinewood Derby Times is a free e-newsletter focused on pinewood derby racing. It is published biweekly from October through March.
If you haven’t already done so, please forward this issue to your pinewood derby friends. But please don’t subscribe your friends. Let them decide for themselves. Thanks.
If this newsletter was forwarded to you, why not subscribe to receive this newsletter. There is no cost, and your e-mail address is safe, as we never sell or share our distribution list.
To subscribe, send a blank e-mail to
[email protected]
You will receive a confirmation e-mail. Reply to the confirmation e-mail and you will start receiving the Pinewood Derby Times with the next issue.
Randy Davis, Editor, Pinewood Derby Times
E-Mail: [email protected]
(C)2018, Maximum Velocity, Inc. All rights reserved. Please do not reprint or place this newsletter on your web site without explicit permission. However, if you like this newsletter we grant permission, and encourage you to e-mail it to a friend.
Maximum Velocity disclaims any personal loss or liability caused by utilization of any information presented in this newsletter.
The Pinewood Derby Times is not specific to, and is not affiliated with the Boy Scouts of America, YMCA, Awana, or any other organization.
(R)Maximum Velocity is a registered trademark of Maximum Velocity, Inc.
(R)Pinewood Derby is a registered trademarks of the Boys Scouts of America.
(R)Awana is a registered trademark of Awana Clubs International.
All other names are trademarks of their respective owners.