Truck

Truck

Pinewood Derby Times
Volume 14, Issue 12
March 11, 2015

In this Edition:

- Editor's Notes

- Feature Article - Using a Scale Plastic Model for a PWD Car

- Humor

- Product Showcase - Indy Roadster Kit - Additional 10% Off

- Pinewood Derby Car Showcase

- Q&A


Call for Car Photos
In the next issue, we plan to have an expanded Car Showcase. But right now, we do not have enough car photos. Please send us a photo of your car along with a description of any special features to: [email protected]

Please include your full name. If selected, we will include the photo and description in this newsletter.

Photos must be sent by e-mail in JPG format (minimum size of 640x480, maximum size of 1280 x 960). Please shoot photos from the front left of the car, similar to the orientation of this car.

For better focus, keep the camera four or five feet away from the car, and then use the camera's zoom to fill the frame with the car. Also, use a solid (preferably white) background for the photo.

Send only one photo per car, unless an additional photo is needed to adequately show a feature. Thanks.

Reader Feedback
We received this feedback from Joe Burns regarding the article "Shifting the Wheelbase" in the previous issue.:

"(If you cut off a piece from the back and glue it to the front) it is best to make sure that the wood grain is exposed so the inspector can see that it is a new piece of wood glued on and not an intact block of wood with just new slots cut. (As an inspector) I will allow glued on portions but not just re-cut slots; it is the principle of the thing."

Can We Help?
If we can help you in any way with your pinewood derby project, or if you have any feedback regarding this newsletter, please contact us at: info@maximum-velocity.com
MV Basic & Wedge Car Kits

If you are planning a race and are not required to use a specific kit type, our MV Basic or Wedge Car Kit are just what you need. These attractively priced kits are equipped with:
  • Quality Block - Unlike the blocks provided by some organizations, our blocks are soft, northwestern pine blocks, cut precisely to 7 inches long, 1-3/4 inches wide, and 1-1/4 inches tall. These dimensions, as well as the axle slots accurately duplicate the dimensions of standard pinewood derby blocks from BSA and PineCar.

  • Simple Axle Preparation - Don't worry about filing off flaws, or losing hub caps. Our Speed Axles have no burrs or crimp marks, and install without hub caps. With or without polishing, they are ready to go. We supply five, so you have a spare.

  • Quality Wheels - Forget cheap, out of round wheels. Our MV wheels are top-quality wheels. You will not be disappointed with the quality of these wheels.

So, if your organization does not mandate a particular kit type, consider our MV Basic Car Kits or MV Wedge Car Kits


Feature Article

Using a Scale Plastic Model for a Pinewood Derby Car
By Andy Holzer

I have often wondered what a 1/24th scale model body would look like as a pinewood derby car. A couple of years back I started measuring 1/24th and 1/25th scale models to see if it would be possible to use one as a pinewood derby body. Last summer my son and I were at a car show and they had a Revell Make 'N' Take model-making event. At these events children are able to build and take home their own model car kit. My son usually builds whatever model kit they are offering that year, even though he has been building the more advanced kits for years.

This year they had the '34 Ford Street Rod. After I measured the parts, I found this snap together model would fit the pinewood derby design specifications of less than 2 3/4 inches wide, although the car would be shorter than 7 inches. We discussed how this model would make a great pinewood derby car. He built the kit and handed it to me and said, "If you want to build it, take it and modify it."

In early 2015, we are sponsoring a pinewood derby race for a car club we are members of. I decided to build the '34 Ford Street Rod to show alternative ideas for a cool looking pinewood car. It turns out the wheelbase for this car is the same wheelbase as a standard pinewood derby block (4 3/8 inches).

Before I started to build the car I decided to ask a couple of questions on the DerbyTalk forum, such as if the car would be legal in most races. I only received positive comments saying this would be legal in all races that don't have a wheelbase requirement. Of course this car would still be legal as it is the 4 3/8 inch wheelbase. The model body would simply be a decoration on the pinewood base, as long as it was firmly attached to the base.

So, here are the steps I went through to build the car.


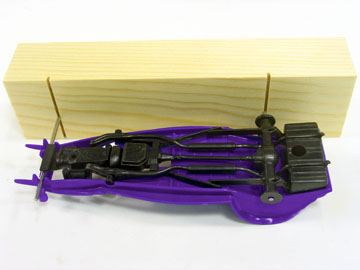
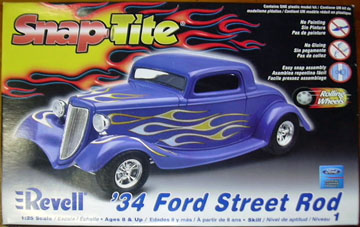
1. The box for the Revell '34 Ford Street Rod model. Our kit was part of the Revell, Make 'N' Take kit so it came in a plastic bag.


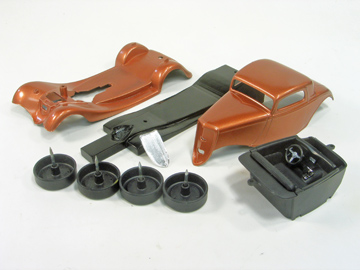
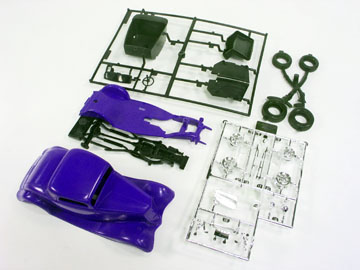
2. The contents of the kit minus the instructions. The only parts we will be using are the body, fenders, interior and some of the chrome bits (about 75% to 80% of the kit).

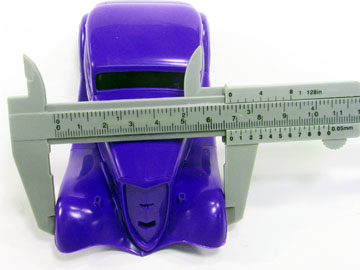
3. The width of the model body is 2 11/16 inches.

4. The length is 6 3/8 inches. We will be making the car to the standard 7 inch lenghth. This will allow the weight to be placed higher up on the track to give us more potential energy.

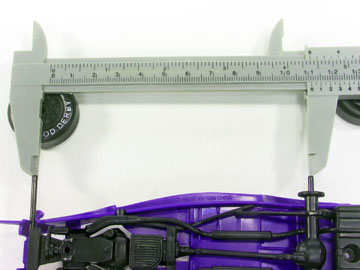
5. Turns out the wheelbase measures 4 3/8 inches, just like the standard pinewood derby car wheelbase.

6. The axles line up perfectly to a pinewood derby block.

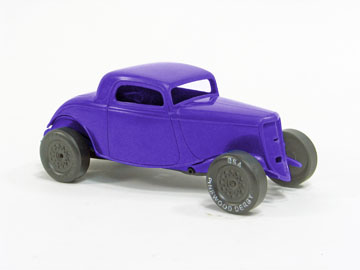
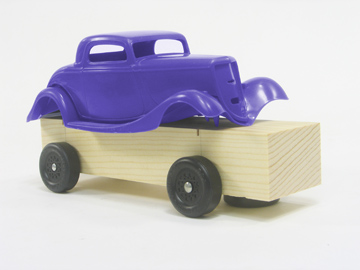
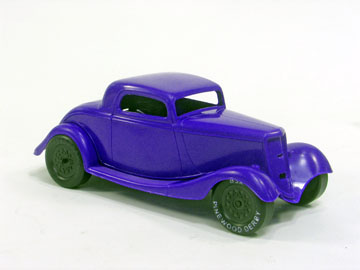
7. Using the model chassis, I added the pinewood derby wheels to the axles provided with the model to see if the wheels would look right within the model fenders. At this point I think it looks right on.

8. The car could also be built fenderless. This would be more difficult as the wooden frame would be harder to cover up.

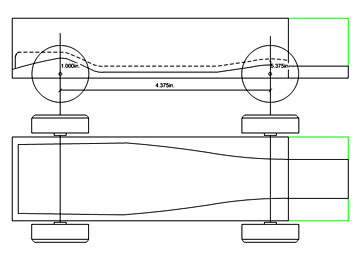
9. Here is the plan I drew based on the frame of the model. The chassis should make the wheels fit snuggly within the fenders.


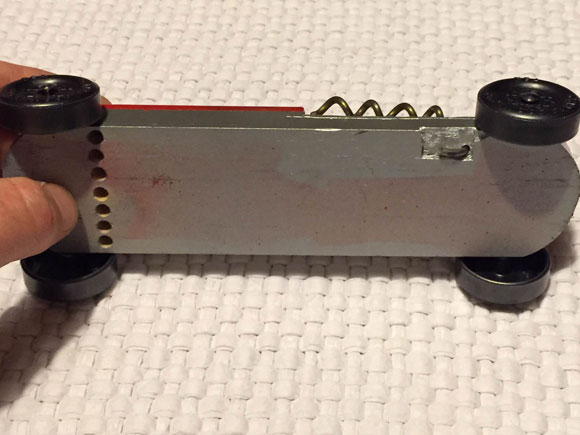
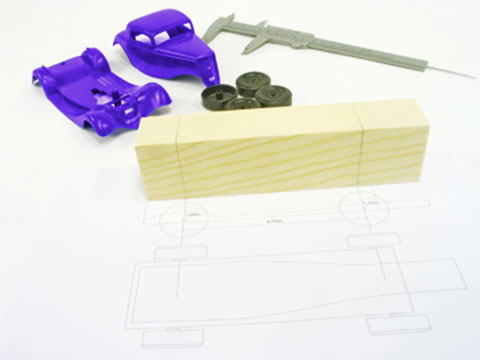
10. The plan and the standard block with wheelbase dimensions drawn on. We are allowed to drill our axle holes. The rear axles will be drilled at a 2.6 degree angle for rail riding. The front-left axle is raised.

11. The axles were drilled using the Pro Body Jig tool (this could also have be done with the Pro Body tool).

12. Drilled block and car body.

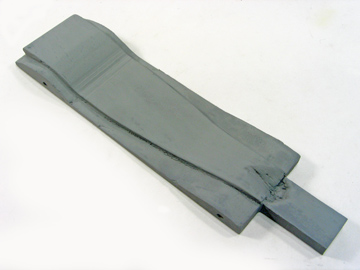
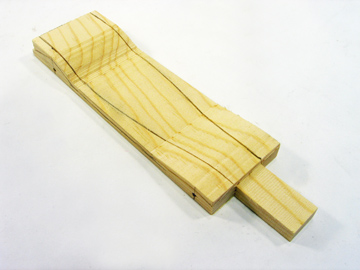
13. All of the saw cuts have been made on our modified pine chassis, you can see the lines that have been scored so the remaining wood can be removed with a wood chisel.

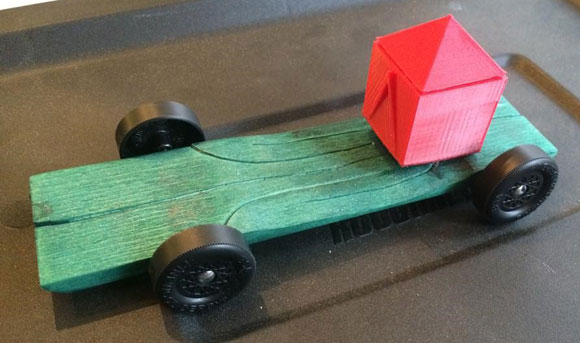
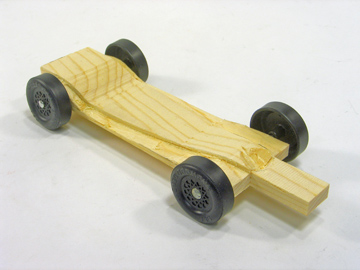
14. Here is the rough carved chassis with the wheels mounted.


15. This is one of the body fit tests. The chassis must be modified to get the wheels to sit even with the fenders. The trick is to get the raised front wheel to look good along with the rest of the wheels. At this point the body, chassis, wheels and axles weigh 2.71 ounces.

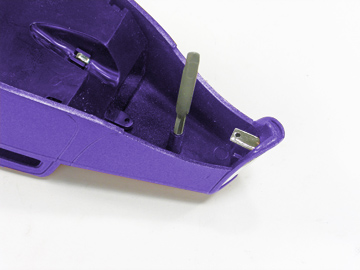
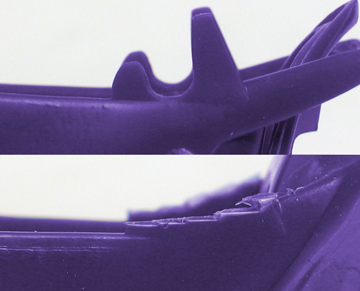
16. During the mock up, the front wheel frame horns need to be cut out. This picture shows the frame horns and what they looked like after they were trimmed.

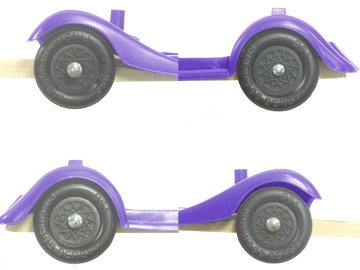
17. Here are the wheel clearances when the chassis is complete. All wheel clearances were checked to make sure they are even and the wheel is not dragging on the fenders. All clearances look good!

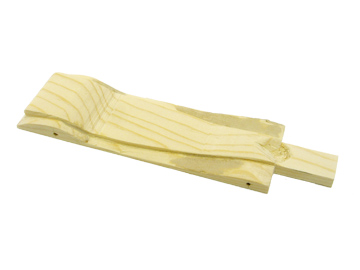
18. The chassis filled and ready to be sanded smooth.

19. The chassis is sanded and primed. The primer will be sanded smooth before the chassis is painted semi-gloss black.

20. Originally I was planning to glue the car body to the pine chassis, then I decided to use the holes provided to attach the body and fenders to the plastic frame. Using a pinewood derby axle I marked the holes where the screws hold the body to the model chassis. I drilled the holes through the wood frame with a 1/8 inch drill bit. I measured and determined the body could be held with 4-40 screws, as the provided screws were not long enough.

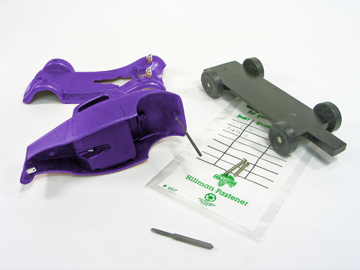
21. I stopped at a hardware store to purchase some 4-40 screws. I measured and figured I could attach the body with 4-40 X 3/4 inch (rear) and a 4-40 X 1 inch (front) screws. I bought the screws in stainless steel for 61 cents.

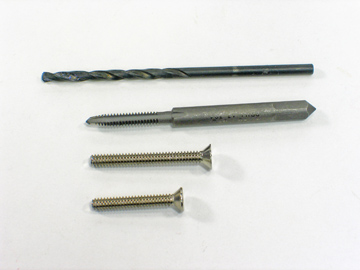
22. I had a 4-40 tap and drill set. They are available for about $5 at most hardware and home stores. These are pictured along with the 1 and 3/4 inch SS screws.

23. The mounts in the body were drilled out with the bit. I placed the drill bit next to the plastic mount and applied tape to the bit so that I knew when to stop drilling. I used a pin vise to drill the holes out. The tap is used by hand to make the threads in the hole; you may want to use tape to make sure the tap doesn't go too far.

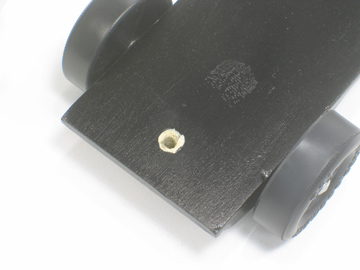
24. The screws are flat heads so I used a drill bit, by hand, to make a countersink so the screws mount flush with the bottom of the car. Flat head screws also keep the bottom flat, which aids in stopping the car.

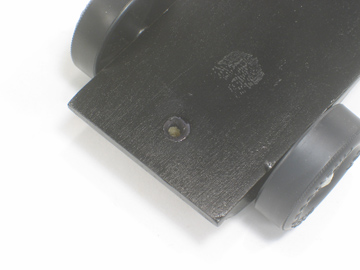
25. The countersink was easily fixed with a Sharpie marker.

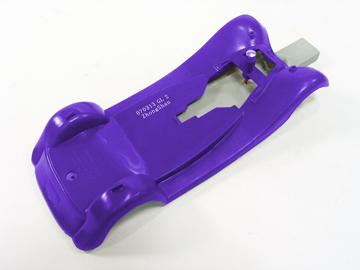
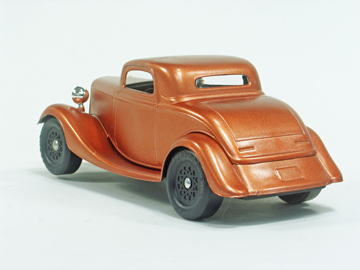
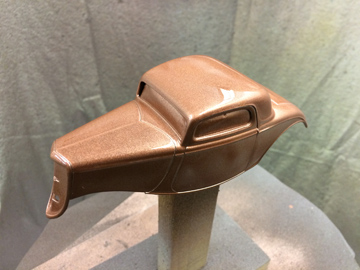
26. I decided to paint the body a metallic copper color.

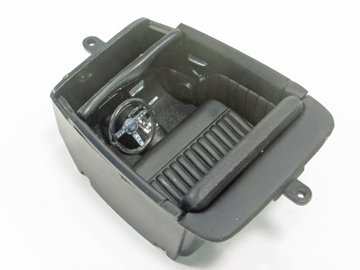
27. While the paint was drying I worked on detailing the interior.

28. Shown are all of the pieces awaiting assembly. The weight is 3.71 ounces.

29. I could have added 1-1/4 ounces of tungsten to the rear of the car, but decided to use lead. I encapsulated the lead in aluminum tape.

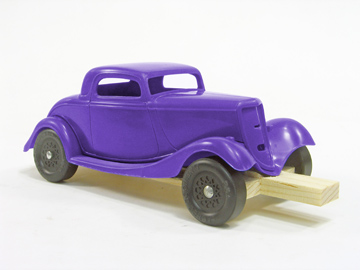
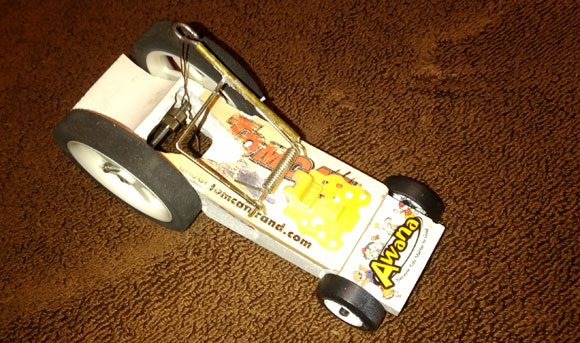
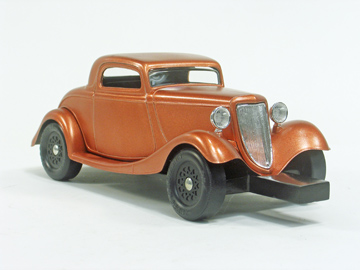
30. Complete car, ready to race.

31. You can see the raised front wheel in this picture, you can also see the cambered rear wheel.

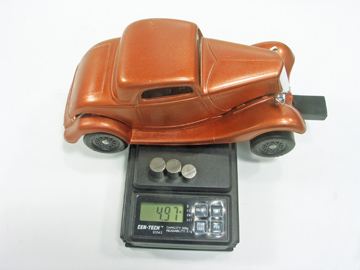
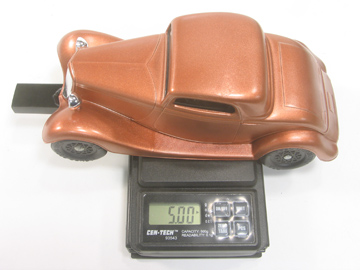
32. Ready to race, weight.
Before anyone builds this type of a car for any Pinewood Derby race, make sure to read your rules carefully to make sure this would be allowed in your race. If there might be a question, contact your race coordinator.

This car was engineered and built in approximately 6 hours, over 2 evenings. It was built to show others that you could build a cool looking pinewood derby car, using a plastic model as a basis. This could also be engineered to work with many other models.

I once measured a model I was going to use for a pinewood car. This particular model was close to 3 inches wide, so I was going to try and slice the body down the center and take 1/4 inch out of it, then glue it back together. I think this would probably be easier to build the car from the wood block, like I usually do. If you would like to see an article of a full body car I built for the Pinewood Derby Times, Click Here.


Humor

GREAT TRUTHS ABOUT GROWING OLD
  1. Growing up is mandatory; growing old is optional.

  2. Forget the health food. I need all the preservatives I can get.

  3. When you fall down, you wonder what else you can do while you're down there.

  4. You're getting old when you get the same sensation from a rocking chair that you once got from a roller coaster..

  5. It's frustrating when you know all the answers but nobody bothers to ask you the questions.

  6. Time may be a great healer, but it's a lousy beautician.

  7. Wisdom comes with age, but sometimes age comes alone.


Product Showcase

Indy Roadster Kit   Indy Roadster Kit  
Additional 10% Off
Indy Roadster Kit

The Indy Roadster is a super-looking car that will catch the eye of the spectators and judges alike. And with the right wheels and axles, some lube and alignment, this car will be fast as well!

The car chassis is based on an official BSA block, and the car meets BSA specifications for height, width, length, axle slot separation, and underbody clearance. An underbody weight pocket exists to hold the weight needed to bring the car to 5 ounces.

Through March 24, 2015, you can get a Indy Roadster kit for an additional 10% off the clearance price. To take advantage of this limited time offer, add part 5664 to your shopping cart Here, and apply coupon code MAR11NL before pressing the "Proceed to Checkout" button.


Pinewood Derby Car Showcase

Flex Car - Bret Wortman

My son's Flex Car came away with the Grand Champion's trophy (44 cars raced total). The weight box is supposed to be a tent. We didn't have enough time to model one properly, but this came pretty close.

Swiss Army Knife - Dave & Cole Oshman


My son, Cole, and I are particularly proud of our car this year. The original intent was to be in the running for the Most Scout Spirit trophy but my son wanted it to be fast as well. Since he's a Webelos, he did all of the axle and wheel work, along with all of the paint (I masked for the red coat). The design was my idea, and the corkscrew rotates out. I've been building cars for 9 years now and don't recall seeing a design like this.

Based on all of the help I've gotten from you through the years, the car ended up winning first place in the Pack for speed. They'll give out the design trophies next week at the Blue and Gold Banquet. Hoping that Cole will get one more for his shelf.

Mouse Trap Car - Mike Henkelman

This car was built to compete in the mouse trap division at our pinewood derby event. The car is dimensionally and weight compliant with pinewood derby specifications.

Using a rubber band to attach the mouse trap to the rear axle, the car will accelerate for 15 to 20 ft.

Share Your Car With Our Readers

Do you have a car you would like to "show off" to our readers? If so, send us a photo of your car along with a brief description of any special features. Please include your full name. If selected, we will include the photo and description in this newsletter. Please e-mail photos to:
info@maximum-velocity.com.

Photos must be sent by e-mail in JPG format (minimum size of 640x480, maximum size of 1280 x 960). Please shoot photos from the front left of the car, similar to the orientation of this car:


For better focus, keep the camera four or five feet away from the car, and then use the camera's zoom to fill the frame with the car. Also, use a solid (preferably white) background for the photo.

Send only one photo per car, unless an additional photo is needed to adequately show a feature. Also, only one car per subscriber per year please. Thanks!


Q&A

Are there tie-breaker rules available (or that are standard) for the points system of racing? The software at my son's race came up with a tie for 4th in the finals. There were only 4 trophies, so instead of them going by overall time or having a 3-run race off or something they did a coin toss, the winner got to pick the lane he wanted and the two cars raced ONE time to determine the winner. My son who lost (the other boy was the coin toss winner, and picked the lane that was running the fastest that day) was out the trophy, but I believe it was said at the microphone that the 5th place child (my child) actually had the fastest time that day by a fraction of a second which the computer didn't consider when coming up with that "tie" for 4th place. So they did the one quick race-off. I was a bit dumbfounded at the decision, and in shock at the time to know what to say without seeming unsportsmanlike. It seemed to be just a "made up" tie-breaker decision at the time. I don't know how to go about approaching the powers-that-be for something more fair in the future? Any tips? Or what is the general tie breaker rule for the points system? Thank you so much.

There is no hard and fast rule, but generally one of two ways are used to break a tie.
  1. Use the cumulative fastest time - the lowest of the sum of the regulation heats.

  2. Have a best of three heat runoff (this is what we do). We have tokens for each of the four lanes, and the kids pull tokens out of the cup for lane selection for the first heat. In the second heat the lanes are swapped. If a third heat is needed, then tokens are drawn again.

Either of these method are reasonably fair. For a large event, the first method is typically used (to save time). Smaller events can use either method. Having a single heat tie breaker is not particularly fair.

I just finished checking the cars for our derby, and one of the tools I used was the car inspection gauge (item #7540). And, I really like this tool. However, a few of the parents had cars with one wheel off the ground, and they argued their wheels were fine when they placed them on top of their glass table top. Their argument was a glass table top should be more true than the gauge. What is your experience with surfaces when judging whether or not all four wheels are touching?

Glad to hear that you like the gauge. I am going to state my opinion below. Please don't take this as anything personal - just my thoughts on the subject.

First of all, I am strongly against a "four on the ground" rule. If you give 10 cub scouts/parents a kit and ask them to put the car together, 9 out of 10 will have a wheel slightly off the ground (unintentionally). It is very difficult to get all four axles installed evenly, without using a drilling guide or a drill press. Since it is so easy to have a three-wheeled car, the rules should allow it.

That being said, some leeway should be given on a four on the ground rule. Many packs use a paper test. That is if a piece of paper can pass under the raised wheel and the wheel doesn't move, then the car violates the four on the ground rule. But if the wheel spins when the paper is passed under the wheel, then the car passes.

Regarding the gauge, glass is smoother than wood. So if a car had a wheel that was off the ground by a thousandth of an inch (less than a hair), on the glass the wheel wouldn't roll, but on wood it might roll due to irregularities in the surface. So actually, the gauge would be less strict than glass in enforcing a four on the ground rule. That is if a car was rolled on glass and all four wheels rolled, then the same should occur on the gauge. But this is all the more reason to have a less strict rule.

If you are going to stick with the strict rule, then bring along a small pane of glass. Then if there is a question, you can always roll the car on the glass.

Do You Have Questions that Need Answers?
Do you have a pinewood derby-related question? If so, send your question to: info.maximum-velocity@com. We answer all questions by e-mail, but not every question will appear in the Q&A section of the newsletter.


Back Issues

Are you a new subscriber, or have you missed some of the previous newsletters? Don't miss out! All of the issues for Volume 5 through Volume 14 are posted on our web site and can be found using our Newsletter Index.

Issues from Volumes 1 to 4 are available in four formatted documents, ready for immediate download. To find out more, Click Here.


Newsletter Contributions

We welcome your contributions! If you would like to contribute an article, a web site review, or a speed tip, please send it to: [email protected].

Please read our submission policy.


Subscription Information

The Pinewood Derby Times is a free e-newsletter focused on the Pinewood Derby. It is published biweekly from October through March.

Please Forward This Issue to a Friend

If you haven't already done so, feel free to forward this issue to your pinewood derby friends. But please don't subscribe your friends. Let them decide for themselves. Thanks.

Sign Up

If this newsletter was forwarded to you, why not subscribe to receive this newsletter. It is absolutely FREE and your e-mail address is safe, as we never sell or share our distribution list.

To subscribe, enter your e-mail address below and press 'Subscribe'. You will be sent a confirmation e-mail. Reply to the e-mail to complete the subscription.
Type Your E-mail Address


Randy Davis, Editor, Pinewood Derby Times
E-Mail: [email protected]

Copyright ©2015, Randy Davis. All rights reserved. Please do not reprint or place this newsletter on your web site without explicit permission. However, if you like this newsletter we grant permission, and encourage you to e-mail it to a friend.

Maximum Velocity disclaims any personal loss or liability caused by utilization of any information presented in this newsletter.

The Pinewood Derby Times is not specific to, and is not affiliated with the Boy Scouts, YMCA, Awana, or any other organization .

®Maximum Velocity! is a registered trademark of Maximum Velocity, Inc.

®Pinewood Derby, Regatta, and Space Derby are registered trademarks of Boys Scouts of America.

®Awana is a trademark of Awana Clubs International.

All other names are trademarks of their respective owners.

Mailing list services are provided by: www.mail-list.com

Pinewood Derby Banner